Trigger Point Massage for the win

As is true for most of us who are on the far side of the half-century mark, I have a number of what my mother referred to as “aches and pains”. For reasons that I hope will become clear shortly, here’s a short list:

  1. I get shoulder and neck pain when I ride my bike, especially on long rides
  2. I get this weird pain just above my butt when I ride, especially on hilly or very hilly rides
  3. There’s this weird cramp I get under my left shoulder blade when I try to bench press
  4. If I drive in rush hour traffic, I get pain on the front side of my shin just above the ankle from lifting up my toes.

I’ve spent a fair bit of time in PT for the first two and gotten some relief (and some overall improvement in other areas), but the issues never really got fixed. I’ve done a fair bit of foam rolling and some ball massage as well, but still not fixed.

A few months ago, I came across a recommendation on Reddit for someone with weird back pain. It was for a book:

image

So, I ponied up the $17, it showed up a few days later, and I started reading.

In the introduction, the big new thing that I learned was trigger points can be referred, which means that the point where we feel the pain may not be the cause of the pain. You can massage the hell out of the painful spot and not make any progress.

This wasn’t that much of a surprise, as I already knew about referred pain in other contexts; appendicitis pain can show up on the wrong side or even in the shoulder. But I hadn’t thought about it related to muscle pain.

The introduction is followed by a 15 second on treatment guidelines; different ways of doing massage and what you need to be careful about.

The second half of the book is organized into chapters for specific areas of the body. Since I was most interested in the lower back pain, I turned to Chapter 8 – Midback, Low Back, and Buttock pain.

For the lower back, it lists a bunch of muscles; gluteus medius, psoas, deep spinal muscles, etc. I’m not really excited about working through all 9 of them.

The next page has a list of symptom; does it hurt when you cough, when you swim, when you turn over in bed, and my personal favorite, “Forced to Crawl on All Fours”. “Climbing stupid steep hills on your bike” is not listed, so I turn to the next page, which is titled, “Pain Illustrations Guide”.

On this page there are drawings for each of the muscles, showing where there trigger points are typically located, and then an accompanying drawing showing where referred pain can show up. This is very nice and easy-to-understand approach.  I do a quick search, and I come up with this:


image

I dig out a lacrosse ball, find a wall, and start rolling around to see if I can find the trigger point. And – what do you know – the upper trigger point hurts when I roll over it (the book uses the term “exquisitely painful”, which I think is a nice phrase) *and* it refers pain to my lower back, to pretty much the exact spot where my back has been hurting.

I flip to page 199, to the section titled “Quadratus Lumborum”. Each muscle section has an introduction has some simple anatomical information; where the muscle is, what it does, etc. Then there is a section on Symptoms, which talks about where the pain can show up and what movements are most likely to make it appear, what other maladies might cause the same symptoms, and whether there are more likely muscles for a specific pain.

Next comes “Causes”, which talks about injuries or other conditions that might lead to trigger points. In this case, I find that QL trigger points may show up if gluteal muscles are stiff or weak, and Eric knows that he had poor gluteal activation from previous trips to the PT (I think I’ve mostly fixed that).

And finally, there’s a “Treatment” section, which tells you how to find the muscle and how you might find the trigger points. And it tells you want to do for treatment; in this case it’s rolling with a ball or using a Thera Cane, which I already happen to own. For some muscles, it will give cautions about reasons to be careful. It might also tell you that you should work on a different muscle first because they are related.

There is a ton of detail about each muscle, and I think that’s what makes the book worthwhile.

So, I start rolling those trigger points with a massage ball on a mostly faithful basis, and after a few weeks, the pain is pretty much gone. Last year I dropped out of Sufferin’ Summits because the pain was too much; this summer I rode both Sufferin’ Summits and Passport to Pain without lower back pain, which is a significant improvement.

I should note that I’m not sure that there is less pain in the short term, because trigger points can be very painful when massaged. If you’ve ever had a deep tissue massage, it’s that sort of feeling, but since you are doing it yourself I think it’s easier to regulate the pressure to be tolerable. On the other hand, as a cyclist, I spend a lot of time in self-inflicted pain so I’m not sure you should trust my opinion.

I’ve been working on some of my other issues as well. The shin pain when driving fit the Tibialis Anterior referred pain diagram, and holy cow, did the trigger points there hurt. The luckily seemed to resolve pretty well.

I’ve had less luck with the neck/head issues; they have been going on for a lot longer and from I can tell there are approximately 357 different muscles that I need to work on.

So, highly recommended. Just be aware that it’s going to take some study and it’s not going to be comfortable.


Sufferin’ Summits 2016

One of the downsides with being a ride leader is that whatever course your come up with, it’s your own fault. As I pull myself up some of the hills we ride in the evenings, I think to myself, “Who chose this route? Oh, yeah, it’s my fault”

This is the second year of Sufferin’ Summits, and I am fully responsible for the existence of this deliberately stupid ride. The premise of the ride is simple; stuff as much climbing into the smallest number of miles.

Last year I had to drop out after climb #5 because of some back issues, and I decided to resolve that by going to the PT in preparation for this year’s ride. And that is exactly what I was thinking the morning of the ride; going to the PT is an *excellent* idea. I should get on that. I did spend a fair bit of time rolling my back, doing exercises, doing stretching, and riding a lot of ugly hills, so I felt – well, “prepared” is probably the wrong term, so let’s say, “less unprepared”.

And I felt reasonably confident. Until I saw this:

image

The forecast was for the low 90s, which is pretty hot around these parts. I shifted the unofficial ride start time from 9AM to 8AM, and decided to just deal with the heat. I am no stranger to suffering on the bike in the heat – RAMROD 2009 comes to mind – but because reasons, never seem to do much training in the heat which is about the only thing you can do to suffer less.

Anyway, I got up at 6AM, had breakfast, got dressed, slathered sunscreen on, and headed out. Got there about 7:30, pulled out the bike, and got ready.

“Do a lot more promotion for the ride” was right after “make sure to go to the PT” on my list of things to do, so I’m really not expecting that many people, and I expect that a few will be scared off by the heat.

We end up with about 8 people when we pull out at 8:03, heading over to climb up Grand Ridge, the first of the 8 climbs we will be doing. Two of them had already done climbs 2 and 3 because they couldn’t find the first climb.

On reading that last sentence, I feel that I should make it clear that “two of them” refers to cyclists, not to hills.

So, anyway, we roll through the cool and quiet Issaquah streets, making our way to the start of the first climb and talking about the chances that we will feel cold the rest of the ride (the consensus prediction is 0% chance). My legs are a little tired on the first bit but not too bad and my back is a little sore, but also not too bad. Grand Ridge is a climb I really like; it’s not too steep (say, 15% at the worst, and that’s not too long of a section), and at the top it has some really nice views, though the houses they are building are cutting many of the views off. It’s also a cool 1017′ of elevation gain. I feel pretty good on the way up but am trying to moderate my effort as I know what is coming up later in the ride. We descend back down into the highlands, and then back down into Issaquah, making our way to our second climb.

The Squak Mountain climb is next on the agenda, and here we establish the usual pattern; I start the climb on the front and the rest of the riders slowly pull away from me as we climb. The climb doesn’t feel too long, which is a good indication that my fitness is decent. A look at my stats for the ride shows that I PR’d the climb, doing it about a minute faster (5%) faster than my previous best. Either an indication of fitness or an indication of me pushing a bit too hard this early in the ride. I actually get a bit cold on the descent as my sweat dries.  The climb is actually about 976′, but I’m going to round up and call it the second 1000′ climb of the day.

At the bottom, we stop at the ball field for water and a nature break. I’ve done through one bottle of water; I mix another and try to pre-hydrate a bit. After telling myself not to forget, I forget to wet down my sunsleeves (like arm warmers, but white) to keep cool.

Next up is a little development called Talus. Our route features a nice little climb that few people know about; in looking the Strava stats, I note that 48 people are in the list, but looking at the dates, well over half of those are from the two years of Sufferin’ Summits. The climb starts out brutally hard; 18-19% or so, curves around, moderates a little, and then turns into a little one-lane road through the woods. Near the top they are putting in some new houses, so we have to dismount and walk our bikes through the gravel, and then take a nice 20% connector between houses to continue to the top. Might be a bit steeper than that at the top; I get that “I’m not sure I can keep climbing without falling over” feeling. After the top of the first climb, we head over to do a small climb to the south, where we are tantalizingly blocked from the new upper section of the development by a chain link fence. Talus clocks in at around 550′; with any luck the upper section will be done by next year and we’ll be able to add a chunk to this section.

A descent and a short spin takes us to the base of Cougar Mountain, which has been a benchmark to separate the truly stupid for decades. While “have you done STP?” is by far the most common question non-cyclists will ask; if you are a serious cyclist, one of your riding buddies will eventually ask if you have done “the Zoo”. Which is why it shows nearly 2000 unique people on Strava. Once we get under the canopy, it’s fairly cool, and I spend some time talking with Jeanne as we climb up. Zoo is quite pleasant if you have the legs for it and are willing to take it easy. Instead of heading straight on the traditional climb, we head down to the next development to a particularly nasty connector section of 18-19%. As the group slowly rides away from me, I start tacking back and forth across the hill; I have the leg strength to ride straight up but I’m pretty sure I’ll need it later, and going back and forth chops the grade down to maybe 14% or so. This section is notable not only for how steep it is, but for how long it goes on; the first pitch is a full 250′, which is a long time at these gradients. At the bottom of the second section, I briefly chat with a group of women out for a walk, and they congratulate me. I’m not really quite sure why; perhaps they believe that anybody who is stupid enough to ride up that particular hill clearly has more than his share of problems in life and would therefore benefit from some extra encouragement. Seems like a decent theory to me.

At the top we connect with the traditional Zoo climb, and then hit the top in three separate climbs – Zoo top, Pinnacles, and Belvedere – each of which nets us another 250′ of hard-won altitude, and bringing up the total of this segment to 2030′. I am climbing okay, but the heat is getting pretty bad by now, and my heart rate is higher than I would expect for a given power output, which is a decent sign I am getting dehydrated. Up Belvedere, I average 200 watts riding 5 MPH with my heart rate averaging about 150, where 150 would normally net me something closer to 225 or even 250 watts. I drink as much as I can stomach and keep riding.

We descend a bit, do a short and easy climb up to the park for a rest break. I have cleverly arranged for my wife to run a food stop for us, and we snack on brownie bites, cinnamon rolls, and cheez-its, get cooled off a bit, do our best to rehydrate, and then head back out.

This next section is something special. And not in a good way; this first climb features the steepest section of the ride (measured at 23%), it faces directly south, and it’s 11:20 so it’s been baking in the sun so it is pretty hot. There is a steep section, a slightly easier section, and then it just gets nasty. I spend 11.5 minutes suffering up this 494′ climb, and I’m really unhappy, but this is not unexpected as this is the worst climb of the ride.

At the top – as usual – the group is waiting for me, and at this point I realize that although they are climbing faster than me – and working harder – they are also spending a few minutes in the shade resting, while I just keep riding. I carefully spray a bit of precious water onto my arms, my back, and my head, and find that it’s quite hot; somewhere between “hot tub” and “lobster boil”.

We do a smaller and not-quite-as-steep section to the east, and then finally climb up the Summit development which is just a twice-baked sufferfest at this point. I am dripping and crusty and dehydrated, but we hit the summit, hop the wall at the emergency gate, and descend to the north to a gas station, where I purchase the Coke Zero and half-gallon of water that has been calling my name for the 10 miles.

I buy a coke zero and a big chunk of water, and we all get out of the sun for a while. Everybody is looking a bit tired and hot, and is happy for the rest. We spend a full 20 minutes there and then head out for the next chunk, first descending all the way down next to Lake Sammamish.

This climb is another one I like when I take my usual route, but the route I’ve chosen for the ride features another really nasty steep part, nicely named “ay mamacita” by an unknown cyclist. I climb it slowly but the combination of a large infusion of liquid and wetting myself down at the stop makes it fairly tolerable, but as we go to the next section of the climb, my clothes dry out and the air is totally still; it feels much worse than the the Summit section we just climbed on the south side. I’m still trying to drink at a reasonable rate because I know I need to stay hydrated but my stomach is starting to rebel a bit, in the “I think I might need to pull off the side of the road and make a deposit” sense. Eventually, we arrive back near the gate that takes us into the development; I call a 5 minute break so that I can get my friend Mike out of the sun for a bit because he is not looking very good. It was a purely selfless gesture and had nothing to do with my desire to hop the fence of the summit clubhouse nearby and “accidentally” fall into the pool.

We descend down on Forest Drive and turn right to start climbing the Highlands. Luckily, this is three small climbs with a chance to recover in between; unluckily, it’s a single lane so you mostly have to go straight up. I turn off into the flat side streets for a small bit of rest before heading back up. I reach the crest and Jeanne is on the side of the road, confused because her GPS is trying to tell her to skip part of the course. We regroup, do one short climb to the top of Somerset (but not the real top), at which point I tell her of my plan.

My plan is to pull off in the shade on one side of the road and see if I can get myself cooled off a bit before I decide what to do next. And so I sit down for 5 minutes, stand up, grab a drink of water, and start riding down to do the last hill. On the way down, I cool down a bit and start to feel a bit more nauseous, and I continue to feel that way as I roll along the flat for the last climb. It would seem that I have made a tactical mistake, and a few alternate routes back flash through my head, but I decide to press on. I hit the first pitch and am surprised to discover that if I tack back and forth and ride really easy on the tacking parts and faster on the turns – averaging about 150 watts – I actually feel better than I did on the descent.  Weird. I keep this up on the other pitches, and after about 15 minutes, I get to the easier part, work my way to the north, and then head up a short bit back up to near the top.

And it’s time keep riding. There’s a voice in my head that says, “that wasn’t that bad; you can do the top bit here and then the two last hills”, a second voice that says, “did you *see* how slow you were riding on that last section? I was surprised that you didn’t fall over”, and a third voice that says, “Recalculating… You can return to your start point with 6 miles of descending and approximately 0 miles of climbing”.

I listen to the third voice, and it’s actually a good thing I do because I feel sick on the descent again, but manage to keep focused and riding. At a construction zone right before the end, the rest of the group catches up with me, and we ride to the finish together. The car claims it’s 102 when I get in; after a bit of driving it sheepishly corrects that to only 95 degrees, but whatever the actual temp, it was really, really hot.

So, that’s the ride. I’m going to declare victory and say that I finished the ride and that those last little bits didn’t really matter. I had the legs to keep climb up them, at least.

And onto the stats.

55.9 miles of riding in 5:34:54, for a blazing 10 MPH average, just 0.1 MPH less than last year when it was cloudy and about 25 degrees cooler. 8213′ of climbing. And, for all of that – a measly 2891 calories burnt. My climbing was at just a hair over 700 meters per hour (155 acres per jereboam in “freedom units”), which is decent.

Strava activity is here.


Ride Report: Riding Per’s "The Edge" 50 (ish)

Today is the 37th running of STP, a 206 mile jaunt from Seattle to Portland. Despite the heavy number of registrations, I was once again successful at not registering for this ride, continuing an 11-year streak in non-participation, even though my ride leadering would have granted me a complementary pass. Perhaps if it were a complimentary pass, things would be different.

Anyway, with Sufferin’ Summits looming on the calendar – a ride that I am hoping to finish this year – I needed a ride with a bit of bite to it, and along came Per Sunde’s “The Edge“, which seemed to fit the bill nicely.

Per was one of the founders of the Eastside Tours ride that I now lead, and has run the RAMROD training series for a lot of years, so I knew it would be a good ride. The ride has the following options:

  • 42 miles with 4200′ of up
  • 50 miles with 6000′ of up
  • 75 miles with 7500′ of up
  • 100 miles with 10000′ of up

Which one to do? Well, I had no desire to blow my whole Saturday and/or kill myself, so that eliminated the 75 and the 100. And I would be riding there and back, which would add about 17 miles to the total. Hmm; that gives me either 59 miles without enough climbing or the 67 mile with enough climbing but more riding than I wanted.

A look at the routes showed that if I took the 100 mile course (which is – somewhat strangely – 6 miles shorter at the start – and cut it off after the 4th climb, it would be in the right ballpark, so that was the plan. The ride starts in southwest Bellevue, and Per has chosen this area for the same reason I chose it for Sufferin’ Summits; it contains 4 of the tallest hills around – Somerset/Summit, Cougar, Squak, and Highlands/Grand Ridge. Most of them off 1000′ climbs.

I often forget to remember how lucky I am to live just a few miles away from such a cornucopia (literally, “big basket full ‘o corn”) of options.

The day dawned cool and cloudy – it was 58 when I rolled out of bed at 5:30 in the AM. A quick breakfast, getting dressed, sitting around waiting for my breakfast to settle, looking at the route again, took me to 6:35, and I put on my shoes and headed outside. In my pre-ride outside weather check, I settled for underlayer/jersey and shorts, with my arm warmers to help on the initial ride which has a lot of descent.

I toyed with loading the route on my GPS, but – as a experience ride leader – I make it a point of pride of keeping the route in my head, and not depending on any technical assistance. As those who ride with me know from experiencing a u-turn when I temporarily misplace a route…

The ride to the start was uneventful; nobody was out and I hit most of the light. I did notice a headwind – which would have zero effect on our ride, but was bound to cause some angst amongst the aforementioned STP participants. I arrive at about 7:18 – enough time to sign in and talk to Per a little bit.

The first block of us rolls out at around 7:35, and I head North with the all the riders. Well, all the riders starting the 100 mile course; the others head South. This is a short little section to get the group off the trail in an orderly fashion. I cheat and take a shortcut exit off the trail (I like to call that “leveraging local knowledge”), bypassing the 30 or so riders who were in front of me at that point and gaining the not-at-all important “first rider in this particular group to the base of the first hill” honors.

We turn onto the first climb – which I guess I should call “Newport Hills” – and start heading up to the south. I am immediately passed by “the fast group”, which is just fine with me, as my guess is that while I can pull the 300+ watts that are needed to keep up with them on this hill, I’m not going to be happy later. They pull away, we finish the climb, pass on of the ubiquitous small strip mall, and descend back down to Coal Creek Parkway. A quick descent, a turn onto Factoria Blvd, and turn on Newport to start the next climb, which will be a trip up Somerset.

There are three main ways to head up Somerset. There is the classic way, up Somerset blvd (hard), the much easier way up 148th/150th/whatever they call that road, and a really painful way coming up from the West. Per has a new alternative, we turn onto Somerset blvd, start to climb, the gradient kicks up to 13% (on it’s way to 16%), and then we turn off to the right and descend, wrapping our way around the hill to the south, and then turning left on Somerset Drive, which wraps around the north side of the hill, turns into SE 44th St, and then finally intersects Somerset Blvd near the top of the climb. There are a couple of steep pitches (I think 13-14%), but nothing as bad as the classic route. I ride this whole section with a guy I’m going to call “Bill”, because that is the name that my brain is giving me, and we chat about bicycle-related stuff. What rides are you doing this year, what have you done in the past, have you been watching the tour, those sorts of things. I think I’m a little bit faster than him or perhaps just a bit less out-of-breath. This ride up Somerset does not feature a trip all the way to the top – off of SE 47th – and today I think I’m okay with that. The view is stellar, but the 18-20% gradient is painful.

Somerset is a hard place to navigate. Note only are there a lot of different streets, but whoever set them up suffered from a supreme lack of creativity. We have:

  • Somerset Blvd
  • Somerset Drive
  • Somerset Ave
  • Somerset Place
  • Somerset Lane

It is possible – though a bit contrived – to write a set of directions that say:

  1. Head south on Somerset Ave
  2. Turn right on Somerset Place
  3. When that ends, turn right on Somerset Drive
  4. Turn right on Somerset Blvd
  5. Turn left on Somerset Lane

I don’t know how people found their way around here before the advent of GPS and online maps.

Anyway, we finish the climb, descend to the east and then descend all the way back down to Eastgate. I like this descent; it’s not steep enough that you really need to worry about speed and the pavement is pretty good. At the bottom, we turn and head up the second hill.

If we were doing the route I usually do, this would be the “Summit” climb, but Per has something different planned; we hit a steep part, and turn to the East to do a little loop. The trip to the East features a nice 18% climb – which I would complain about, except that I know that the trip back to the west involves to 20% descents, and it would have be *way* worse if we went the other direction. We do the first part of the loop, I misplace the next part for about 15 seconds but we quickly realize and turn around, and the group reforms as we head to the west, and then finally we turn south to descend on Highland Drive. That puts us on the South side of the hills, on Forest Drive.

Forest drive is one of my absolute favorite roads; it is a roller road that has steep sections and flatter sections, and if you have legs you can power on the flatter sections and keep your speed up. A *great* descent, and I that would make me very happy except that today we are riding it the opposite direction.

Most of our small group pulls away a bit, and then we hit the steepest part and I reel them back. I’m not as light or fast as a lot of cyclists, but when it gets really steep, I have a strength advantage. I also run slightly lower gearing, but I’m going to stick with the “stronger” explanation.

I pass the group on the last steep part, we turn left on Lakemont, and then we turn right on Cougar mountain road, for our trip up “The Zoo”.

The Zoo – named for a small zoo at the base – is probably the most notorious climb in the area. It gains that reputation not by being the worst climb in the area – though at 1300′ of climbing in 2.8 miles it is pretty hard – but rather by being a benchmark that cyclists use to cull out the weak. “Have you ever done The Zoo?” is a question that will separate the men from the stupider men.

This reputation is somewhat diluted by two things:

  • The top third of the climb is an out-and back, and many people think riding up the lower two-thirds counts. They are incorrect.
  • More disturbingly, there is a back way up that gets you to the two-thirds point without too much steepness, and some people call that “the zoo” as well. They are also incorrect.

We are heading up the easy back way. Very soon after turning onto the climb, my climbing prowess shreds the group into tatters, with a small assist from everybody else stopping when the GPS of one of the riders gets confused.

<aside>

Routes that cross themselves are really confusing to most bike GPSes. They assume that your goal is to get to the end as quickly as possible, so you cross the later part of the route and the GPS wakes up and say, “Hey! Hey! If you just turn right on this road, we can cut like 50 miles off the route. I am SO smart!”. Which would be okay if it really did that, but all it really says is something like, “Turn around to rejoin route”, which isn’t very helpful.

</aside>

We sort things out, the errant GPS is suitably reprimanded, and we continue up. I push a bit and stay in front on the the climb, ease up so that Bill can catch up, and as we near the turn for the top third of the climb, we see the fast group descending back down. This section has a couple of steep tight turns at the bottom, but after we clear that, it’s pretty much a 12% climb to the crest, and it’s only half a mile, so it goes by quickly.

At the crest, we keep riding on a short downhill, because we know the secret: the crest of the road is not the top of the Zoo climb; the top is reached by a small road that heads up to the city water towers. We finally crest the top, which 1350′ or so is pretty much the highest paved spot in the area. And also a nice view, which I do not stop to see because lunch is on my mind.

A quick descent back down, and then we turn right to descend the lower portions of the classic route. The last time I rode this was probably a decade ago, and my brain tells me that it was curvy and a bit scary, and my hands were very tired at the bottom from using the brakes so much. This time the whole descent takes only 7 minutes; there are a few tight corners and a hairpin that is torn up, but it’s really a fun descent. Apparently I’ve learned something in the last 10 years.

At the bottom of the hill, we spin back into Issaquah and stop for water at Tibbets field. We then head up Squak Mountain from there, on a route that I have labeled in my head as the second hardest way up. I still think that is true, but I had forgotten the steep initial climb and the steep later climb, which are something in the 15-18% range, but thankfully the rest is pretty easy. We topped out the first part of the climb, and then turned onto the second part. This has one steep kicker at the start but other than that it is a very nice climb through the woods, which is mostly spoiled y the fact that the road is very old so it’s just a bunch of aggregate sticking up. It’s like riding on chipseal – basically, you like a slower and weaker version of your normal self. We hit the development at the top without incident, do the loop at the top (you have to do the loop to get the full elevation gain), and then head back down. The crappy pavement limits traction on the way down and messes up braking and cornering, so we are conservative.

Near the bottom of the top section, the route has a turn off to do a bit more climbing on the East face of Squak. The group splits here; I want to get my last climb done and head for home, so Bill and I head down the climb from the west, which is nice new pavement but has a stoplight at the bottom that I remember so we can stop in time. I think my next bike is going to have disk brakes…

That puts us in Issaquah, and just a quick spin across the town to get to the last climb. About two blocks in Bill sees somebody he knows on the sidewalk and pulls off to chat, so I ride on solo.

Per has a route that is unfamiliar to me for the next section – a climb up Highlands/Grand Ridge – but I don’t remember what route he chose, so I just head up on one of my routes. This is a long climb; the lower part takes us up into Highlands, and involves about 300′ of elevation gain including a pretty unpleasant section at 13-14%. I’m feeling pretty tired now; I rode harder up Squak than I should have and I think I’m a bit dehydrated. I push on because suffering is what we do. The second section is up the main drag (NE Park Drive), which is really pretty calm. Then I turn right on Central park drive, navigate past all the parents here to watch their kids play in sports, and then head over towards Daphne street. Daphne must not have been very nice, because this is a hard pitch – 15% or so – and I’m tired so I do the whole thing standing. Slowly and standing. Eventually I end up on 30th, which is the defined top of the climb for today’s ride, but there is no way I am going to skip heading up Harrison street, because that is the best part of the climb; every house is custom and they look like an architecture manual on “different styles of houses”. At the top I am rewarded with a nice view of Seattle shrouded in the mist (I think perhaps “dark and brooding” is a good description of how it looked), and I’m a cool 1000′ above the start of the climb in Issaquah.

To keep things short and quick, I descend the first section and then work my way over to Black Nugget drive and take that to the bottom. Then it’s a quick ride along the South shore of lake Sam, a “I am very tired” climb up the I-90 trail, and then a ride back home in time for lunch.

That gave me 55 miles of riding at 12.3 MPH average and a satisfying 6346′ of climbing. Or something like 2/3 of Sufferin’ Summits.

Overall, it was a pretty good day, once I got some lunch into me.

Strava here.


Flying Wheels Summer Century 2016

Saturday, I participated in the Flying Wheels Summer Century, though I find myself compelled to point out that – despite the warm weather – June 4th is not, in any way, “Summer”.

It’s been 11 years since I did Flying Wheels. It’s not really one of my favorite rides because it has long flat sections, which I find a bit boring and tend to make my neck and butt hurt. It’s something like 30% hilly, 70% flat-ish.  It’s also not a very hard ride, with only about 3500′ of climbing over 100 miles.

This year, however, due to a conflict in Duvall, they changed the route, and the mostly flat section from Snohomish to Monroe and back to the south has been replaced with a climb up by Snoqualmie Falls to North Bend, and the sprint back on East Lake Sammamish has been replaced with a section south of Cougar Mountain on May Valley road and a section north in Bellevue. It’s quite a bit hillier. And the end of the ride passes about 1/2 mile from my house, which meant I didn’t have to deal with parking or riding home after the ride.

I get ride leader points from leading rides for Cascade, so I decided to redeem some of my ride leader points for the ride.

The Monday before, on Memorial Day, I did the 7 Hills Metric Century and felt pretty good. Strangely good, so I worked hard on the ride and finished with very tired legs. The next night – on our Tuesday ride – I *still* felt good and my legs felt great, so I worked hard on that ride, too.

I consider myself to be a rather smart person, despite ample evidence to the contrary.

Wednesday morning was not pretty, nor was the much-flatter-than-usual Thursday ride I led, but I was hoping that I would be recovered by Saturday morning. If not… well, it wouldn’t be the first time that I modified a planned ride to make it shorter.

As is my ritual, I prepared for the ride Friday night by mixing two water bottles of Skratch, filling three snak-sized ziplocs with skratch powder, getting some other food ready, and developing a slight cough. And I went to bed and slept surprisingly well and woke up when my 5AM alarm went off. I got up, had some cereal, waiting to wake up, and got ready. Chamois butt’r on my chamois, sunscreen on my face and legs, PI sunshields on my arms, and various foodstuffs in my jersey pockets. I’m wearing my rails-to-trails jersey that is my favorite for long rides because it has absolutely massive pockets and it is a highly attractive yellow and blue.

Clicked into my pedals at 6:14 AM, headed out of the neighborhood, and descended down to Marymoor. On the way down I got cold, reminding me that this would be the last time today that I would be cold, as the forecast was for hot. I got to Marymoor, happy to be on my bike on such a beautiful morning, and especially happy that I was on my bike and could avoid waiting behind the hundreds of cars on the way in to park. I rolled past the start at 6:34, and rolled out the east side of the park.

I passed a few people, searching for a group for this section that doesn’t scare me. That requires a bit of explanation…

This is a big ride, and like all the big rides I’ve been on, there are differing levels of expertise – in terms of speed potential, bike handling skills, group riding etiquette, and attentiveness. This is also a tune-up ride for Cascade’s hugely popular Seattle-to-Portland ride, and therefore contains many 70 and 100 mile riders who have never ridden that far before. It’s a bit of a recipe for chaos.

My goal in this section is to find a spot in a group that seems reasonably sane, and after passing a few sketchy riders, I slot behind a woman wearing a white jersey, and we cruise south down East Lake Same at around 18-19MPH. My legs are okay, but I know that they generally feel okay on the flats, so my plan is to ride the first part of the ride pretty lightly, and then see how I feel.

After 3.6 miles and only a couple of incidents, we reach the base of Inglewood hill and start up. Inglewood climbs about 275′ up, and at around 9-10% gradient, it’s pretty steep. Like any climb, you want to find a route that is safe for you, safe for others, and lets you climb at your desired pace, but on Inglewood the speed ranges from the fast riders – who climb it at over 10MPH – riders like me (6.4 MPH in this case) – down to cyclists who are pedestrians for the hill, and finally to those who have stopped on the side.

I manage to navigate my way to the top with a minimal amount of assholery on my part, and things seem to thin out at the top where I pass “white jersey girl”.  Just in front of me, there are two guys in RAMROD jerseys from a few years ago; that generally indicates both some group riding skills and a lack of common sense for paying to do that ride, but as a 4-time finisher, it’s not like that doesn’t describe me as well, so I ride behind them in stealth mode east across Sammamish.

Which brings up a bit of etiquette: Generally speaking, I should ask before drafting behind them, but there are so many people on Flying Wheels that it’s just assumed that drafting is going to happen. Three or four times I will look back and find somebody just hanging out there. This used to bother me, but since I’ve been leading rides for so long, it’s kind of comforting.

We cruise through a roundabout, do a few rollers (white jersey girl passes me), and then a nice descent down 228th to highway 202. A quick spin to the east, and we head up Ames Lake road. There are a lot of people on this climb; I pass white jersey girl – and about 50 other cyclists – on the way up, and she passes me on the way down, only for me to catch her on the run to the first food stop. This time, I pull up next to her and say, “Looks like we keep passing each other”, and she replies, “Yeah, it will probably keep happening all day”. If there weren’t so many people on the ride, I’d ask her to work with me, but companionship is not a problem and I’d prefer to be unencumbered.

At the food stop I pull over to open the sandwich bag of cheez-its in my right jersey pocket, stuff a few into my face, grab a Rocketlyte electrolyte pill, and wash it down. The Rocketlytes are electrolytes that are supposed to keep your stomach calm with ginger and mint. I’m just finishing my first bottle of skratch, and it’s not very warm yet, so I switch bottles and head out so I can keep ahead of the crowd. About 2 minutes in, I pass white jersey girl again, and head north towards Duvall, and head up Stillwater hill.

Oh, yeah, I decided to keep riding as if I’m going to do the century, because my legs feel pretty good. My neck and butt are pretty sore, but my legs are good, and they feel fine on Stillwater, even though it starts with a 12-13% grade for a bit. I head up, passing a few people, getting passed, and end up following the two RAMROD guys again. The loop ends up a lot shorter than I expect because I’m thinking it’s the usual one that goes farther to the North, but this one only has about half the distance because of the aforementioned Duvall festival, and I spend it sucking wheel behind the two RAMROD guys – who know how to ride in a group – and, unfortunately, green jersey guy, who does not.  A quick descent puts us back on 202, we head across the valley, and turn south. We are going at about 18-19MPH, which make me a bit impatient, so I hop to the front and pull the group back to the food stop at 21-23 MPH. I have paid back a bit of my kharmic debt, and I stop to refuel, mix a couple of additional bottles, and take a nature break. In the time it took me to do that Duvall loop, approximately 7500 century and 70 mile riders have arrived, and the stop is a madhouse. The real challenge is finding a place to put your bike, but after that, things are fine and I get a nice oatmeal raisin cookie. In 10 minutes, I am back on the bike again, heading south towards the climb in North Bend. For some reason, my power meter stopped working right at the stop, so I’ll have to go old school and base my riding on how I feel. I head south through Carnation, turn on Tolt, and then turn onto the river road.

I’m at a comfortable 19MPH on this road, and realize that I have somebody drafting me. That is – as I said – perfectly okay on this ride, but for this section, it’s really nice to have somebody to help out. I slow down a bit to see if he will come up next to me and we can decide to work together, and he rides off into the distance. About 30 seconds later, a paceline passes me at around 21 MPH, I hear a, “Hi Eric”, see one of the guys that rides with my group, and decide to catch up and latch on to that group. The guy in front is a bit of an animal, so we are holding about 21 or so into a headwind. This section features six 90-degree turns, and the paceline is disciplined so it is of fun to work at taking the turns safely as a group without losing too much speed. We turn left on 202 and roll into Fall City, the next stop. I stop long enough to take a couple more Rockeylytes and head out again.

The normal route I take here is to just ride the highway, but we take a side trip on Salmon Hatchery road before we head up the Snoqualmie Falls climb. I’m conflicted by this routing; it’s nice to skip the highway, but the road is all chipseal which is more than a bit annoying. After a nice rest in the middle of the paceline, I’m feeling pretty good, so I turn up the speed a little on the climb, and start passing people. Then something happens that I used to think was weird, but have since encountered it enough that it doesn’t surprise me any more.

The route pretty much empties; I am riding about 10MPH for about 6 minutes up this hill, and I only pass 5 or 6 riders. I’ve had times on RAMROD where I swore that I made a wrong turn because I didn’t see anybody for 15 minutes. Not quite the same thing here, but it’s still a little eerie.

I ride into North Bend, and then we head North (North North Bend?), riding through the farmland with Mt. Si on the right. The setting is bucolic and the environment is wonderful, but I’m feeling cranky because my butt, neck, hands, and feet are hurting, and I’m getting a bit of a headache. I therefore formulate a plan of what I shall do after I descend, and this plan – this glorious plan – is what keeps me going. Though this part is fairly flat, I haven’t found a group to ride with, so I do it solo, passing individuals, trying out the pace of a few people, and getting passed by other solo riders. I finally hook onto a paceline of about 15, and just as I settle in, we are back to the highway and descending back down the highway. So, not much help there.

Unlike my trip up, the climb is now packed; there are at least a couple of hundred riders on the climb as I head down. Near the bottom, I get caught by Mike, who I rode 7 Hills with and who is quite a bit faster than me. We talk for a while, ride into Gold Bar, and he rides ahead while I stop at the market to put my plan into action. A quick purchase, and I ride to the food stop, which only has about 150 cyclists there. I thankfully find a bag of sour cream and onion Sun Chips, walk into the shade, unscrew the top on my purchase, and drink deeply.

The taste of ice-cold Coke Zero flowing down my throat is exquisite, and it only takes me about 5 minutes to eat the chips and finish the 20oz bottle. I mix up two more bottles of skratch, take another RocketLyte, and head out again. We are headed to a hill that I like a lot, because it is a bit of a bastard – Fall City Issaquah. We take what I think of as the back route, and along the way, I talk with a few people. I get slowly passed by a guy playing music on his phone, and ask him to slow down so I can have music. For some reason, he does not comply.

The route is littered with slower riders, because this hill is climbed by all three routes –40, 70, and 100 miles – and it is a significant challenge for many of the 40 milers. Hell, it’s a challenge for a lot of century riders. A quick descent, and then we turn left onto the main climb, which is about 10% gradient, It flattens, kicks up about 12%, momentarily flattens, and kicks up to 14%. Then it flattens for a bit, turns and kicks up, flattens, kicks up, turns, flattens, and kicks up again. Then, after the crest, you get a really nice fast descent, only to find that there is another 100′ to climb. As I said, it’s a bit of a bastard, but I really like that sort of hill and I feel good on it so I push the pace again. On the last little climb, I come to a group that is seriously not having fun, and I remind them that we all paid good money to do this. This is technically not true in my case, but I feel that a detailed explanation of ride leader credits and their utilization is probably beyond the scope of a relationship that has not even reached the first stage of “acquaintance”…

A quick right and a quick left has us heading West again, and I catch a group of three. There is a guy at front holding a nice pace, a guy behind riding well, and then, in front of me, there is a guy who doesn’t know how to group ride. He will spin for 8 or 10 revolutions, and then coast.  20 revolutions, then coast. 6 revolutions, then coast. It is maddening because every time he coasts, I need to adjust my speed down in case the whole group is slowing, and then smoothly close the gap that opens when it turns out that isn’t true. He does this for the next two miles, at which point I am saved from further annoyance as he and the other two guys jump a queue of cars waiting so they can dart in front of a car already in the roundabout, winning my award for the top dickish move of the day.

A fast descent and ride takes us through Issaquah to the next food stop, a very uneventful section except for the distinct lack of response I got when I asked if anybody wanted to join me for a quick trip up Squak Mountain (a nice 1000′ climb that has a bunch of 15% sections). I really expected that joke to do better.

This food stop is only used by the century riders, and therefore it only has about 40 people. I flip my remaining skratch bottle to the front, refill a bottle with water, and soak my sun sleeves, jersey front, and head in water. Another RocketLyte + some cheez-its, and I head out again. We head east to a section that has a bit of climbing and is a bit roller-y. I’ve decided that I probably will ride this solo, when a paceline passes me. I try to chase but get a bit bogged down, drop off, but then the paceline slows up a little hill and I catch right up again. Apparently, I am fast enough to stick with them, so I stick with them for this whole section, feeling a bit bad because I am not helping, but the guys at front aren’t very well organized and I can’t work into the rotation, so we travel along and I wheel-suck all the way to Factoria.

Then it’s up the hill, through a few neighborhoods, across into Bellevue College, and then a quick trip to the East to the last food stop. There is only 10 miles left, so most of the group just continues, but I need to rest and cool off.

This food stop exists primarily for the 25-mile riders, but they went through long ago, so when I pull in the number of riders at the stop (5) is outnumbered by the number of volunteers (6).

They have massive amounts of food left; I eat a couple of cookies and 4 or 5 orange slices, get a bottle of Nuun and a bottle of water, wet my clothes down, and take stock of my situation…

It’s something like 5 miles to my house with only small hills, and I’ve done this ride feeling way worse than I do now. My head and neck are quite painful, as are my wrists and feet. Interestingly, my butt doesn’t feel bad; I rode the second half hard enough that it took some weight off and made that tolerable. This ride is totally unremarkable except for catching another guy who rides with us sometimes and talking with him until it’s time for me to turn off.

Stats:

Distance 106.4 miles
Riding Time: 6:14:17
Average Speed: 17.1 MPH
Elevation Gain: 4880′
Calories: 3500?

For me, that’s a pretty fast century. I went and looked, and in 2005 I did the other route and averaged 18MPH, but that was a much flatter route and had more paceline opportunities.

The RocketLytes that I used –  I don’t know if they work or not, but I can say that the only point my stomach was even mildly upset was when I drank some Nuun after the last rest stop, so I am definitely going to keep using them.

Overall, a nice route and a pretty good ride.


PSIA Level 2 Alpine Exam

This past weekend, I took the skiing and teaching portion of the PSIA Level 2 instructor examination. I am writing this to share a bit of the experience, and to offer a few thoughts on the process. I hope this will be useful as you journey towards your level 2. I’m planning on feeding some of this back into how we prepare/clinic at Olympic, but that will be the subject of another post.

I passed one of the portions and did not pass the other, but to retain a sense of mystery I shall keep the identity of which module I passed until later in the post.

Day 1: Skiing

Day 1 starts at 8:30 AM in the Pacific Crest Lodge at Stevens Pass, my home mountain, when we meet our instructors clinicians examiners. That distinction will be important later on. We were assigned to groups of 6 or 7, with two examiners plus an optional examiner-in-training and an observer.

The goal of the day is to evaluate each of the candidates to see whether they meet the PSIA national standards for Level 2. There is a pdf here that describe the national standards; in addition to that, you need to understand how your particular division approaches certification. I’m in the Northwest division, so my guide is here, those for the Rocky Mountains are here, Eastern is here, etc.

The day of skiing is broken up into a number of different tasks, 10 in all. Some are directly related to things that you need to do to teach intermediate skiers (the target of level 2) – things like medium radius turns, wedge Christies, and off-piste skiing. Others tasks are designed to help the examiners determine if you meet the level 2 standard for one or more of the 5 fundamentals.

So, after a brief warmup, we start doing tasks. We move around the mountain because we have spring conditions, which are pretty variable. We generally get a couple of chances on a given task, and there is pretty much zero feedback from the instructors unless it relates something like the size of turns they want us to make. Other than watching the other skiers and trying to correlate their performance to your own, there is no way to know how you are doing.

This is by design.

During the tasks, the examiners are intently watching us and taking notes. Between the tasks, the examiners are watching in an off-hand way; remember, the goal is for them to evaluate your performance throughout the day. I think the intention is for them to see you in less structured environments where you are less nervous, but what it really means is that you are trying to ski your best for the whole time you are out on the snow. It is an exhausting experience.

My performance is not great. I have traditionally been pretty strong on the groomed, and I’ve spent a lot of this year working on improving my off-piste skiing, and my last skiing was on a trip where we had a couple of nice days of fresh snow. I recommend very highly that you do not take the approach I did, as it really messed up my focus during the test. Most of the tasks require either very little edge engagement or very good edge engagement, and that’s where the practice should be.

But the fresh snow was very nice…

In our preparation for the exam, we had a lot of discussion about terrain that was appropriate for each task. As far as I can remember, this is where my group skied.

  1. Off piste: From the top of skyline, traverse under the 7th lift base off into the ungroomed, and then ski a face there and then down the face of windy ridge. Then the more distinct bumps under the skyline chair at the bottom.
  2. Skating. I think we did this in the middle of daisy. Everybody in my group could skate, and our examiners spent little time on this.
  3. Straight line hop from ski to ski. We did this at the bottom of hog heaven. We also didn’t spend much time on this, which surprise me a bit.
  4. Pivot slips. The kickover face on rock-n-blue.
  5. Short radius. The steep part of I-5 which was groomed. It felt black to me and – other than the off-piste – was the steepest pitch we skied.
  6. Medium radius – rock-n-blue
  7. Rhythm changes – rock-n-blue
  8. Wedge christie – skyline at the top of windy ridge working down to the flatter part, then along near the terrain park.
  9. Leapers – rock-n-blue
  10. One-ski turns – this was either rock-n-blue or hog heaven.

The terrain choice seems fair to me. The short radius were maybe a little too steep, but that was probably the only place on the mountain that had a firm groomed surface.

At 3PM we were done. Those who were only doing the skiing go their results at 4:30PM; the rest of us would find out both sets of results at the end of the teaching day.

I think the skiing part is *relatively* straightforward. The tasks are clear, and you just stay with the group and try to ski them to the best of your ability. The examiners did a good job within the constraints of the format. More on that later.

Day 2: Teaching

Skiing was the physical day, and teaching is the mental day. it consists of the following activities:

  • A 20 minute teaching segment in which you will teach a topic assigned to you. The topics go from “first day on the snow” through higher-level intermediate topics, and then a wildcard to teach one of the tasks fro the skiing day.
  • A 5 minute short teaching session.
  • Motion analysis; this might be watching a skier and commenting on them, or watching instructors ski and doing motion analysis on the differences they show.

We drew our teaching segments out of the hat. I got, “Day one skiing, working with gliding, stopping, and turning”. My wife and I had spent some time discussion how we would teach each of these, and I was hoping I didn’t get this one (which I think is the hardest one to teach), but on reviewing my notes in the morning I had a bit of an inspiration, and when I drew that topic, I decided I was going to go with my inspiration.

I taught second, and I highly recommend teaching in the morning if you can. I found it hard to be focused later in the day (though to be fair, one of our candidates taught at 1:30 and she absolutely nailed it). The teaching segment is about teaching something appropriate to the other candidates, something they can learn from. There aren’t any skiing skills I can teach to the candidates, so I elected to work the mental side; I wanted to get the back into the mindset of a beginner, and specifically, get a bit of that nervousness and apprehension in their brains. I did that by having them ski straight on a very flat slope towards a slightly steeper slope, but I made them do it with their eyes closed. And then we did some skiing with our weight far to the aft. My point in all of this – which I drew out by asking them questions – was that the mindset of day one beginners is very fragile, and you have to go overboard in making things not only safe, but obviously safe. I felt pretty good about that part, and since I passed, it was fine, though not great.

The teaching segment is where I saw the most variance across instructors. Things that I saw:

  1. Teaching to the candidates as if they were students; ie teaching the group how to do a wedge turn rather than teaching them how to be better at *teaching wedge turns*.
  2. Teaching inefficient movements not currently I the PSIA approach
  3. Not following the PSIA teaching cycle. Because of the nature of exam, you can’t really do “Assess Student and their movements” and “Define goals and plan experiences”, but you should be doing the rest of them. It was common for instructors to only teach the “Guide practice” part. Notably, “present and share information” and “check for understanding” were absent
  4. Not having a specific goal. The things you teach are in service of this goal.

I’ll probably write about the teaching side in more depth in the future.

The compare and contrast sessions were interesting; we were split into two group (team ski/snow interaction, team body), and each group watched examiners ski, discussed what they saw as a group, and then shared it with the examiners and the other group. I found this part to be relatively simple, but I’ve worked a lot on MA recently. We saw three things:

  1. Medium radius turns by two examiners, one with banking, one with angulation.
  2. Wedge christie turns, one generating the wedge by pushing out the tails and holding a high edge angle, the other generating wedge through rotation of the outside ski and skiing a flatter turn. This one generated quite a bit of discussion as the candidates did not agree.
  3. Medium radius turns done three ways; with retraction, with extension, and with big leg/little leg. We had to figure out the order. I was on team body, and we agreed right away, but those on team ski had three different interpretations of the order.

My big advice on doing the MA part is to do the part that you are assigned but still look at the whole body and ski/snow interaction as the followup questions will be in more detail.

We did not get to the 5 minute teaching.

Eric complains about the process

First off, my results (fail skiing / pass teaching) were a fair evaluation of my performance. I did not ski well enough to meet the bar.

I have two areas of complaint, and the come under the “not being set up to succeed” heading.

The first is in the preparation phase. I’ve looked at what PSIA-RM and PSIA-E require for their level 2 candidates, and it is has a lot more structure and waypoints. For example, PSIA-East requires that you get your CS1 (Children’s specialist 1) certification before for you go for level 2, which sounds like a very good idea to me.  PSIA-Rocky Mountain requires that you have a level 2 proficiency log, which would help to address the key concern of the candidates I talked with, which is their lack of understanding of what the level 2 skiing standards are. I am not looking for assurances that I will pass, but what I would like is for somebody to have said, “based on my understanding of the standard, I think your performance today meets/does not meet the level 2 standard” in a specific area.

Keeping this a mystery does not benefit anybody; what it means is that a lot of candidates are going to be disappointed. The pass rate in skiing for my group was less than 50%, and I’m sure the majority that failed would have preferred spending their time in a different way.

The second part is the actual examination. If PSIA-NW had more structure in preparation, this becomes less important, but I don’t understand the “no feedback” rule during the examination. Time constraints prevent extensive feedback, but you could easily do something like this:

  1. Candidates ski medium radius turns
  2. Examiners write down notes on their performance (they do this anyway)
  3. Examiners share observations relevant to their performance with respect to the standard (“Eric, you are skidding your turns rather than carving your turns”, “Steve, your center of mass is behind your base of support”).
  4. The rest of the exam day proceeds as it does now.

This gives the candidates a way to calibrate against the standard. As it was, I missed something I could have corrected if I was only told.

Looking at how other regions do exams, RM separates motion analysis from teaching as a separate module, and east breaks both teaching and skiing assessments into 3 separate parts, where you get credit for what you passed. This is a far better approach than the “all or nothing” approach that NW takes.

A couple of small points:

  1. At the end, the examiners hand out a score sheet with written notes and your pass/fail grade, then make themselves available either to congratulate you and hand out your certificate and pin, or discuss why you didn’t pass. If you did not pass, this is your chance to get more insight than the written notes. For some reason, the examiners do this without any notes of their own, which means that you really aren’t getting the insight that you could be getting.
  2. A group of candidates had a discussion about one of the task videos on the PSIA-NW site for level 2 skiing, and we were told that it was an old video and was out of date. This is really unacceptable; examiners get together to clinic several times, and it’s really cheap to grab video from them at the time. The lack of quality videos exacerbates the “I don’t know the standard” problem.

In summary, I did not think that PSIA-NW served me well as a member during the certification process. A little bit more structure would help the learning structure considerably.


Skiing BC: Silver Star, Big White, and Revelstoke

This last week my wife, daughter, and I took a trip to British Columbia to do some skiing.

We stayed in a condo at Silver Star as our central base, and then drove to Big White and Revelstoke for a day each. Here are my quick thoughts…

Silver Star

Silver star is 22 km from the town of Vernon. We stayed in a condo on the hill above the village (not on the ski hill side) above the Silver Queen lift. It was ski-in ski-out if you are willing to do a small bit of climbing on your skis.

The village is pretty tiny, though there are 3-4 places to eat. All are pretty much exclusively run by young adults from New Zealand, Australia, or other ex-British colonies. This is a pattern all over BC.

It was late season, so the snow wasn’t great on Monday. The snow off of the comet chair was okay, the snow off the lower Silver Woods Chair was not. We took one trip over to the backside, which involve some long green runs. The snow there was uniformly awful; it had the wet and refrozen surface that we all hate, and the grooming ridges had set up very hard.  We went back on the front side for the rest of the day. It was decent for spring skiing, and I spent a bit of time skiing Attridge face and Christmas bowl.

Friday was a different story; there was 6″ of new snow. We headed back to the very empty Alpine Meadows chair, and did laps. I mostly skied off of Ridgeback, and found anywhere from 4″ – 6″ of untracked, with a few deeper spots I the trees. It was obviously very nice. When that got skied out a bit, I headed more to the left and found some glorious turns on untouched snow on the Fastback run. And then I found out why; those runs only feed below the village on the entrance side, so it’s a cat track out, a trip up the Silver Queen lift (back by our condo), and then cat tracks to get back to the Comet six-pack, and then some skating to get back to the Alpine Meadows chair. That took a bit of time.

After lunch we headed to backside to ski Eldorado. This is marked as a blue, but it is really a very long cat track with a couple of blue pitches on it. It’s there so that more advanced terrain can be accessed. This is the same story for Aunt Gladys on the other side. On paper, there is a ton of terrain on the backside, but they really need two or three lifts to make it accessible without a lot of traversing.

Solo after the others headed back to the front, I skied Cantastic glades at the top, which still had some very nice snow on them, and then ducked into Doognog, a double-black with a thin entrance. And it lived up to the billing; it was tight, bumpy, and steep. Most of the new snow was scraped, so I sideslipped the tight sections and very carefully skied the rest.

With one more run in my legs, I decided to head down 25 north and sunny ridge. These are real blues and had some nice snow on them. Then I made the mistake of turning off into Sunny Glades, and they lived up to their billing, with about 9″ of the gloppiest snow you have ever seen.

Access back to the front side is via a very long run and sometimes flat run “last chance” or a tee bar. I took the t-bar.

I think it’s a pretty decent mountain to ski at, and would be a great family mountain. The backside has potential, but all of the traversing and cat-tracking got on my nerves. Village is a little small but was okay (though don’t think you can buy groceries at the grocery store).  The condo we got was nice and fairly cheap, and Vernon is close enough if you need civilization.

Silver Star is a member of the Powder Alliance, which means you get to ski free if you have a Stevens Pass Season’s Pass. This is a really nice benefit that saved us quite a bit of money.

Oh, and if you get the chance, do the sleigh ride to dinner. The sleigh ride was fun and relaxing, and the food was pretty good.

If you like Nordic skiing, there were a *ton* of trails around and a lot of extremely fit skiers. They claim to have the largest network of groomed trails in North America; they have 55 km of trails and you can dual-pass to get another 50 if you would like. There was also some fat biking.

Big White

Big White is the big daddy in the neighborhood. It is big, with 15 different lifts, and a whole lot of different terrain. If you want the resort experience, this is a good place to go.

There is a fair bit of terrain variety, but on the day we were there, we ran into fog at the top of Powder chair. This is a common enough experience that the resort is nicknamed “big whiteout”. Having never been there when the top was clear, I can’t tell you what it is like, but there isn’t a ton of high-level skiing here. It’s a great intermediate mountain, however, and there is a ton of on-slope housing.

Even with the amount of available slopes, it actually felt crowded, though we never had much of a wait for a lift. We skied the Snow ghost & ridge rocket blues, spent some time playing in the glades off of the black forest express. I also recommend a trip through the skiercross/boardercross course in the Telus park; it is a lot of fun.

Big White runs from about 5000′ to about 7600′ at the summit, if you could see anything when you got up there.

Revelstoke

Revelstoke is north and east of Silver star, conveniently located in the town of Revelstoke. Revy – as you have to call it if you have any aspirations of coolness – has the most unassuming base area I have ever seen:

There’s a small parking lot, a small base building and an attached hotel, all plunked down in the outskirts of a small town. The base area is only at 1,680′, and given that it was late March, there wasn’t really much of what you would call snow left there. There is a small magic carpet, and a single gondola. This Gondola takes you on a 4-minute ride up the hill, up to Revelation lodge at about 2300′. There is a small magic carpet there (both for skiing and getting back to the gondola). It was technically possible to ski down from there to the base, but we did not attempt it.

If you hop on the upper Revelation Gondola, it will take you on a 9 minute ride up to Mackenzie outpost at about 5000′. There are a number of blues and blacks below the Gondola but the snow didn’t look great on the way up, so we opted to skip it, and we skied down to “The Stoke”, which took us another 2000′ up the hill to 7,300′. And then we skied.

The lower slopes looked sparse because of a fair bit of rain the night before, but that gave us 8-10″ of fresh on the top. We came down Critical Path, which has the distinction of being the steepest blue that I have ever skied. The snow was soft, and once I got a bit warmed up, we had a nice time. We also skied snow rodeo a couple of times before lunch. These are *long* runs; Stevens Southern Cross is about 1700′, so the Stoke is about 20% longer than that, and if it was mid-season with good snow, you could ski the rest of the way down to revelation lodge, something like 4500′ of vertical.  Which, honestly, is a bit nuts.

It didn’t take long to tire ourselves out, and we gondola’d back down to Revelation Lodge for lunch. Here you have a lot of choices; you can go the cafeteria, or you can go to the cafeteria. Revy is not currently a place with a lot of dining options.

After getting our food from the British/Aus/Kiwi staff, we headed back up the gondola and back up “The Stoke”. We were headed to the North Bowl. There are two ways to get there; if you like really steep double blacks, you hike up the Lemming Route or traverse over to the edge. I am not good enough to do that, so we skied the top bit of The Stoke and took the Ripper Connector, a blue. And we skied, then we skied some more, and then we skied still some more. I can’t find any elevations, but my guess is that we dropped a bit over 3000′. Powder bowl only has three runs – all blue – with a lot of “glades”. I put quotes there because they aren’t really gladed enough for me to really be able to ski them. We skied a bit of the edge and then under the chair a few times, until or legs got tired of trying to turn into the now heavier-than-normal snow. The Ripper chair is only 1600′ in elevation, and at the top you can see the runs on North Bowl, which look ungodly steep to me, and at least 1500′ long.

Come ski here only if you like steeps. The blues are fairly steep, and the greens are only cat tracks.

And – if you want a little more experience – they offer cat skiing packages that take you outside the ski area. And – if you still want more – Selkirk Tangiers Heli Skiing leaves from the base area.

The whole experience is a little hard to wrap your mind around. They have big plans to add more lifts, on slope housing, the usual resort things.


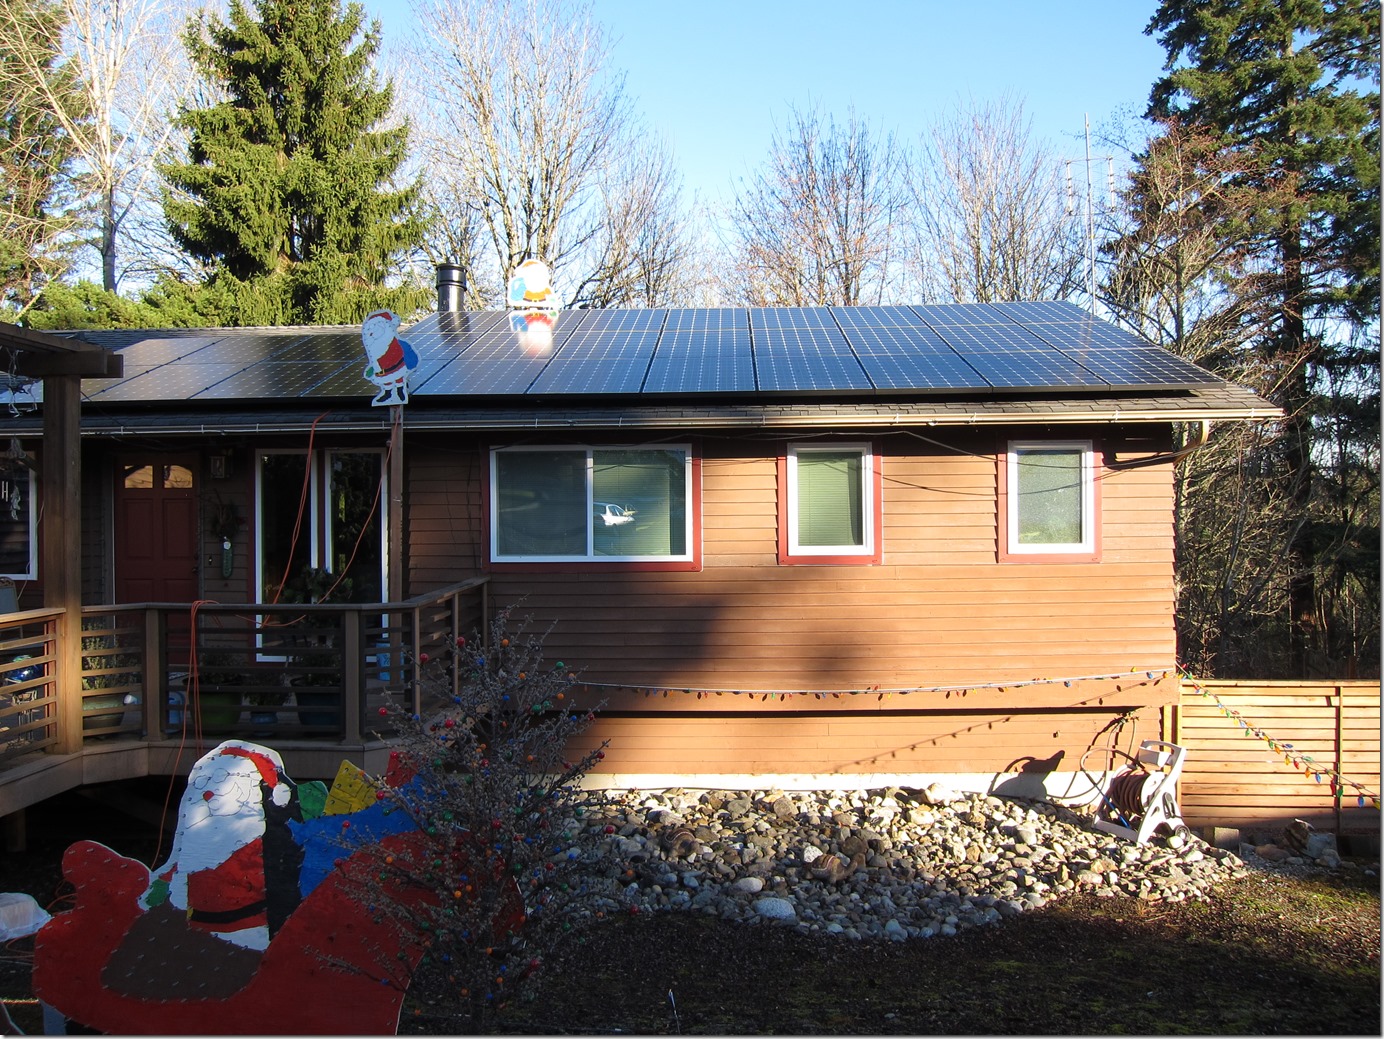
Gunnerson Solar Installation

IMG_8645

We had a photovoltaic (aka solar cell) system installed on our house in mid-November, and I’ve had a few questions about it, so I thought I’d write something about it.

We got started through the Solarize Bellevue program, a city program designed to make it more straightforward for homeowners to install photovoltaic (PV) systems. The program provides a few things:

  1. Presentations where residents can get a lot of information and remove a lot of the confusion.
  2. A pre-qualified installer with pre-negotiated contracts
  3. Introductions to banks that can finance the installations.
  4. A well-thought-out process

I don’t know whether the program is going to repeat in 2016 or not, but if it does, I recommend it.

The equipment

The solar system consists of the following equipment:

  1. The solar panels, which convert the sunlight to direct current electricity.
  2. The inverter, which takes the direct current electricity and converts it to alternative current that is in sync with the power coming from the utility.
  3. A production meter, which measures the power that comes from the inverter.
  4. A replacement electric meter, which measures power coming from the utility into your house or going from the house back to the utility.
  5. Power monitoring equipment (optional, but nice).

IMG_8647

From left to right, the net (normal) meter (labeled “NET METER”), the production meter (labeled “PRODUCTION METER”), and the inverter (labeled with lots of scary labels because here is high voltage DC coming into the system if the sun is shining). The conduit fro the production meter goes down and back inside, coming into the service panel, where there is a 240V solar breaker.

Money and Stuff

There are a number of different incentives at play that make the monetary aspect complex. I will try to make it simple.

No sales tax

Systems that are 10 KW or less have no sales tax. AFAICT, those that cost more get some sales tax forgiveness.

This is very nice, but it’s mostly hidden, since you are going to have to remember that it allows you to pay $20K for a system instead of $22K if you do payback calculations.

Residential renewable energy tax credit

This is a federal tax credit worth 30% of the installed price of the system until 2019, with reductions in years after that.

Note that this is a tax *credit*, not a deduction, so it comes straight off of your tax bill. 

Solar Production Incentives

With production incentives, you get paid by the utility for every KWh that your system produces – regardless of whether you use it or send it back out to the grid. That sounds pretty straightforward. Let’s add some complexity:

The incentive rate depends on where your solar panels and inverter (which convert the DC from the panels into AC for the grid) were manufactured. If the solar panels were built in-state, you get one bonus, and if the inverter is built in-state you get another. These can be significant; if both the panels and inverter are built in-state, the incentive can be $0.54 per KWh.

However, it gets more complex than that. The production incentives are paid from a pool that is 0.5% of the taxable power sales by the utility that serves you. The size of the pool varies based on how much power the utility sells for a year, and the number of people who are participating in the program and how much power they make. Last year’s bad winter meant less power to sell and there were lots of new systems, and for Puget Sound Energy customers at least, the rate is no longer $0.54.

So, the real answer is that you need to talk with your utility and they will give you some idea of what rate you might receive for the coming year. Puget Sound Energy projects $0.36 – $0.468 per KWh for the coming season.

The solar production incentives currently expire June 30, 2020. It is not clear whether they will be extended beyond that time or whether they will change the program to increase the per KWh rate.

Net metering

Net metering is very simple. If you are producing more power than you are consuming, you sell the excess back into the grid at your current rate.

Details of our system

63%

System Size 8.4 KW
Panels 30 Itek Energy 280 Watt panels
Inverter Solectria PVI-7600TL
System monitoring eGauge with Home Plug
Guaranteed KWh/year 7500
System Price $31,580
Expected power offset 63%

Our installer is A&R solar, and we were quite happy with their service.

Our payback was originally calculated at 4.4 years at the $0.54/KWh production incentive. It’s obviously worse with lower rates. A quick look at the numbers says the payback is about 8 years at the $0.486 rate and 12 years at the $0.36 rate. This assumes that the production credit goes away in 2020 and does not come back.

Power monitoring

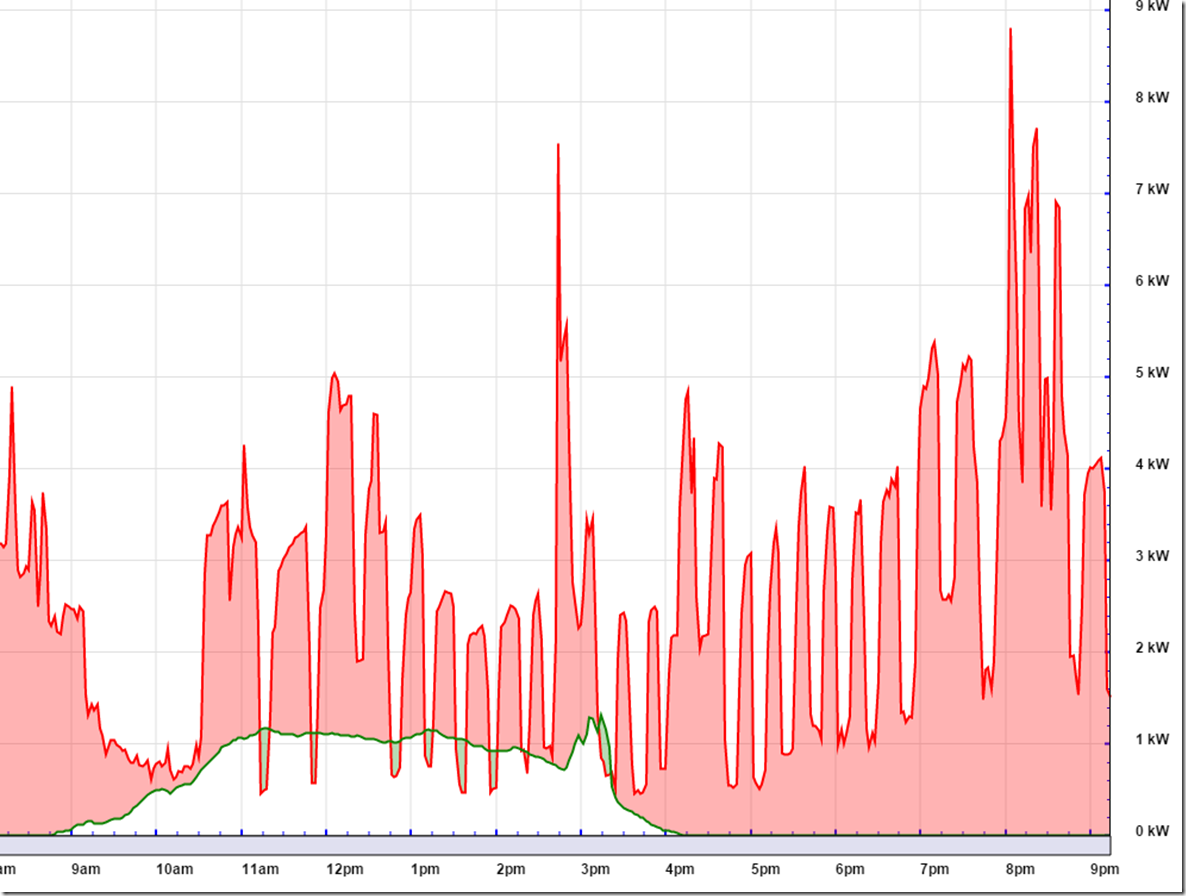
One of the nice things about the agreement between the city and our installer is the inclusion of the eGauge monitoring system as a free bonus. This gives real-time monitoring of the amount of power the panels are producing and how much is being used by the house. It does nice graphs like this:

Energy usage

Okay, so it’s December 29th, which is one of the shortest days of the year, and though it was light for December, it wasn’t really very sunny, and the sun is low in the sky. The green line is the power produced by the panels today; not surprisingly, it doesn’t really peak that high. The peaks around 2KW are the heat pump switching on and off, and the really high ones are both the heat pump and the dryer.

The system updates continuously, and it’s good enough that you can use it to figure out roughly how much power appliances or lights use; turn on the lights, look at the usage, turn it off, look at the usage, and get a good idea how much power is being used.

Details

A few details that I think might be of interest.

The main panels face pretty much due west on a roof with a 1/4 pitch. This is not an optimal placement or orientation, but the installation – which is flat on the roof plane – is simpler, cheaper, and looks better than the alternatives.

The most-commonly-asked question is “can you use your system during power outages?”. The answer with the current system is “no” – as a safety measure, the grid-tied inverters only work when there is power coming in from the utility. There are solar solutions that provide this capability, but they cost more $$$.  There are also ways to trick your inverter with a small inverter driven off a battery; the actual implementation of that approach is left as an exercise for the readers. Note that there is from 200 volts to 500 volts DC coming into the system, which is a pretty dangerous voltage.


Cassette Tapes

Back when I was in high school – in the last 70’s and 80’s – there were four ways to listen to music.

You could listen to the radio. There was music on AM radio, but if you cared about music, you listened to FM radio. In my case, it was album-oriented rock radio.

Or, you could listen to your records. This gave you great sound, but 1) records degraded slightly each time you played them, 2) to get the best sound, you needed to follow an elaborate cleaning ritual, and 3) if you liked your music loud, the record would skip. Oh, and 4) they weren’t very practical for your car.

For your car, you could obviously listen to the radio, you could listen to 8-track tapes, a weird and clunky format that wasn’t very good.

Or, you could listen to a compact cassette – what everybody just called a cassette. Cassettes were small, easy to carry, and had decent sound. The record companies sold a ton of pre-recorded cassettes, which had a limited lifetime, sub-par sound (because they were duplicated at high speed and used cheap speed), and – if you were unlucky – would transform itself into a large wad of crumped-up tape. Interestingly, pre-recorded cassettes generally cost more than record albums.

If you wanted the best sound – and if you wanted to be cool – you had a stereo of your own, you bought albums, and you recorded them onto blank tape that you bought for $3 or so. And – if you bought 90-minute tapes – you could fit two albums on a single tape.

Okay, so, that wasn’t quite accurate. You bought *some* albums, but most of your music came from recording albums that friends. Because this was a bit of a hassle to do, you wanted to use a tape that was good quality. Most people I knew chose a specific brand – and often a specific tape – and stuck with it. At one point – around 1982 or so – they came out with a 100-minute variant, which was great because you could use it for albums that were longer than 45 minutes in length.

In my case it was the TDK SA-X90 pictured above, in a number of variants over the years. In college, I had a tape holder on the side of my stereo cabinet that held 48 individual tapes.

And then CDs came, then MP3s came, and then portable music players came, and cassette tapes went away. Though I found it difficult when I finally decided to get ride of them.

If *any* if that has any resonance with you, you might want to spend a few minutes on Project C-90.


Agile Transitions Aren’t

A while back I was talking with a team about agile. Rather than give them a typical introduction, I decided to talk about techniques that differentiated more successful agile teams from less successful ones. Near the end of the talk, I got a very interesting question:

“What is the set of techniques where, if you took one away, you would no longer call it ‘agile’?”

This is a pretty good question. I thought for a little bit, and came up with the following:

  • First, the team takes an incremental approach; they make process changes in small, incremental steps
  • Second, the team is experimental; they approach process changes from a “let’s try this and see if it works for us” perspective.
  • Third, the team is a team; they have a shared set of work items that they own and work on as a group, and they drive their own process.

All of these are necessary for the team to be moving their process forward. The first two allow process to be changed in low risk and reversible way, and the third provides the group ownership that makes it possible to have discussions about process changes in the first place. We get process plasticity, and that is the key to a successful agile team – the ability to take the current process and evolve it into something better.

Fast forward a few weeks later, and I was involved in a discussion about a team that had tried Scrum but hadn’t had a lot of luck with it, and I started thinking about how agile transitions are usually done:

  • They are implemented as a big change; one week the team is doing their old process, then next they (if they are lucky) get a little training, and then they toss out pretty much all of their old process and adopt a totally different process.
  • The adoption is usually a “this is what we are doing” thing.
  • The team is rarely the instigator of the change.

That’s when I realized what had been bothering me for a while…

The agile transition is not agile.

That seems more than a little weird. We are advocating a quick incremental way of developing software, and we start by making a big change that neither management or the team really understand on the belief that, in a few months, things will shake out and the team will be in a better place. Worse, because the team is very busy trying to learn a lot of new things, it’s unlikely that they will pick up on the incremental and experimental nature of agile, so they are likely going to go from their old static methodology to a new static methodology.

This makes the “you should hire an agile coach” advice much more clear; of course you need a coach because otherwise you don’t have much chance of understanding how everything is supposed to work. Unfortunately, most teams don’t hire an agile coach, so it’s not surprising that they don’t have much success.

Is there a better way? Can a team work their way into agile through a set of small steps? Well, the answer there is obviously “Yes”, since that’s how the agile methods were originally developed.

I think we should be able to come up with a way to stage the changes so that the team can focus on the single thing they are working on rather than trying to deal with a ton of change. For example, there’s no reason that you can’t establish a good backlog process before you start doing anything else, and that would make it much easier for the agile teams when they start executing.


Moving to the Power BI team…

This coming Monday, I’m going to be starting a new gig on the Power BI Team. It’s a great fit for me, both from the technical side and from the process (ie “Agile” side) of things, and I’m pretty excited about it.


Pages:1...10111213141516...35