In February of 2024 we took a trip to Korea and Japan. We spent time in Seoul and in Tokyo, and between that time we skied at Shiga Kogen. This was a “visit Korea and Japan and ski” trip, not a “visit Japan *to ski* trip”. If it was the latter, we may have made different choices. Note that the exchange rate is $1 US to 150 Yen which is *great* for those of us in the US, but you’ll want to see what it is when you plan a trip.
Nagano has two separate sets of ski areas; to the west of the city is the Hakuba there is Hakuba Valley, which is an association of 10 different ski resorts. Vail has an agreement with Hakuba Valley so you can ski there for 5 days free with an Epic pass.
To the Northeast of Nagano is Shiga Kogen, which is an association of 18 different ski resorts. They have combined passes that allow you ski any of the properties.
Note that “resort” is not indicative of the size of each area.
Getting There
While it may be possible to fly directly to Nogano, we flew to Tokyo. On the way there, we took the Shinkansen – otherwise known as the bullet train – from Tokyo to Nogano. The ticket cost $78 and the trains are comfortable, smooth, and fast. It’s about 110 miles and the total time is 1:24, so you average about 80 mph for the trip.
Note that the Shinkansen has special rules for oversized luggage, so if you bring your skis you’ll want to reserve an oversized luggage seat (at the back of the car).
Once you get to Nogano, it’s bus time. You’ll spend another 60-80 minutes to get to your hotel.
Another option is to take a bus directly from Tokyo to your hotel. This will take longer but it will be easier to deal with your skis. We came back on the bus and the trip was fine. We used Nagano Snow Shuttle for both bus trips.
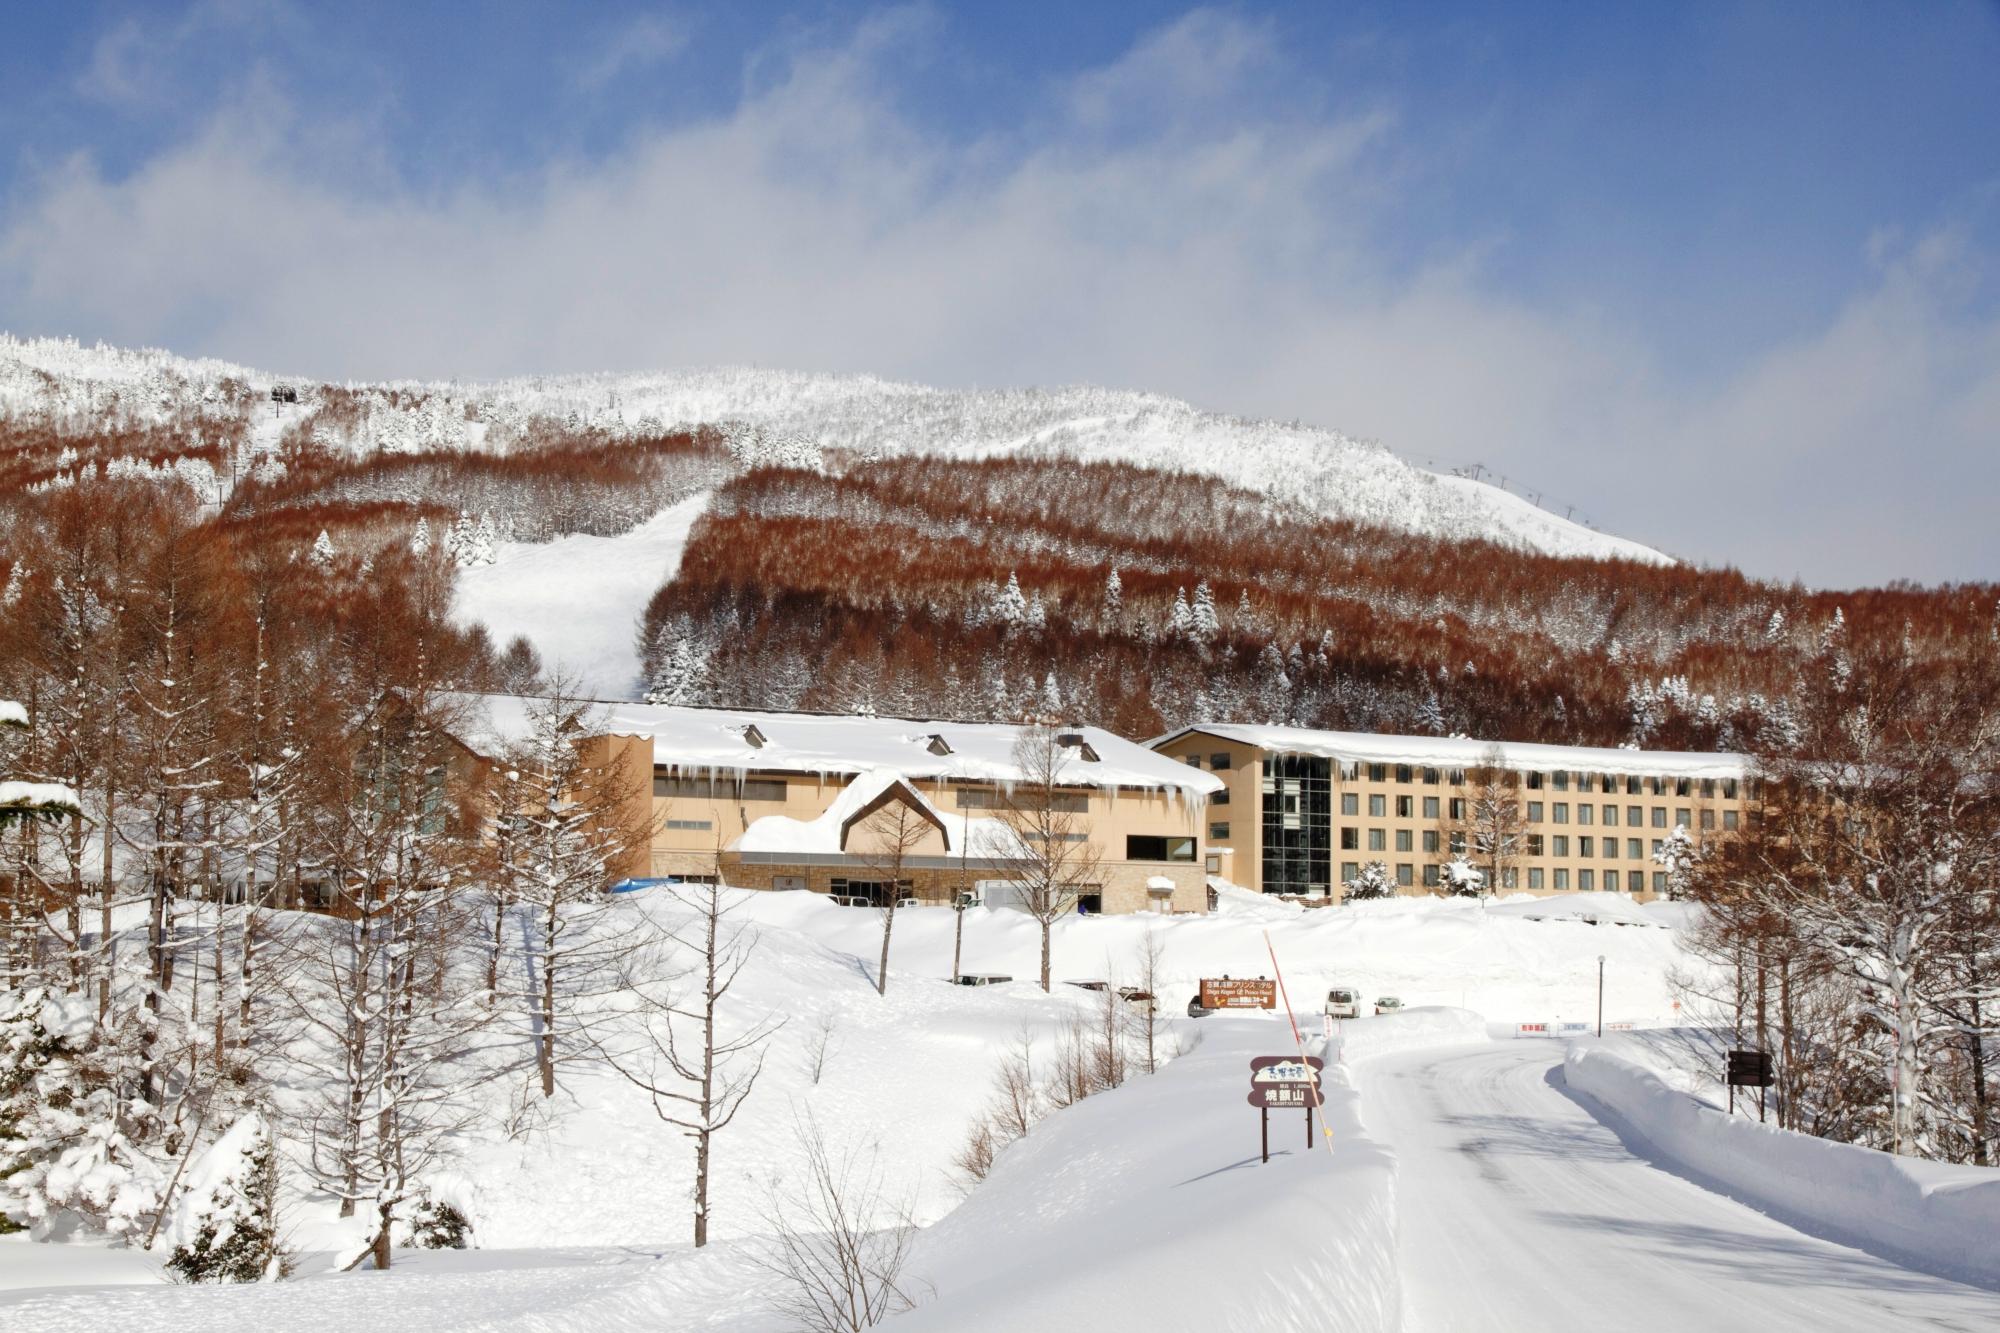
We stayed at the Prince Hotel West in Yakebitaiyama. Ski in/ski out, restaurants, ski rental, etc. It’s a bit rustic but decent.
Shiga Kogen Mountains
One of the neat things about Shiga Kogen is that 14 of the ski areas are contiguous, meaning that you can ski from one area to the rest. They do offer shuttle buses between the areas and to the other 4 areas that form another cluster off of the map to the right.
For the 1998, Shiga Kogen hosted a number of events.
Mount Higashidate hosted the alpine giant slalom events.
Mount Yakebitai hosted the alpine slalom and snowboard giant slalom.
You will find the olympic courses on the trail maps for both mountains if you want to ski them.
December in Seattle is very damp and that means I need to deal with GFCI outlets tripping for my holiday lights. I’ve come up with some ways of improving the situation and that’s what this post is about.
The Point of GFCIs
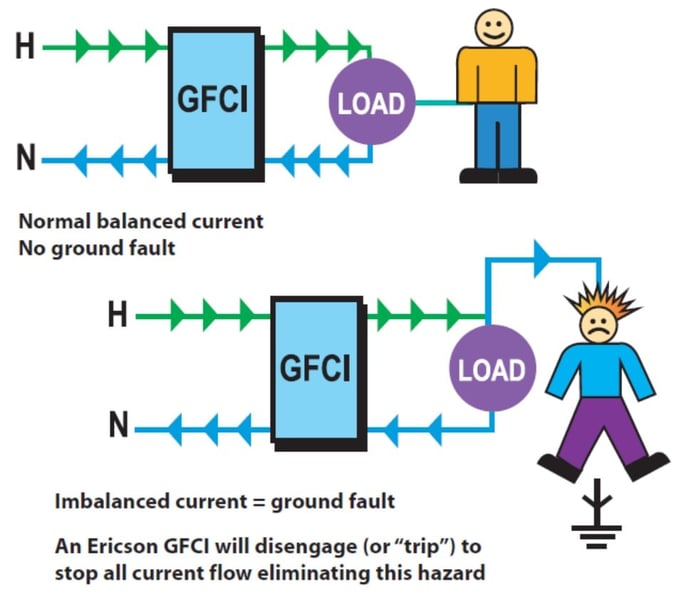
The whole goal of GFCIs is to keep dangerous amounts of current flowing through human bodies, and the electrical standards set that current to 5 milliamperes. That is a good thing.
The problem that we run into is that light strings are not waterproof, and that means there is a possibility of a current path between the electrical wiring in the light string as a ground. That current is normally known as “leakage current”, and if you get more than 5mA of leakage current on your GFCI, it will trip.
Measuring leakage
One of the biggest frustrations dealing with this issue comes from not being able to figure out what part of the display is causing the issue – you are stuck with trial and error and that does not work well.
If this is a significant issue, I highly recommend buying yourself a leakage meter. The good ones from companies like Fluke are many 100s of dollars, but there are cheaper ones that have worked well for me. I use this one, which costs around $100:
Go to Ebay, do a search on “leakage current clamp meter” and you’ll find some options.
If you get a trip that you can reset your way out of you can then walk around and clamp the meter around the cords at different locations and figure out where most of the leakage is coming from.
Mitigations
Ground contact
Ground contact makes the current path short and therefore means more current will flow. The amount of current that actually flows depends on the amount of moisture around. Dry ground and dry weather generally means very little leakage. High humidity, wet weather, leaves or other debris, wet snow, ice, or standing water increases the amount of leakage.
Keeping your lights out of this situation is the first step to keeping trips to a minimum.
This also means that you can mostly ignore strings up in the air or mounted to the house though if they are mounted to metal, that could be an issue.
Light string insulation quality
A 50-bulb light string has as least 100 places where leakage can occur. Some light strings are better designed and have less leakage, some have a poorer design and leak more. Light string insulation deteriorates over time and this can lead to more leakage.
Therefore, using higher quality light strings or getting rid of old ones can help.
Electrical connections
If you have connections between light strands or connections to extension cords sitting in wet areas – or jammed into the grass of your lawn – you can definitely get leakage there. Keeping them elevated helps a lot.
If they are elevated a little I have not found connections to be a significant source of leakage, and I’ve measured hundreds of cases.
GFCI Count
One of the best mitigations is to split your load across more GFCIs so the leakage current isn’t enough to trip any single GFCI.
For my display, I have replaced my GFCI outlet with a normal outlet. Not that this is *not to code*.
There is a single extension cord that runs from that outlet out to a Sockit Box that is in the middle of my yard.
Inside this box there are 4 individual GFCI outlets and I can split my loads across the all of those GFCIs.
I have one of these for each side of my display, and it has reduced the number of trips considerably.
One of my non-resolutions of late is that I would try to write more – or any – and that I would specifically try to write more humor, because that is the kind of writing I find to be most challenging and therefore most rewarding.
Just to be clear, that’s rewarding to me, not rewarding to you.
Some have complained in the past about my “self deprecating humor”. Putting aside the possibility that it may be the “humor” part they are actually commenting on, I can understand their sentiment, but I have in fact tried to substitute “shelf deprecating humor” (Ikea product names) and “elf deprecating humor” (funny shoes) but have found that to be too limiting. A more specific complaint was that I was using self deprecation because it’s an easy way to get a laugh (duh) and that my depictions were not accurate.
I recently did a bicycle ride that I believe is powerful evidence in my favor…
You can find the official origin story of Sufferin’ Summits here, but suffice it to say that it’s a very hilly ride that was designed to be right on the edge of what I would find possible *given* my aversion to the kind of training that makes rides possible – training every weekend and working your way up to the distance and elevation gain of your target ride.
Sufferin’ Summit has 8 designated hills. Here’s a graph of my results by year:
My only true completion was in 2017, though I’m going to count 2016 as I was really close and it was over 100 degrees and I had heatstroke on the last climb. I should also probably note that in 2018 we cut it short because of smoke from forest fires, rain, and an unseasonal plague of locusts.
As you can see, the median is 5 hills, so there’s no self-deprecation when I talk about my performance on this ride – in the last 5 years I’ve been able to finish 5 hills and that’s pretty much the max. Which is, frankly, a bit disappointing for a ride that I created.
Now that I’ve dispatched with the impression that I’m not realistic in my abilities or performance, we can move onto the ride report…
Early in 2023, I read a book about athletic accomplishment and pushing through even if you have difficulties. I don’t recall the title, it was something like, “Okay, it’s broken, but there’s no bone showing…”. And I decided that this year I was going to actually train for Sufferin’ Summits – which means going out and riding the same hills on training rides in the months before the ride and working a bit more on leg strength during my other rides.
And it was all going great until a Thursday night ride on the 20th of July, in which I was riding in the hills – as one does – with a two of my friends, and I noticed that I was cold and 20% short on my usual ration of Vim and Vigor.
The next day I started to feel sick, and that day or the next my wife tested positive for the Covids.
And for once, I don’t have need to invent an excuse for my performance as instead of spending 7 weeks riding hills and improving my fitness for what I hoped would be my second successful completion, I spend 3 weeks coughing and a further 4 weeks estimating the percentage of lung capacity loss I was experiencing when I was trying to exercise.
Which brings us to the Sufferin’ Summits ride. I already decided not to do the Passport2Pain ride – which honestly is a much better ride than mine – but since I host the ride people expect me to show up and if I show up the least I can do is try to ride the first hill (never let it be said I don’t do the least I can do…)
Saturday the 9th turned out to be a nearly perfect day, with a temp around 55 to start and an estimated high of 80. The only better day would be 60 and overcast.
I had very low expectations. The previous Tuesday my riding group climbed the upper part of the first climb – known as Grand Ridge – and I was okay as long as I didn’t work too hard, so I was pretty sure that the title of this writeup would not be “Sufferin’ Summit”. I was hoping to do 2 hills and though that 3 was a stretch since I know the third hill quite well.
The group of 10 or so left the start at a little after 8, and we rode together to the first hill. My legs feel weird – generally spinning easy on the flats they should feel great, but they don’t. Not foreshadowing, just odd. At the bottom of the first hill, two “faster than me” friends pulled ahead and I knew I would not see them again. Which is fine – this is a self-paced ride and “ride your own pace” is explicitly one of the rules.
Grand Ridge was fine. I suffered up the steep parts – there’s one grade that is 18% IIRC – and was really out of breath and it took me at least 30 seconds to recover, which is just a post-covid symptom, but other than that I felt okay. This is a big climb – a little over 1000’ – but it’s frankly not a super difficult climb, even on the route we take. That’s why it’s the first climb on this ride.
A fast descent and we headed over to Squak Mountain. Our route goes up what I would call “the hard way”, and the first section has undulating sections of 10%-16% that took us about 10 minutes to climb. Like the early steep stuff, I got pretty out of breath. This is a bit of a weird climb in that once you past the lower part, there is one steep section and then the rest of the way it’s pretty manageable. We topped out at the water towers at the top, and I felt okay.
Another quick descent and we headed to Talus.
Talus has a perfectly nice entrance to the development, with a good bike lane up to the midpoint, but it’s not the hardest way up, so Sufferin’ Summits goes up an old road that is/was used to access city property. It’s thin and painfully steep, steep enough that even if I ride very slowly it still requires quite a bit of power. I generally deal with it by whining the whole way up, but with my lungs still below par I found myself at what is technically know as the Maximum Voluntary Ventilation – breathing as hard as I could. It’s that feeling you get while you are recovering from a sprint, but I still have another 4 minutes of climbing and I’m enough on the edge that I’m not sure I can clip out of my pedals.
Keep going and maybe pass out or try to stop and probably fall over? I don’t understand why more people don’t show up for this ride.
I did make it to the top, and then there’s after quick flat spot there’s a short section steeper than 20% and a short slog to the top. Of this side of the development. Then it’s over to the other side of the development, to climb another 300’ to the real top of the development.
At the top I took stock in myself and thought about what the next hills were like, and decided that I needed to be done for the day. I could *maybe* have done the fourth hill, but it would have pushed me to the limit of my current fitness and health and was therefore contraindicated in my opinion.
But at least this time I have a real excuse.
If you care for the Strava for the ride, you can find it here.
As a ski instructor who loves to teach kids, I think ski lessons are a great place for kids to learn to ski or improve their skills.
But perhaps lessons aren’t accessible to your family, or maybe you’re wondering what to do when you ski with your child outside of lessons.
That’s the point of this post. If you’ve read my other posts aimed at adults, you’ll find that what I talk about here is very different, and that’s because kids – especially young kids – are very different in how they learn than adults. Spending time on anything beyond basic verbal descriptions is largely a waste of time.
I’ll state up front that there are different philosophies on ski instruction. I largely align with the current approach used by PSIA, but other instructors feel differently, and there are different ways to reach the same goal.
Safety –> Fun –> Learning
My three priorities when teaching anybody are safety first, then fun, and finally learning.
The fun part is especially important – the last thing that skiing parents want is a kid who can ski but hates to do it.
And some days, fun means taking 20 minutes to stop by the side of a run and play in the snow.
Slope selection
What we are looking for is a slope that keeps the child interested at their current level of skill *and* allows them to ski with appropriate technique.
The number 1 issue I see with parents and their kids is improper terrain selection, and it is virtually always slopes that are too steep. This has two different results:
In some skiers, it results in high levels of anxiety, and the child melts down and/or skis very slowly. They are not having fun.
In other skiers, they develop a “super-wedge” technique that I’ll talk about later. It gets them down the hill – though often too fast and with little control – but it’s a dead-end when it comes to technique, and it’s challenging to get that skier back on a progression to parallel skiing.
Drills, coaching, and mileage
When I learned to ski as an adult, we did a lot of drills in our lessons. And as a ski instructor, we do a lot of drills in our training.
Specific drills definitely have their place, but they are boring (not fun) and kids don’t want to spend much time standing around listen to adults tell them what to do. They get a bunch of that already.
And until you get to older kids – say 9 years and older – they aren’t great at translating instruction into doing specific things with their bodies, so you can spend a lot of time talking without much benefit. This is also true with older kids and adults.
I definitely do drills in my classes, but I spend very little time talking. My agreement with my classes is that if they pay attention when I am talking we will spend most of our time skiing.
I spend a fair bit of time coaching, which is 1:1 feedback with a specific skier about what I would like to do. Proper coaching is *one thing* that I want them to keep in mind – “Steve, your skiing looks nice. Can you make wider turns that take longer instead of the short ones you are doing?”. And there might be a demo to show what I’m looking for.
Coaching does *not* consist of a list of things that I want them to do better on. I may see 5 things, but nobody can focus on 5 things, so I give them the one thing I think is most important.
If we are working on a drill, my comments focus only on what we are trying to do on the drill. It’s common for students to regress in some other area of their skiing when they are focusing on something new, and me commenting on that is not constructive.
Finally, mileage is just skiing. Everybody needs repetition to impress new ways of moving into their neuromuscular pathways, and that is what mileage does. If you do nothing else, just skiing with your kids on terrain that is appropriate and comfortable for them will yield large improvements in performance over time. And it’s fun.
Philosophically, my goal is to put students in a situation where they can try different things and have the chance to experience success in the form of more efficient movements. Drills let them try new things, coaching helps guide them in the proper direction, and mileage cements the new movements into their bodies.
Let the mountain do the teaching
In the ski instructor world there’s a term known as “terrain-based learning”, which means letting the mountain do the teaching.
Some ski areas have beginner areas that are specifically designed for this – their beginner areas have sections with banked turns that curve back and forth. Or they have sections with small bumps. Anything like this is great as they will move beginners towards the movements we want to see naturally, and its fun to ski on. Win/Win.
Trails
Most ski areas also have a variety of short little trails of varying difficulty. These are great assuming they are appropriate in difficulty for the skier. I can do a lot of drills working on balance with my kids, or I can let them ski short trails and they will quickly learn that a) leaning back does not work and b) balance is dynamic and constantly changing.
A few tips on trails:
The difficulty of trails varies drastically depending on snow quality. A trail that is fine for a experienced beginner with fresh snow may be difficult for a good intermediate with hard snow.
The majority of trails are never groomed.
Coach your kids to “pick a slow speed”, especially if it’s their first time on a trail.
If you ski trails with your kids – and it’s good for your skiing as well – note that most trails are made by kids with 3 foot skis and your longer skis may not fit well. Pick a good speed, and use the sides to scrub off speed.
Coach your kids to move off to the side if they need to stop, as following skiers may not be able to see ahead.
It is vitally important that kids yell “Whee!” when they are going through sections like this.
Bumps
It’s unlikely that your kids are ready for runs that are fully bumped out. But unless you tell them, kids don’t know that bumps are supposed to be hard, and you can often find short areas next to groomed runs with small bumps that you can play on. These, like trails, are great, and if they aren’t, it’s easy to ski back to the groomed run.
Adventures off the groomed
My classes spend a lot of times on “adventures”. For beginners, it might just be the terrain-based learning that my ski area builds or very short trails, but once they’re intermediates we will be spending time off the groomed if the snow is good enough. It’s important to ramp these up slowly – kids absolutely love to be off in the snow away from the groomers even if they have to work hard and fall down more, but they take a lot of effort physically, especially for less skilled skiers and they may get tired out. Choose paths that allow an early exit if it’s too hard for them for any reason, and you may need to ration the number of adventures you go on.
Pay real attention to where you are and what the options are. You will often have the opportunity to traverse back and forth and keep the slope low, much lower than it would be if you went straight down the hill.
Also note that sometimes you are going to make poor choices. If it turns into a big slog, apologize to the kids for taking them on it.
Gliding wedge versus braking wedge
Look this instructor training video:
This is a gliding wedge turn, and this is what we teach beginners. The big points are:
The skier is standing up tall
The skis are almost flat on the snow; there is very little edge angle
The skis are mostly turned by twisting the feet.
The turns are slow and progressive
The wedge – or “pizza” – is small. I’m looking for what we call a “functional wedge” – it’s big enough that the skier is able to effectively make turns but not bigger.
The wedge is initiated by turning the feet.
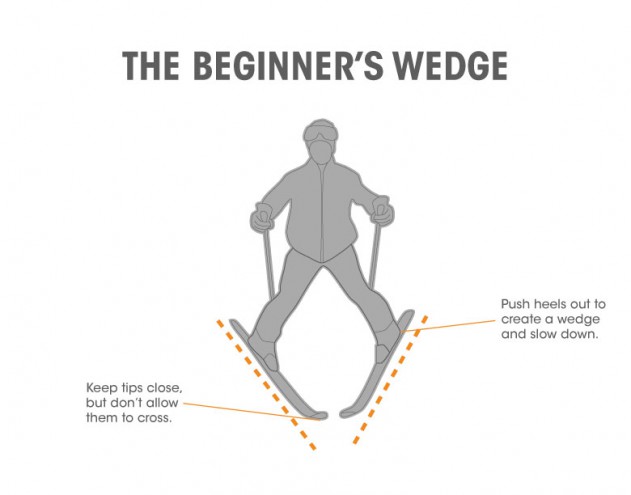
Here’s what we used to teach in the old days. It’s what I would call a “snow plow” or “braking wedge”.
In this wedge, the heels are pushed far apart and this shifts the skier’s weight backwards. Note that the skis are not flat; they have significant edge angle.
The problem with this approach is that when we try to move towards parallel skiing, we run into a problem. On a turn, we can’t get the inside ski parallel with the outside ski because it’s on the opposite edge. This is especially pronounced on steeper slopes, and exactly what we see on skiers that have been skiing wedge turns on slopes that are too hard for them.
This is a great diagnostic to determine whether the terrain is okay for your child. If they are in a gliding wedge and their wedge is small, they are fine; they will naturally progress toward a more parallel turn over time.
If you take them somewhere harder and they flip over to a braking wedge, that means you should move back to an easier slope.
If your kids are skiing trails or other adventure terrain, you may see a braking wedge pop up now and then. That’s okay if they’re using it to slow down, but if it persists and especially if it shows up back on the groomed, head for easier terrain. You also might see it pop up in lift lines, and that’s okay as well.
If we don’t use a braking wedge to slow down, we need another technique, and that is “turn to stop”. It will generally take a bit of reinforcement to get that to always happen.
Turn shape
Our goal is for skiers to develop nice big “S shaped” turns, but many young kids will ski partial turns – just into and out of the fall line. The bigger slower turns will really help with technique.
The best way to do this is to ask them to ski in your tracks – do “follow the leader” – as you ski the kinds of turns you want to see.
A sample beginning progression
There is no one single progression that people use to learn to ski, but this is a common one:
Walk around a flat area in ski boots
Walk around a flat area with one ski on. Circles are good, figure 8s are good.
The same with the other ski on.
The same with both skis on.
Make sure to spend enough time on this; skipping ahead to a later step before the child is ready for it will just slow down their overall progression.
Straight run on skis on the flattest slope that allows them to slide, preferably one with an upslope or flat part so they can just come to a stop. Walk back up to the starting point.
Maybe introduce a small gliding wedge and see if they can turn.
After this, most kids are usually ready for the magic carpet if your ski area has one. Have them watch other people riding, tell them they will just need to shuffle forward, stand still while it’s taking them up, and then shuffle off at the top and wait for you.
For the first time, pick the absolutely easiest way down. This is typically off to the side to a flatter slope and then that flatter slope down.
This is where we start working on turning; the coaching that I like is to twist their feet and point them in the direction they want to turn. Some kids like the idea of having flashlights on their knees (or lasers) that point where they want to go, some kids respond well to you being on the snow and coaching them to come to you. You will not get linked turns at the beginning – at this point, *any* turns are great, and turns to a stop are extra great.
Note that those first runs are new and different and can produce a fair bit of apprehension, so don’t expect much performance until they get used to doing it.
It’s hard to spend too much time in this environment; your endpoint is looking for linked turns in control.
Pro tip: take off your skis and just walk around in your ski boots. Some instructors just wear their snow boots during this phase as they’re more comfortable than ski boots.
Other sports & skiing
Sports in general are good training for skiing. The one sport that transfers the best to skiing is skating with either inline skates or ice skates, as the turning technique is similar.
Clothing
Good clothes really help, but choose something appropriate for the weather of the day. My students are much more likely to be too hot than too cold, so stuff that can unzip is good. And no hats under their helmets.
Leashes
Leashes are a way for parents to take their children to places that they don’t have the skills to ski on by themselves. I do not recommend them. I also don’t recommend skiing with children between your skis; it’s not good from a skills perspective and it’s easy to get hurt if one of you falls.
Those posts are targeted at intermediates who want to improve their technique, and improvement there is generally fairly straightforward; fixing the stance and the path works pretty well.
Carving is an advanced skill, and that means it’s probably going to take more work on your part to get there, more time, and a fair bit of introspection about your skiing.
What is carving?
The definition of carving is pretty simple; it is skiing in a way that the skis leave two distinct tracks in the snow, like this
The skis are placed on an edge and the skis carve two parallel tracks in the snow. This happens because of the sidecut of the ski; the front and tail of the ski are wider and therefore touch first when the ski is on edge; put pressure on the middle of the ski and it bends into a curve, and that is what generates the curved path. Less angle and pressure; big radius – more angle and pressure; tighter turn. Different ski designs have different sidecuts and therefore give different turns; you can look at the radius.
Many people extol carved turns as the goal to be a “real” skier, but the reality is that carving is just one technique, one way of turning. At the opposite end of the spectrum are skidded or rotary turns, which are done with very low edge angles and twisting motions.
Both are useful techniques; as much as I like carving there are many situations where I ski blended turns (part carve, part rotary) and some situations where I ski turns that are mostly rotary (off piste, for me).
Zones of Carve and Meh
Looking the top part of this diagram, we have the zone of carve.
Look carefully at the diagram, especially at what we call “ski lead” – where the ski tips are in relation to each other in the zone of carve. The outside ski is farther back than the inside ski, and it is also more heavily weighted with the weight on biased towards the front. As the turn comes off the hill, the uphill skill is naturally in front and that knee is bent.
Getting to this point is the first step for the aspiring carver. In my examples post, the fan progression exercise is a great way to focus on this, to understand the feeling of just letting the skis run and turn at whatever rate they want to turn. Note that the fan progression is a bit antisocial as it takes a lot of width and you are skiing in a way that other people don’t expect, so make sure to look uphill and don’t do it on a crowded slope.
I also like my diagonal sideslip exercise, which allows you to play around with different stances and understand how to get the one you want.
In between the zone of carve and the zone of meh, we have the transition from one turn to the other. Notice how the ski lead at the end of one turn continues into the the start (or top) of the next turn.
Why “Meh”? Well, because what we would like to see here is effective turning, but what we really see here is a lot of meh that continues until we are back at the fall line, at which point the skis and skier are in a state where they can effectively carve. Two things are common to see here; the first is that the skier is using rotary turning to get the skis turned so they are down the fall line, and it’s also common to see a transition that takes a *long* time.
It’s a little like what we see in the Z turns I talked about before, though a much less extreme version of that motion.
Why is there no carving here? It’s pretty simple; in the carve zone, I said that the outside ski was farther back and the front of it was weighted. In the meh zone, the new outside ski is out in front and that makes it impossible to have the front weighted. It also typically means that the weight hasn’t shifted to the new outside ski – the old outside ski still has most of the weight. So you just meh along until that change happens and you can get the pressure where you want.
Another way to look at this is that the zone of meh is a very long transition zone from one turn to the next.
If you ski this way, you may be unhappy with your speed control as the meh zone isn’t doing much to control your speed and you only generate decent edge angles at the end of the turn.
Effective Carving
The difference in this diagram is all at the transition. We go from the end of the turn where we have the old outside ski behind and more weighted to the start of the new turn where the *new* outside ski is behind and more weighted, and this happens fairly quickly. That allows us to immediately start carving on that new outside ski before the fall line and to have a higher edge angle by the time we get to the fall line. That gets out speed control that is more spread out.
The first thing required to get out of the zone of meh is to get the ski lead change done early in the transition, before you are curving down to the point down the fall line.
If you look at this PSIA medium carved turns video, you can see the ski lead change happening early in the transition. That’s what we are searching for.
Inside Ski Blocking
There’s a second issue in the meh zone that I call inside ski blocking.
At the turn finish, we have a mostly straight downhill leg and an uphill leg that is bent because it is higher up the slope. That is a good thing – that arrangement is what gives the edging that we use to carve the bottom part of the turn.
But that’s not the position we want for the new turn; to be on our edges early – before the fall line – we will need to rotate our skis so that we are on the opposite edge. The *downhill* edge.
That is the only way to get the skis carving through that portion of the turn.
The downhill (new inside) ski presents a problem; it has a strong edge in the snow and we need to get rid of that edge and move to the new one.
The first thing we are doing at turn initiation is straightening out the upper leg to get pressure on the ski. That reduces the pressure on the lower ski and that naturally leads to the body rotating downhill (the green arrow). However, that’s generally not enough to move the body downhill quickly enough, so we add in a movement where we actively move the downhill knee down the hill. That will pull the center of gravity downhill and put the body into the desired position.
Go back to the video and look at the turn that starts at about 1:44 in the video, focusing on the knees. Note how the downhill knee crosses over from being on the uphill side of that ski to the downhill side of that ski as part of the transition.
Oversteering
There’s one more technique to use to get on the new edges that I call oversteering (there may be a real name that I’m not aware of).
Here’s a top view of our current approach shown looking down from above.
At the end of our turn our head and body is balanced over the uphill ski so that we can have both skis on edge. Then to release that edge and get on the other edge, we shift the inside knee and therefore the whole body – including the center of gravity below the downhill ski. This works well, but that’s a fair bit of mass and it takes a little time to get that done.
Our goal is to get the center of gravity below the skis. It certainly works to move the body downhill, but we can also move the skis *uphill*. And because our skis and legs are a lot lighter than our body, this can happen faster than moving the body downhill – especially if we do both.
There is a downside. If the skis get too far up the hill or too far in front of us, we won’t be able to “catch” them on the new edges and we will simply fall over.
Turn radius
The turn radius that you choose has a big effect on technique. If you are doing big long-radius turns, you can do them without a whole lot of movement; you don’t need big changes in ski lead and therefore you probably don’t need knee initiation. You can do most of it just with ankles.
Medium radius is going to require more activity on both ski lead and the knees to get the transition to happen quickly enough.
Short radius turns use pretty much the same technique as medium radius ones but can definitely benefit from a little bit of oversteer (or overedge) as that will really pop the skis across into the new turn. When you fall down, you’ll know that you went too far.
Exercises
I really like the one-ski lift the tail exercise I describe in the other write-up. Get into a traverse, lift the tail of the new inside ski 3” off the snow, and then just let your body move downhill and into the turn. The reason this one works so well is that to get the tail of the inside ski up you must have weight on front of the new outside ski or it doesn’t work. Do this on an intermediate slope where you are comfortable; it is going to take time to get used to a turn initiation that is much less active than the one you are used to.
If you have trouble with the position, go back and do the forward sideslip exercise. One more thing to check is your ski spacing; if you ski with your skis very close together you can’t get the angles you want because your knees will bump into each other. Note the ski spacing of the yellow skier in the video.
Focus on what I would call “big swoopy turns”; you should be nearly across the fall line at the end of each turn. This is sometimes called “skiing the slow line fast”; you are taking a path that is much longer and therefore looks slower but because you are carving you are carrying a lot of speed.
I’m feeling sorry for the Video Only couple. It’s not because of their obsession with video equipment, though perhaps a pastime such as golf or trainspotting would lead to a more balanced view of the world.
I see no justification of them to be stuck with the sisyphusian task of determining the optimal commercial establishment to procure new video equipment over and over again; one cannot help but compare their predicament with that of Phil Conners (so ably portrayed by Bill Murray) in Groundhog day, but despite the forced repetition of the same day, the aforementioned Conners was still able to achieve real character growth despite the obvious constraints of his situation.
Jane and Doug – as I have taken to calling the couple – are destined to be eternally dissatisfied with their current equipment in their endless task of keeping up with their neighbors, endlessly researching prices on the internet and at other retailers, only to ultimately discover the advantages of Video Only. We follow their voyage of discovery, wondering if they will achieve their goal despite the obstacles in the way, and finally cheering their success, while still knowing in our hearts that their victory is Pyrrhic and confers no lasting benefit.
A while back I did a post – and a video – about the Fade animation system that I had built. It runs on an ESP32 and support both PWM and WS2812 LEDs.
One of my commenters asked me whether it would be possible to use that system to drive servos for an art project – 40 servos if I recall correctly.
My response was twofold…
First, servos support should be easy
Second, the ESP32 only has 16 PWM channels, so supporting 16 channels would be easy but it would be harder to go farther.
So the answer was no. But it got me thinking…
Adding servo support was a bit of a pain – see Servos Suck for why I was wrong – but I got it working, at least working well enough. And I added support to the Fade Simulator for servos, so you can graphically see where the servos are pointed.
More channels was a bit more fun. Basically, what I needed was a way for the system to have both local – on chip – device support (ie PWM or WS2812) and remote (to another system) device support. Nicely, the same architecture that lets the system support both PWM and addressable LEDs can let the system support a network device. So I added an Udp led device that takes a number of channels of animation and sends them out over the network. Then there’s a network reader that runs on the second device to pull the animation data off the network and use it to drive the local devices.
This worked pretty well, and I ended up with a new feature for WinFade; you can run the Fade code on your windows machine and use it to drive your actual hardware over the network. This makes development quicker; I don’t even need to download the changes to the ESP32 to test them out.
So that all was great, but I needed a demo.
And I came up with a bit of a stupid idea.
I grew up in the 1970s and 1980s, and since there wasn’t a ton to do we would watch bad TV at time, including Knight Rider.
In that period, anything that used LEDs was by definition cool, and KITT – the car in Knight rider – had a bunch of them, including a Larson Scanner on the front that bounced back and forth.
In the 1970s we were easily impressed. As Douglass Adams wrote in Hitchhiker’s:
“Far out in the uncharted backwaters of the unfashionable end of the western spiral arm of the Galaxy lies a small unregarded yellow sun. Orbiting this at a distance of roughly ninety-two million miles is an utterly insignificant little blue green planet whose ape-descended life forms are so amazingly primitive that they still think digital watches are a pretty neat idea.”
Building your own Larson Scanner was a cool accomplishment in the 1980s, so of course I had built one before. Fade supports them with just a few lines of code. But I did some searching and found out – based on a very cursory search – that nobody had build a physical Larson Scanner, presumably because it was a dumb idea without much utility.
A bit of time in Fusion 360, and I had a design. The box is made of laser-cut 3mm plywood, and the balls are ping-pong balls. Not surprisingly, the first version wasn’t quite right, but the second version was fine. I painted one side of the balls red and the other side black.
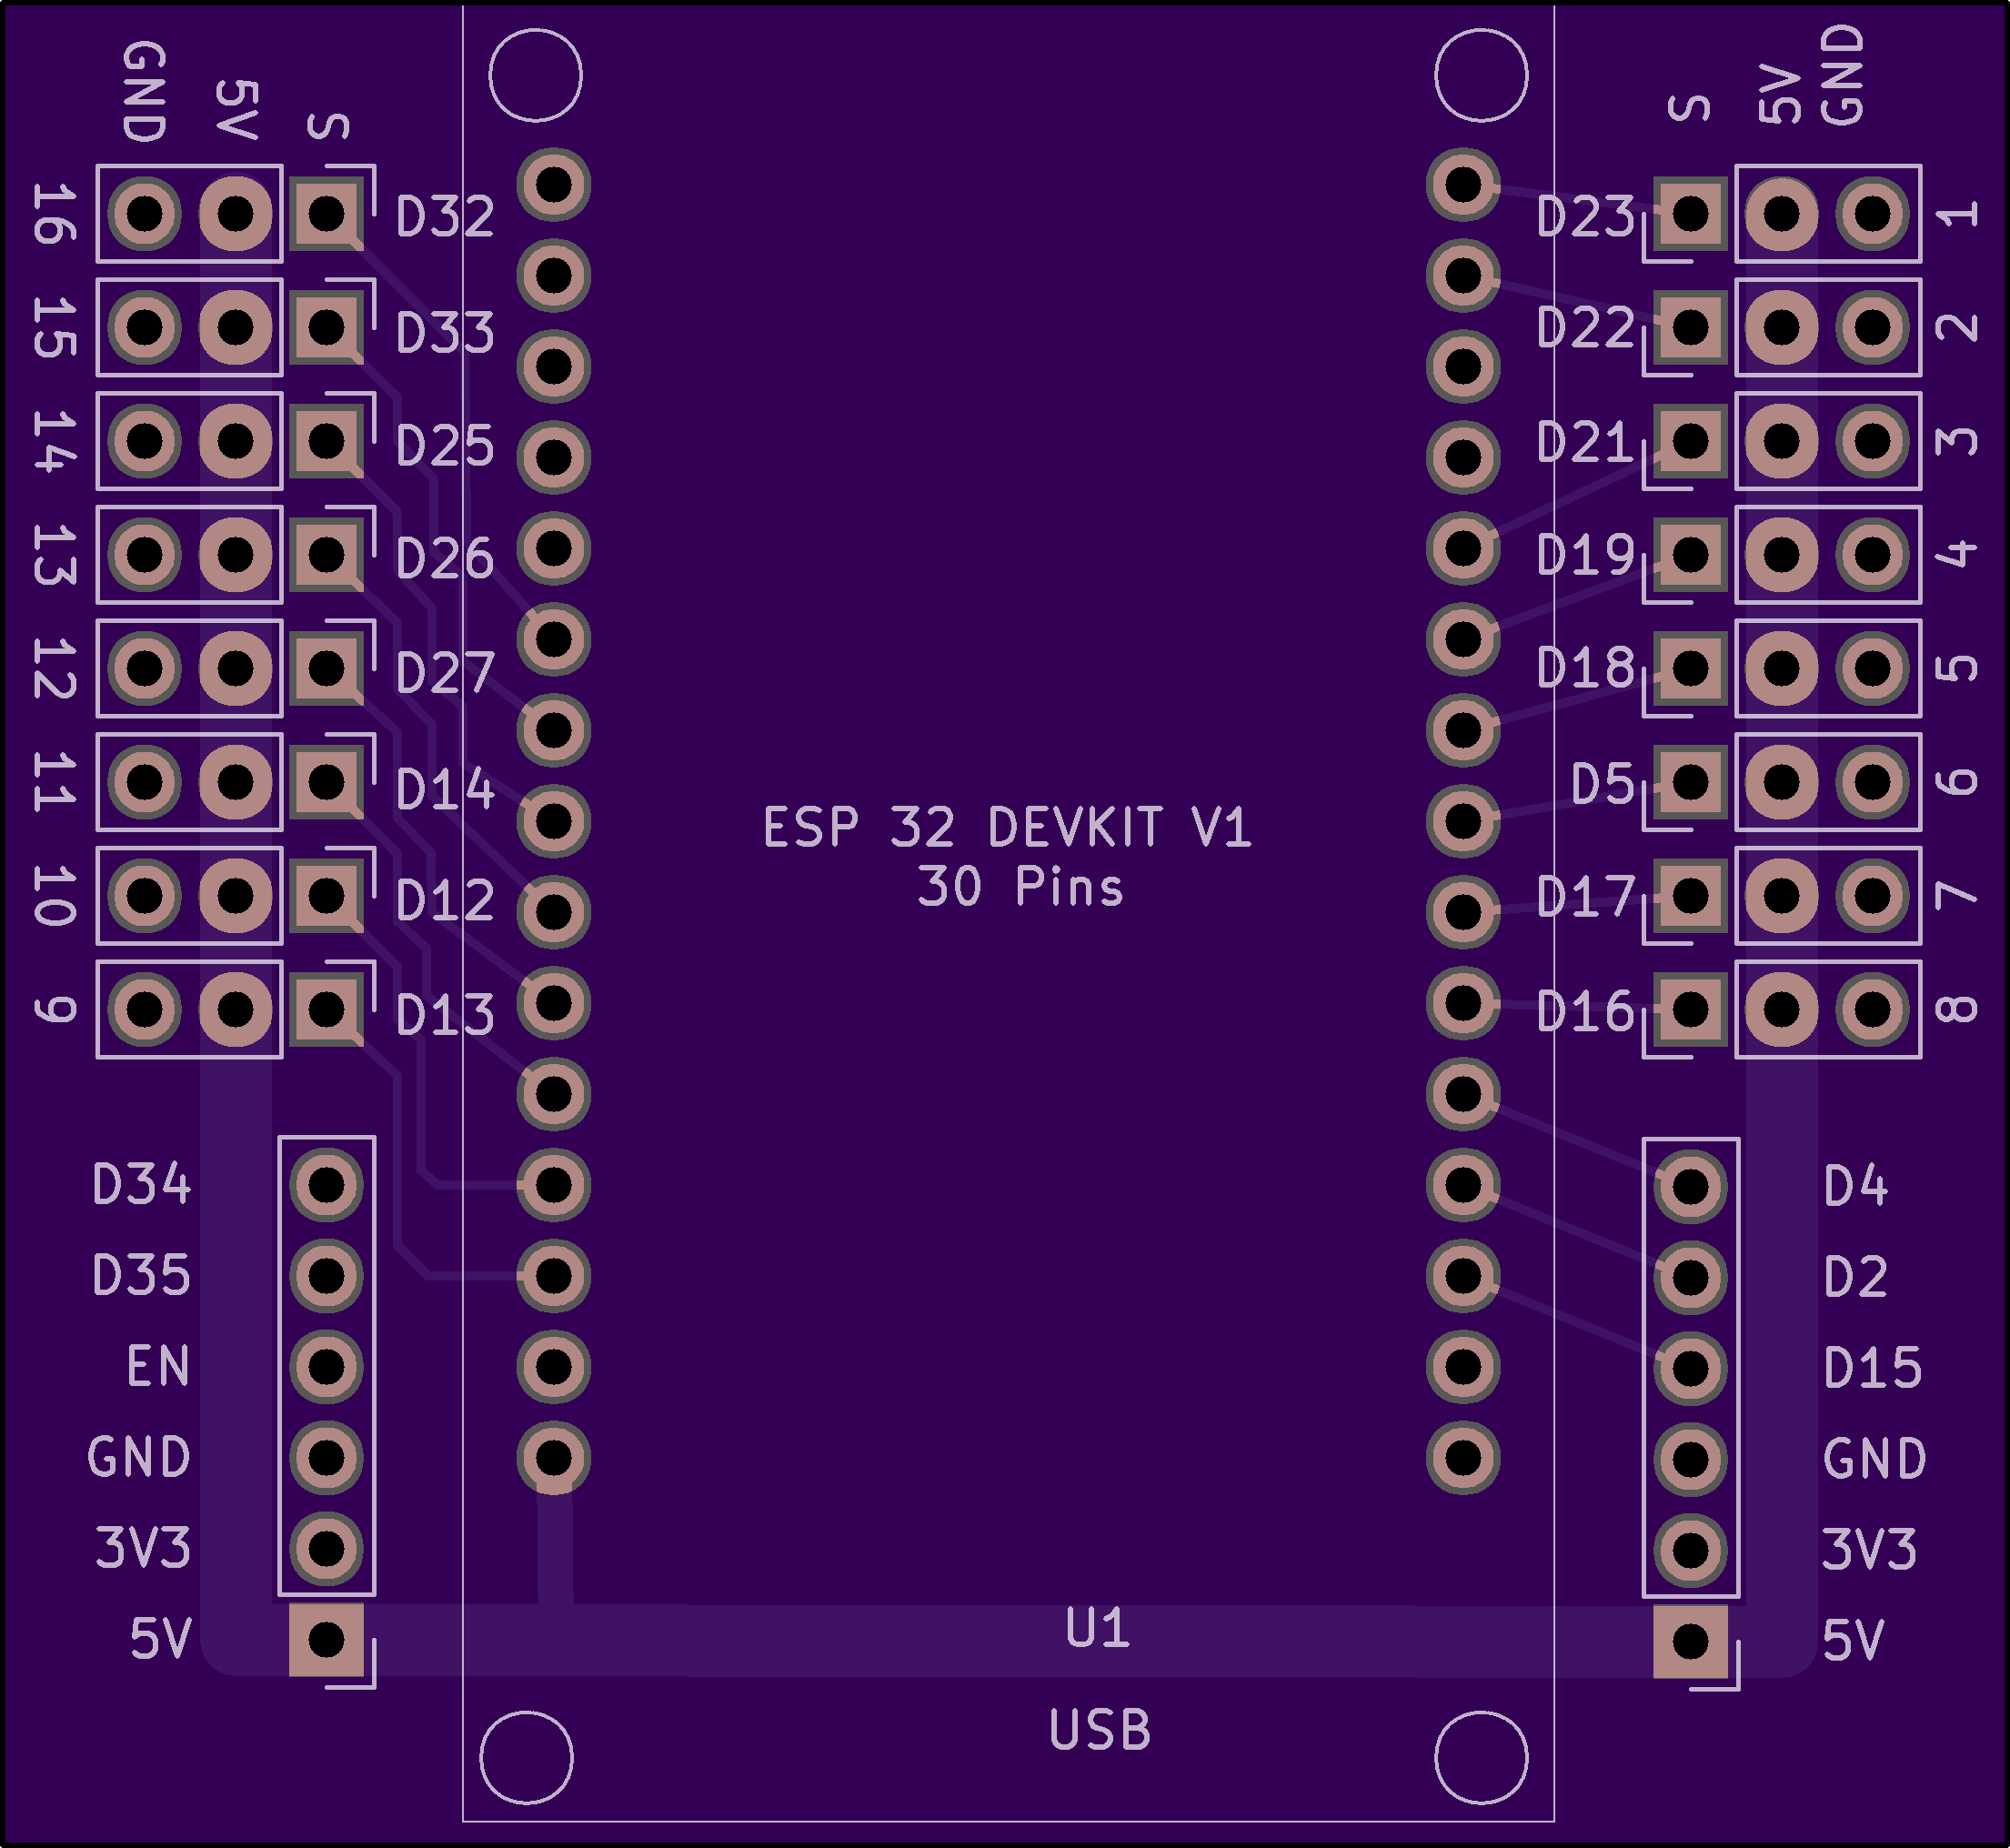
Hiding in back is the ESP32 board that connects to the 16-channel servo breakout board that I built.
In addition to the 16 servo connections, the rest of what I think are the useful pins are also brought out to headers.
If you are interested in this board, ping me and I’ll put it on my Tindie store.
I’m working on a project that was envisioned to use up to 32 servos, and therefore a bought a bunch of cheap servos off of AliExpress for the prototype (there may be no production-type…). They were the infamous “Tower Pro SG90 9g” servo:
Which sounded like what I wanted for my application, and they were cheap – also what I wanted – so I ordered 40 of them and waited for them to show up. Which they did in about 3 weeks, which was a bit surprising given the currently supply chain issues. While I wait, I do some coding.
I’m driving them using my Fade Animation System – one of the points of the project it to add servo support. To write that support, I read a few articles on servos and they all had an picture like this:
You can get what you want from a PWM subsystem if it’s a good one, and I’m running on the ESP32, so it’s a very good one.
It set up the PWM so that it runs at 50 Hz and 14 bits of resolution, so I get 0-16383 as my full counts. A little math tells me that 1 ms / 20 ms is 5% or 819, and 2 ms is 10%, or 1638. I code that up, look at the output on my scope, and it works as expected – I get nice 1ms and 2ms pulses at the extremes. And it works on my test servos – they nimbly go back and forth.
Along the way, I designed a little servo connector board:
The ESP32 has 16 PWM outputs so it will support 16 servos, and I had no desire to wire them together by hand.
When my big shipment of servos show up, I plug one in, write some code – in the Fade Language – and hook up a servo. My 180 degree servo works, very nicely going back and forth. For 90 degrees. I tested my code, played around with a few things, did some more extensive reading, and had my first insight.
The little 1ms – 2ms chart is just plain wrong. If you vary your pulse width from 1ms to 2ms, you will get servo movement, and it will probably be around 90 degrees, but there’s no actual standard. If you want to explore how far your servo will actually move, you will need pulses that are shorter than 1ms and longer than 2ms. How short and how long? That must be established experimentally – the counts that work on my SG90 servos are 350 and 2150 – that seems to give me full movement without a dead zone. It’s not assured that it will even be symmetrical at both ends of the scale.
I had to change the Fade servo support to allow the code to specify these two limit values. It turns out that was a good thing as there is no defined direction for servos as well; big width might mean clockwise or it might mean counter-clockwise. Neat.
That didn’t take long to figure out and the code was pretty simple to fix, but there was something else I discovered is true, at least for these servos…
180 degrees isn’t 180 degrees. The physical range of the servo is about 200 degrees, but when you drive it, 160 degrees is all that you get. Or all that I get with that specific servo, or likely this servo batch – some people say their Tower Pro SG90 servos go a full 180 degrees and others say they only go to 160 degrees the way that I do. I’m going to put that down to poor manufacturing tolerances in the electronics, but it could be that there are multiple factories assembling these things and they use slightly different parts.
There are digital servos that apparently are much better behaved. They not surprisingly cost a lot more.
There’s a nice article here that goes into most of this.
Certainly a surprise given the recent 90+ weather and the forest fire smoke that had the air quality hovering between “moderate” and “unhealthy” for a few days and generated a number of the red and orange sunsets that are so beloved in science fiction.
I have in the past asserted that a good cyclist should always have their excuses ready ahead of time, lest the urgent need for one catch them off guard, but this year things were very clear.
I simply did not have the legs to do the whole route of Sufferin’ Summits.
Over the past year, ongoing issues with my ischial tuberosities and an unexpected and as of yet unexplained interest in running resulted in an uncharacteristic dearth in riding, and especially, in climbing. During previous years, many weekends would find me hauling my bike and body up any conveniently situated hill and therefore build a decent set of legs, but that did not happen for the aforementioned reasons, and therefore my stated plan was to climb 2 – maybe 3 – hills, and call it a day. Seemed like a reasonable plan given the expected temperature and air quality, but to find it cool and crisp – and probably the best conditions for Sufferin’ Summits ever – was a bit disappointing.
But, as noted Stoic philosopher Marcus Aurelius said, “Crura si infirmus colles diutius”, which roughly translates to “If the legs are not strong, the hills are too long”.
Actually, I’m paraphrasing a bit, what he really said was:
If you are pained by any external thing, it is not this thing that disturbs you, but your own judgment about it. And it is in your power to wipe out this judgment now.
Sage advice indeed, though it might be fair to point out that if you are in charge of the entire Roman Empire, you might perhaps be insulated a bit more from external pain than others.
Anyway, our small group – small presumably because of the forecast for heat and smoke – headed out to climb Grand Ridge. This is one of my favorite climbs, and as usual, it did not disappoint, except that it was still a bit smoky on top and we could see the theoretical view of Bellevue, Mercer Island, Seattle, and the Olympics. And unfortunately all the houses they’ve built have gotten in the way of the views.
On the way down, we lost two group members to a broken spoken on a descent – thankfully without an accident – so we re-crossed Issaquah and started up Squak Mountain. There are two basic ways to get up Squak, and this is the more painful of the two ways, but we eventually finished the lower section, made our way above “house line” on the climb, and then finally topped out in the development in the top. Squak is unique in that it has no view to speak of from the top. We descended back down, and I decided that I had a third hill in my legs.
We head over to Talus, a development stuck into the eastern flank of Cougar mountain. The main entrance has a nice climb up that we don’t take because there is a far worse way up to the north. It’s painfully steep at the start – 18-20% – and then the main part is 15% and only about a lane wide. Halfway you need to stop, unclip before you fall over, go around a gate, and then try to start and clip in again before you fall over. After you top out on that road, there’s a little paved connector between two parts of the development that’s easily over 20%, and then a steady 10% climb up to the top.
Exactly the sort of climb that I was looking for when I created the route, and it has the nice bonus that nobody knows about it.
After the top there, we work our way south. In previous years, we would climb a short steep section and hit the end of the road, but there’s a new development at that top and that yields another 250’ of up, all of it painful. That makes me happy – Talus was a big of a young brother compared to the bigger climbs next to it, but with that addition at top I think it holds its own.
And… After a quick descent and a nice spin back, I was done for the morning. Which felt really, really weird; it’s strange to start on a course that I know so well and then just stop after three hills. This reminds me a bit of climbing Hurricane Ridge out of Port Angeles; you spend 2 hours climbing, half an hour down, and then you are back at the starting point and it’s only 9:30 AM.
As for stats, I did 2733’ of climbing in 19.26 miles, for an average gradient of 142’ per mile and an average speed of 10.6 mph.
Here’s a fun little profile that I got from VeloViewer.
I’ve been building animated holiday decoration for over 20 years (playlist of videos here), and written a lot of animation code. As a (now former) software developer, I came up with a couple of different methods of expressing the animation.
None of them were very good.
I used a table-based approach – where the code just encoded every state change along with how long to pause between them. It was simple, easy to author, but didn’t handle dimming very well and wasn’t well suited for multicolor decorations.
I wrote a lot of custom code. That of course had a lot of expressiveness – you can write whatever you want – but it’s pretty clunky. Write the code, compile it, download it to your system, run it, take notes about how it’s working. Repeat until you get tired.
In either case, once it gets deployed out in the yard it’s more painful to make changes. Open the enclosure, take out the controller board, go back inside to the office, download new code, take it back outside, etc.
Then I started using ESP8266 microcontrollers. They’re pretty capable and they can host a web server. I wrote a system where the animation was custom code and it could also be driven over the network by a desktop or laptop. That worked pretty well, but I still had to bring the hardware inside to reprogram it.
Then I started using the ESP32, which is cheap, has great features for animations (16 channels of PWM, all done in hardware, plus addressable LED support, plus a ton of other things), is dual core, runs fast, and has a lot of memory. It *is* possible to update code over the WiFi link, so you can do it remotely. But that still left me writing in C++ and dealing with a slow development cycle.
So, I decided to build a language that ultimately ended up being called “Fade”. I actually built it twice; the first version worked but the parsing approach was decidedly inelegant. It now features a nice recursive-descent parser.
The current system hosts a very simple web-based IDE that displays the current code on the microcontroller. Make changes, hit send, and the new code is shipped over to the ESP32 which reboots and starts executing. It’s much, much faster and I did a nice 16-channel skiing penguins display with it. I could tweak the code using my laptop in the garage, download it, and just walk outside and see how it was working.
But… there was still a problem. The web-based IDE wasn’t great, and I didn’t have a great way to get the code saved and into version control. If the microcontroller died I’d have to rewrite it.
That got me thinking, and I wrote WinFade, a Fade authoring environment that runs on Windows. It has a nicer editor with primitive intellisense and can save the code away in files for version control and later use. Write your code, download it to the ESP32.
The cooler part is that WinFace hosts the same animation code that runs on the microcontroller, so that you can test the animations that you write in the IDE before you ship it down to the microcontroller. And that’s both faster and easier.
It supports strips, rings, matrices, and custom arrangements of LEDs, so you can get the physical layout that you actually use in your project.
It even supports custom LED arrangements, so you can use it for projects like my RGB Snowflakes:
User Interaction
Fade supports some user input. The ESP32 has built-in support for touch buttons, and those can be used from the Fade Language. It also supports traditional touch buttons. The buttons can also be controlled remotely by hitting a specific URL on the microcontroller; this allows for both local and remote support.