In February of 2024 we took a trip to Korea and Japan. We spent time in Seoul and in Tokyo, and between that time we skied at Shiga Kogen. This was a “visit Korea and Japan and ski” trip, not a “visit Japan *to ski* trip”. If it was the latter, we may have made different choices. Note that the exchange rate is $1 US to 150 Yen which is *great* for those of us in the US, but you’ll want to see what it is when you plan a trip.
Nagano has two separate sets of ski areas; to the west of the city is the Hakuba there is Hakuba Valley, which is an association of 10 different ski resorts. Vail has an agreement with Hakuba Valley so you can ski there for 5 days free with an Epic pass.
To the Northeast of Nagano is Shiga Kogen, which is an association of 18 different ski resorts. They have combined passes that allow you ski any of the properties.
Note that “resort” is not indicative of the size of each area.
Getting There
While it may be possible to fly directly to Nogano, we flew to Tokyo. On the way there, we took the Shinkansen – otherwise known as the bullet train – from Tokyo to Nogano. The ticket cost $78 and the trains are comfortable, smooth, and fast. It’s about 110 miles and the total time is 1:24, so you average about 80 mph for the trip.
Note that the Shinkansen has special rules for oversized luggage, so if you bring your skis you’ll want to reserve an oversized luggage seat (at the back of the car).
Once you get to Nogano, it’s bus time. You’ll spend another 60-80 minutes to get to your hotel.
Another option is to take a bus directly from Tokyo to your hotel. This will take longer but it will be easier to deal with your skis. We came back on the bus and the trip was fine. We used Nagano Snow Shuttle for both bus trips.
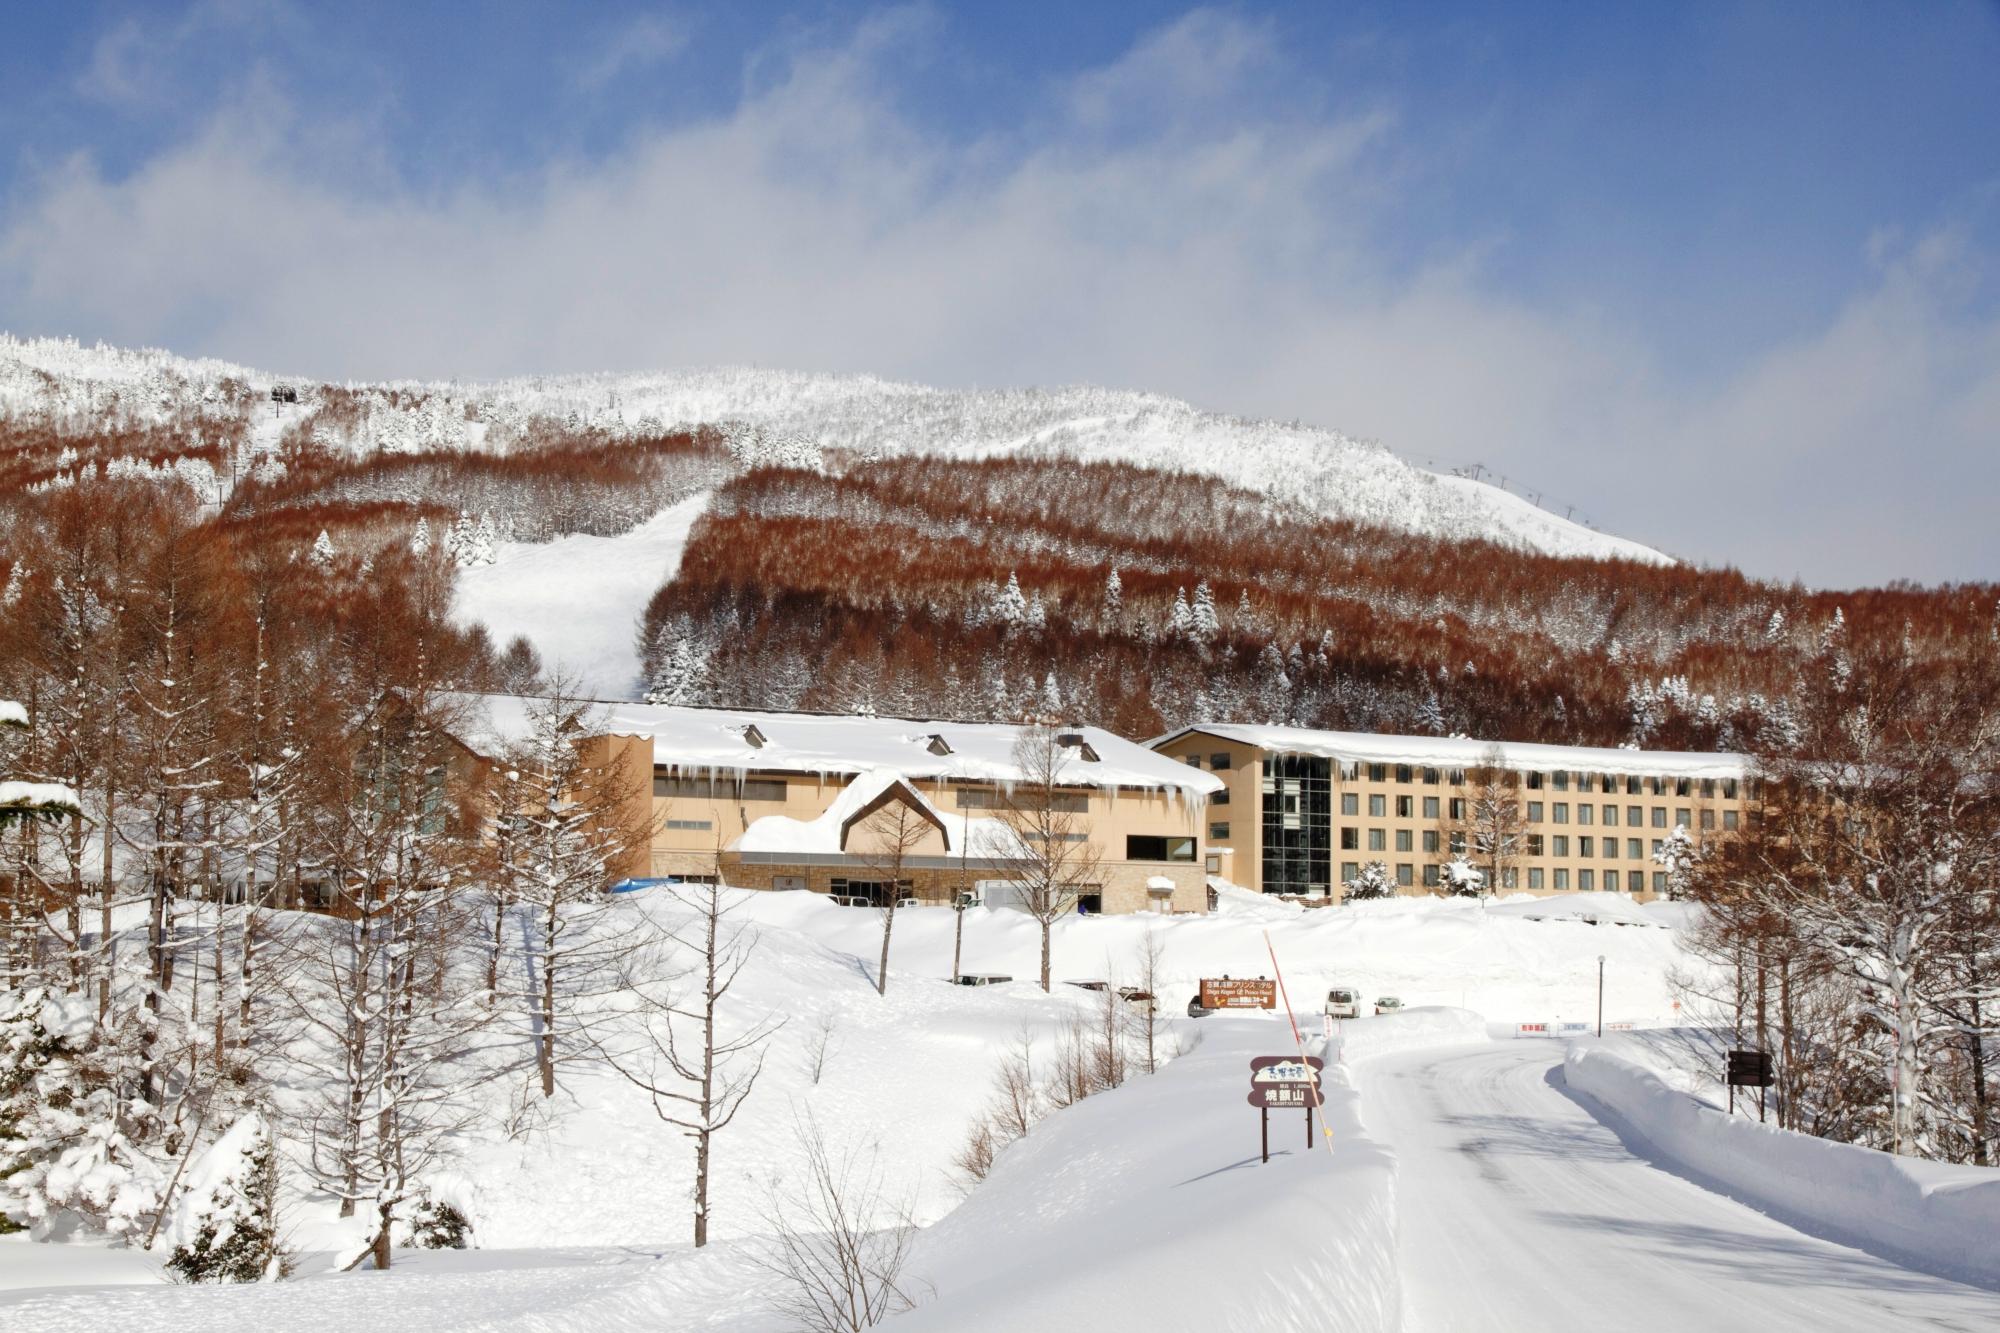
We stayed at the Prince Hotel West in Yakebitaiyama. Ski in/ski out, restaurants, ski rental, etc. It’s a bit rustic but decent.
Shiga Kogen Mountains
One of the neat things about Shiga Kogen is that 14 of the ski areas are contiguous, meaning that you can ski from one area to the rest. They do offer shuttle buses between the areas and to the other 4 areas that form another cluster off of the map to the right.
For the 1998, Shiga Kogen hosted a number of events.
Mount Higashidate hosted the alpine giant slalom events.
Mount Yakebitai hosted the alpine slalom and snowboard giant slalom.
You will find the olympic courses on the trail maps for both mountains if you want to ski them.
As a ski instructor who loves to teach kids, I think ski lessons are a great place for kids to learn to ski or improve their skills.
But perhaps lessons aren’t accessible to your family, or maybe you’re wondering what to do when you ski with your child outside of lessons.
That’s the point of this post. If you’ve read my other posts aimed at adults, you’ll find that what I talk about here is very different, and that’s because kids – especially young kids – are very different in how they learn than adults. Spending time on anything beyond basic verbal descriptions is largely a waste of time.
I’ll state up front that there are different philosophies on ski instruction. I largely align with the current approach used by PSIA, but other instructors feel differently, and there are different ways to reach the same goal.
Safety –> Fun –> Learning
My three priorities when teaching anybody are safety first, then fun, and finally learning.
The fun part is especially important – the last thing that skiing parents want is a kid who can ski but hates to do it.
And some days, fun means taking 20 minutes to stop by the side of a run and play in the snow.
Slope selection
What we are looking for is a slope that keeps the child interested at their current level of skill *and* allows them to ski with appropriate technique.
The number 1 issue I see with parents and their kids is improper terrain selection, and it is virtually always slopes that are too steep. This has two different results:
In some skiers, it results in high levels of anxiety, and the child melts down and/or skis very slowly. They are not having fun.
In other skiers, they develop a “super-wedge” technique that I’ll talk about later. It gets them down the hill – though often too fast and with little control – but it’s a dead-end when it comes to technique, and it’s challenging to get that skier back on a progression to parallel skiing.
Drills, coaching, and mileage
When I learned to ski as an adult, we did a lot of drills in our lessons. And as a ski instructor, we do a lot of drills in our training.
Specific drills definitely have their place, but they are boring (not fun) and kids don’t want to spend much time standing around listen to adults tell them what to do. They get a bunch of that already.
And until you get to older kids – say 9 years and older – they aren’t great at translating instruction into doing specific things with their bodies, so you can spend a lot of time talking without much benefit. This is also true with older kids and adults.
I definitely do drills in my classes, but I spend very little time talking. My agreement with my classes is that if they pay attention when I am talking we will spend most of our time skiing.
I spend a fair bit of time coaching, which is 1:1 feedback with a specific skier about what I would like to do. Proper coaching is *one thing* that I want them to keep in mind – “Steve, your skiing looks nice. Can you make wider turns that take longer instead of the short ones you are doing?”. And there might be a demo to show what I’m looking for.
Coaching does *not* consist of a list of things that I want them to do better on. I may see 5 things, but nobody can focus on 5 things, so I give them the one thing I think is most important.
If we are working on a drill, my comments focus only on what we are trying to do on the drill. It’s common for students to regress in some other area of their skiing when they are focusing on something new, and me commenting on that is not constructive.
Finally, mileage is just skiing. Everybody needs repetition to impress new ways of moving into their neuromuscular pathways, and that is what mileage does. If you do nothing else, just skiing with your kids on terrain that is appropriate and comfortable for them will yield large improvements in performance over time. And it’s fun.
Philosophically, my goal is to put students in a situation where they can try different things and have the chance to experience success in the form of more efficient movements. Drills let them try new things, coaching helps guide them in the proper direction, and mileage cements the new movements into their bodies.
Let the mountain do the teaching
In the ski instructor world there’s a term known as “terrain-based learning”, which means letting the mountain do the teaching.
Some ski areas have beginner areas that are specifically designed for this – their beginner areas have sections with banked turns that curve back and forth. Or they have sections with small bumps. Anything like this is great as they will move beginners towards the movements we want to see naturally, and its fun to ski on. Win/Win.
Trails
Most ski areas also have a variety of short little trails of varying difficulty. These are great assuming they are appropriate in difficulty for the skier. I can do a lot of drills working on balance with my kids, or I can let them ski short trails and they will quickly learn that a) leaning back does not work and b) balance is dynamic and constantly changing.
A few tips on trails:
The difficulty of trails varies drastically depending on snow quality. A trail that is fine for a experienced beginner with fresh snow may be difficult for a good intermediate with hard snow.
The majority of trails are never groomed.
Coach your kids to “pick a slow speed”, especially if it’s their first time on a trail.
If you ski trails with your kids – and it’s good for your skiing as well – note that most trails are made by kids with 3 foot skis and your longer skis may not fit well. Pick a good speed, and use the sides to scrub off speed.
Coach your kids to move off to the side if they need to stop, as following skiers may not be able to see ahead.
It is vitally important that kids yell “Whee!” when they are going through sections like this.
Bumps
It’s unlikely that your kids are ready for runs that are fully bumped out. But unless you tell them, kids don’t know that bumps are supposed to be hard, and you can often find short areas next to groomed runs with small bumps that you can play on. These, like trails, are great, and if they aren’t, it’s easy to ski back to the groomed run.
Adventures off the groomed
My classes spend a lot of times on “adventures”. For beginners, it might just be the terrain-based learning that my ski area builds or very short trails, but once they’re intermediates we will be spending time off the groomed if the snow is good enough. It’s important to ramp these up slowly – kids absolutely love to be off in the snow away from the groomers even if they have to work hard and fall down more, but they take a lot of effort physically, especially for less skilled skiers and they may get tired out. Choose paths that allow an early exit if it’s too hard for them for any reason, and you may need to ration the number of adventures you go on.
Pay real attention to where you are and what the options are. You will often have the opportunity to traverse back and forth and keep the slope low, much lower than it would be if you went straight down the hill.
Also note that sometimes you are going to make poor choices. If it turns into a big slog, apologize to the kids for taking them on it.
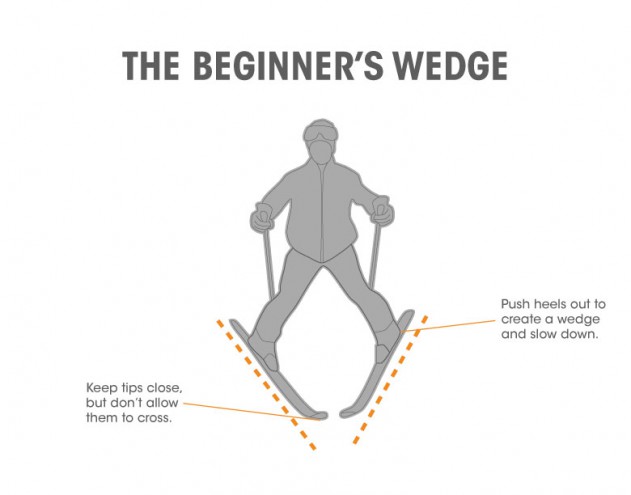
Gliding wedge versus braking wedge
Look this instructor training video:
This is a gliding wedge turn, and this is what we teach beginners. The big points are:
The skier is standing up tall
The skis are almost flat on the snow; there is very little edge angle
The skis are mostly turned by twisting the feet.
The turns are slow and progressive
The wedge – or “pizza” – is small. I’m looking for what we call a “functional wedge” – it’s big enough that the skier is able to effectively make turns but not bigger.
The wedge is initiated by turning the feet.
Here’s what we used to teach in the old days. It’s what I would call a “snow plow” or “braking wedge”.
In this wedge, the heels are pushed far apart and this shifts the skier’s weight backwards. Note that the skis are not flat; they have significant edge angle.
The problem with this approach is that when we try to move towards parallel skiing, we run into a problem. On a turn, we can’t get the inside ski parallel with the outside ski because it’s on the opposite edge. This is especially pronounced on steeper slopes, and exactly what we see on skiers that have been skiing wedge turns on slopes that are too hard for them.
This is a great diagnostic to determine whether the terrain is okay for your child. If they are in a gliding wedge and their wedge is small, they are fine; they will naturally progress toward a more parallel turn over time.
If you take them somewhere harder and they flip over to a braking wedge, that means you should move back to an easier slope.
If your kids are skiing trails or other adventure terrain, you may see a braking wedge pop up now and then. That’s okay if they’re using it to slow down, but if it persists and especially if it shows up back on the groomed, head for easier terrain. You also might see it pop up in lift lines, and that’s okay as well.
If we don’t use a braking wedge to slow down, we need another technique, and that is “turn to stop”. It will generally take a bit of reinforcement to get that to always happen.
Turn shape
Our goal is for skiers to develop nice big “S shaped” turns, but many young kids will ski partial turns – just into and out of the fall line. The bigger slower turns will really help with technique.
The best way to do this is to ask them to ski in your tracks – do “follow the leader” – as you ski the kinds of turns you want to see.
A sample beginning progression
There is no one single progression that people use to learn to ski, but this is a common one:
Walk around a flat area in ski boots
Walk around a flat area with one ski on. Circles are good, figure 8s are good.
The same with the other ski on.
The same with both skis on.
Make sure to spend enough time on this; skipping ahead to a later step before the child is ready for it will just slow down their overall progression.
Straight run on skis on the flattest slope that allows them to slide, preferably one with an upslope or flat part so they can just come to a stop. Walk back up to the starting point.
Maybe introduce a small gliding wedge and see if they can turn.
After this, most kids are usually ready for the magic carpet if your ski area has one. Have them watch other people riding, tell them they will just need to shuffle forward, stand still while it’s taking them up, and then shuffle off at the top and wait for you.
For the first time, pick the absolutely easiest way down. This is typically off to the side to a flatter slope and then that flatter slope down.
This is where we start working on turning; the coaching that I like is to twist their feet and point them in the direction they want to turn. Some kids like the idea of having flashlights on their knees (or lasers) that point where they want to go, some kids respond well to you being on the snow and coaching them to come to you. You will not get linked turns at the beginning – at this point, *any* turns are great, and turns to a stop are extra great.
Note that those first runs are new and different and can produce a fair bit of apprehension, so don’t expect much performance until they get used to doing it.
It’s hard to spend too much time in this environment; your endpoint is looking for linked turns in control.
Pro tip: take off your skis and just walk around in your ski boots. Some instructors just wear their snow boots during this phase as they’re more comfortable than ski boots.
Other sports & skiing
Sports in general are good training for skiing. The one sport that transfers the best to skiing is skating with either inline skates or ice skates, as the turning technique is similar.
Clothing
Good clothes really help, but choose something appropriate for the weather of the day. My students are much more likely to be too hot than too cold, so stuff that can unzip is good. And no hats under their helmets.
Leashes
Leashes are a way for parents to take their children to places that they don’t have the skills to ski on by themselves. I do not recommend them. I also don’t recommend skiing with children between your skis; it’s not good from a skills perspective and it’s easy to get hurt if one of you falls.
This post collects the exercises that I generally recommend.
Sideslip
Find a moderate intermediate slope, and stop with your skis across it. Note that your ski edges up digging into the hill; that is what is stopping you from sliding sideways. Move your knees and ankles downhill until you start to slide sideways down the hill. It generally helps to stand evenly on both skis and keep your skis shoulder-width apart; if they get farther apart it’s much harder to do.
Once you have slide 10-20’, roll your knees and edges back into the hill to stop. Reverse and try it facing the other direction.
Repeat the stop part using a quicker roll and ending up with more of an edge.
What we are working towards is an angulated position.
In the inclined position, the center of mass of the body is a long way towards the inside of the turn. To get to the next turn, that body mass needs to be moved up, over the skis, and to the inside of the next turn. That takes quite a bit of time, and that’s generally the reason for a long transition between turns.
In angulation, the body is bent sideways at the waist, and most of the angle of the legs comes from that bend, with the upper body mostly upright. To go from one turn to the other just requires moving the legs to the other side, and that’s much faster.
Start by just leaning sideways against the wall, keeping your upper body straight. That is *inclination* or tilting. Now let your hips sag in but keep your legs straight. That is hip angulation. Finally, let your knees bend a bit and the curve will increase. That is hip and knee angulation.
There are two points of being angulated.
First, allows us to create significant edge angles. Second, it allows us to switch edge angles from one side to the other quickly because all we need to do is switch the legs; the upper body stays mostly where it is.
That angulated position is what we want to have when we stop in a sideslip. It’s also what we will want in a turn.
Fan Progression Carving Introduction
This exercise works towards getting the ski in a solid carving position and just letting the ski do all the work. Do the sideslip/angulation exercises so you understand the body position we are going for first.
On a medium intermediate slope, point your skis down the hill just enough that you start moving forward at a slow speed. As you gain speed, roll your knees and ankles into the hill; that will cause the skis to smoothly arc in a large turn until they turn up the hill and stop. Do not twist the skis to turn them; let the skis do all the work. If you are doing it right, you should see two distinct parallel tracks in the snow. Repeat to the other side.
Now for the progression part; repeat the exercise but start by pointing your skis closer to the fall line so you end up going a bit faster before you start the turn. When a given starting angle feels comfortable, you can point your skis closer to the fall line.
The goal of this exercise is to pay attention to what your skis are doing and how your body position affects what they are doing; if you want, you can play around with shifting your weight backwards, which will generally make it much harder to complete.
You can push all the way to starting straight down the fall line, but note that this may result in some fairly high speeds and it may take a long time to turn and come to a stop.
WARNING: Your path on this exercise is not a typical skier path, so it may surprise/confuse people coming down the slope. Pick a slope that isn’t busy and make sure to look uphill before you start.
There’s a good video here that shows what it should look like. Make sure to watch it full screen.
BTW, this introduction is the gateway to large radius carved turns, which use the same technique, except they involve a turn both into and out of the fall line.
One ski skiing
This is a stance diagnostic exercise that I use all the time myself.
Pick a comfortable intermediate slope and start making intermediate turns. At the transition between one turn and the next, pick up the tail of the new inside ski 3-4” in the air and hold it up during the turn. This is great at troubleshooting stance; if you cannot do it, it means you do not have enough ankle tightness/forward pressure in the outside ski.
My advice is to do the following progression:
Ski 10 turns doing this drill.
Ski 10 turns thinking about getting the tails light but not actually lifting them.
Ski 10 turns trying to get the same feeling in your outside ski but ignoring what the inside ski is doing
Ski a whole run to cement that new outside ski feeling into your skiing.
This can also help your off-piste skiing; do the drill on a groomed run, and then try #2 on the ungroomed run or in bumps (you generally don’t want to lift the tail because the big increase in weight in the outside ski can cause it to sink significantly.
Shuffle turns
This is another stance diagnostic exercise; it’s also good to loosen things up if you think your stance is too static.
It’s pretty simple. Start your turn as you normally would, and during the turn shuffle your feet forward and back about 3-5” throughout the whole turn.
You will need a good forward stance to be able to do this, and you will need a smooth turning motion as well; you can’t do this if you are using a big rotary motion to pivot your skis across the path of travel.
Initially, just shuffle during the part of the turn where you can shuffle. In the advanced version, keep your feet shuffling the whole time you are skiing a series of linked turns.
I’ve been looking at some skier video recently and I’ve noticed issues with tip lead in some of the better skiers, so I decided to write down a few thoughts…
Tip lead – also known as “ski lead” – is simply the situation where one ski tip is in front of the other. This is a natural – and desirable – situation at the bottom/end of a turn; as we go across the hill with our weight mostly on our bottom ski, the uphill ski is higher up the mountain. The only way to do that is for the upper foot to be slightly in front of the lower foot.
How far ahead depends on the degree of slope and the degree of angulation/inclination of the skier. Carving on steeper slopes and with more angulation/inclination will lead to more tip lead.
All of that is fine. Where we start running into problems is the turn transition, where we go from one turn into the next turn.
Here’s what I’m often seeing:
There is a switch in tip lead at the apex. Or, to put it another way, the tip lead at the bottom of the turn persists all the way to the next apex.
As most of you know, if we want to get a ski to carve, we need that ski to have consistent forward pressure and a tight ankle on that boot.
Another way to think about this is thinking about which ski is dominant:
The outside ski that is dominant at the end of a turn is staying dominant into the start of the next turn, where it is the inside ski. It has to stay dominant because the new outside ski is still ahead, which means that it’s not underneath us and therefore not forward weighted. The only way to carve in this state is to carve on the inside ski, which has a number of downsides…
What I would like to see is for the tip lead to change at the start of the turn:
That gives the following result. To label it:
I want the right ski dominant throughout the turn to the left and the left ski dominant through the turn to the right. That is what will give me those nice, early entry, flowing carves.
How do we accomplish that?
Different people have different cues that work for them; for me I’m thinking of actively pulling that uphill ski back and standing up on it. Others think of using the hamstring and glute to pull the knee back. And others think of it more as a pressure change.
One more picture:
On the left side, we are at our turn finish. Our weight is mostly on the downhill ski, and our uphill knee is bent and the ski is forward.
At turn initiation, we have actively gotten our uphill (old inside) ski underneath us, and we are lessening the amount of pressure on our downhill (old outside) ski. That lifts the weight off of our downhill ski, and helps our upper body move – or “flow” is the term I usually use – downhill. That movement lets us get our skis on their new inside edges at transition and carve both into and out of the turn.
Hope that helps. Please comment with any questions.
I’ve been seeing a common question recently – how do I become a better skier? – and I’m immodest enough to think that I have something useful to say on that topic. This is a summary of how I approach skier improvement for adults when I’m teaching.
I guess I should start by defining exactly what I mean by better. It’s one or more of the following:
Able to ski a wider variety of terrain
Able to ski a wider variety of conditions
Able to ski more efficiently – with less effort and/or for a longer period.
Prerequisites
There are a couple of prerequisites that are required for you to learn efficiently, which I call “happy and casual”…
Your happy place
Skiing is inherently a physical skill, and I can’t physically make your body parts move the way that I want to see them move. The best that I can do is try to provide you with opportunities through which you can discover better ways of moving.
To improve the chances of that happening, you need to be able to pay attention to what is going on, process what is going on rationally, and be able to explore modifications to your current technique.
For that to work well, you need to be calm and focused, which I just label as “happy”.
For us to reach that state, we need to feel safe, and it helps a lot of we are also having fun. If you feel scared or distracted, it is very hard to make progress.
Spending a lot of time skiing slopes that are too hard for you is a great way to be in a mental state where it’s hard to improve, and it’s also a great way to develop bad habits.
However, having said all that, you don’t learn to ski bumps on the bunny hill. Part of learning to ski off piste is getting used to skiing off piste so that you can be in that situation and stay in your happy place, or at least not in your very sad place. A little challenge is good as long as you track your mental state and are functioning well in it.
Your casual place
Compare two scenarios. In the first, you are doing a turn every 5 seconds. In the second, you are doing a turn every second.
Which one is easier to analyze and pay attention to?
The first one is obviously much much easier to analyze.
Part of this is terrain choice – choosing a terrain where, at our current ability, we can make turns that are what I would label as “casual”. They’re easy, I don’t have to work very hard, and most importantly, I’m not scared that I’m going to fall.
The second part is about technique; finding ways to modify your technique so that a given terrain becomes more casual for you.
Note that “casual” is about how you feel in a specific situation. Some people are casual on easy intermediates. Some are casual on black diamond bump runs.
Foundations
There are two topics that come up all the time, often enough that I consider them to be foundational. And by foundational, I mean that not addressing issues will limit your ability to improve. Those two things are stance, and turn shape.
Stance
If you ask 10 ski instructors what the most common technique issue for skiers is, 9 out of 10 will say “leaning too far back/not leaning forward enough” (the tenth is daydreaming about skiing). And from that comes the common advice:
Lean more forward
Keep your hands up in front of you
Don’t look down.
Does that work? Well, it can work, but it often doesn’t work great.
It helps to go back to what instructors call “ski/snow interaction”. What are we trying to achieve with ski/snow interaction? WRT stance, it’s two things:
We want to be able to load (put pressure on) the skis so they will bend and we can therefore use the sidecut to do the turning for us.
We want to have our weight centered over the skis so that we are going down the slope at the same rate the skis are, so they are not trying to speed up and get away from us.
That boils down to “have enough weight/pressure on the front of the ski so that I can get it to bend and keep up with it”. And the way we exert pressure on the front of the ski is only though the shin pressing on the front of the boot.
Which means there is one bit of anatomy that matters more than the rest: the ankle. If the ankle is flexed and there is pressure on the front of the boot, there is pressure on the front of the ski. If it is not flexed, it doesn’t matter how you are leaning or where your hands are, there isn’t pressure on the front of the boot, there won’t be pressure on the ski.
Here’s an example of the kind of stance that I commonly see:
Note how the ankle is loose, but also note that the skier is a) leaning forward and b) has hands in front. Those “lean forward, hands up” cue is not working for this skier.
I want that ankle joint to be tighter, something that looks like this:
The ankle joint is tighter – the shin leans forward – but note that the skier is leaning forward less and has hands that are closer to the body.
Looking at the joints in the two images, where are there big changes? The knees have moved forward quite a bit, but the biggest change is in the hips; they have moved forward immensely in the second image. Which leads to my first cue to correct stance; stand up taller and move your hips forward. And also try to keep the angle of your back the same as the angle of your shins.
Not only is this a more functional stance, it’s also a more comfortable stance as it relies more on your skeleton to hold your weight and less on your muscles. Great stuff all around.
That is the stance that I’m searching for.
However, there is something problematic here. Let’s say you are skiing something that is challenging for you to ski and you find yourself in the first position. To get to the preferred, you need to stand up, get your hips forward, and do this while your skis are trying to run away from you. That is generally hard to do because it’s a lot of mass to move, so “stand up and move your hips forward” doesn’t work so great in a dynamic situation.
What is the minimal thing we could do from the first position to get pressure back on the front of the skis? What would be the quickest move? Focus on the ankle…
If we can pull our feet back 5 inches, we can regain the pressure on the front of our skis and get them working properly again, and we can make that move much faster than trying to move our whole body forward. It’s not a perfect stance; it’s still too hunched and is going to burn out your legs faster, but it goes us back to a place where they skis are actually working.
I think that move is foundational in off piste and bumps.
Finding the right stance
Remember the part earlier where I said that my job is to put you in situations where you can discover a better way of moving? The following is what I recommend to so you can discover what the right stance feels like and ingrain it into your neuromuscular connections. It has four steps.
Step 1: Sideslip
In a sideslip, we start with our skis across the hill and roughly equal pressure on both of the skis, and then roll our ankles and knees down the hill until our edges release and we start to slide downhill. Try it facing both directions, and roll your ankles and knees back into the hill to stop.
You don’t have to be perfect at sideslip for the purposes of this, but if you have trouble with steps 2 or 3 come back and practice this more.
Step 2: Falling leaf
Start in a sideslip where you are moving straight down the mountain, and slowly shift your weight forward and back on your skis. When you have the weight forward, your sideslip will move sideways down the hill and go forward at the same time. When you have your weight backwards, your skis will go sideways and backwards at the the same time.
Here’s a video of what it looks like. Start by doing it more slowly than the video shows. Pay attention to what your legs and ankles feel like as you are going forward.
Step 3: Diagonal forward sideslip
This is the forward part of the falling leaf held for much longer. Start by going across the hill, and then roll your ankles and knees down the hill slightly to sideslip at the same time. You will need to be in the “forward falling leaf” position for this to work, with ankles flexed and pressure on the front of your boot, and it will feel weird when you first do this. Play around with your stance. Try to stand tall.
The feeling you get in the forward part of the falling leaf and in the diagonal forward sideslip is the foundation position you want in your stance.
Step 4: Diagonal forward sideslip with turn
Take the diagonal forward sideslip, and add a turn at the end of it. Make sure you are in the sideslip as you start the turn, and then as you exit the turn, get back into the diagonal sideslip. You should find your turns to be much easier.
Turn Shape
We talk about this foundation as “turn shape”, but I think that is probably the wrong way of looking at it. What we really care about is not the shape of the turn, but the direction that your skis are pointing during the turn compared to the direction that your body is moving. Perhaps a few diagrams will help. Let’s say you are skiing the following path:
That looks like a nice smooth turning shape. Let’s overlay the direction the skis are pointing in two different turning techniques:
In what we call “Z” turns, at the beginning of the turn, the skis are pivoted quickly across the path of travel and then held relatively straight until the next turn, where they are pivoted quickly across to the other direction. Z turns are problematic because:
They require big movements and therefore a lot of energy
Because the turning is quick, they ask more from the condition of the snow; if the snow is scraped off or a icy, they feel much more precarious.
The motion is so fast that you can’t actually feel what they skis are doing. Remember my part earlier about turns feeling casual so you can focus on what your skis are doing? Z turns make it hard to do that.
In progressive turns, things happen *slowly*, so you can easily tell what is going on.
So, if progressive turns are so much better, why do so many people do Z turns? It’s very simple; if you try to do progressive turns with a rearward stance, your skis take off downhill when they are pointed at the fall line, and you fall over.
My experience is that you can fix your stance, it’s generally fairly straightforward to move towards more progressive turns, but if you want an exercise, I think shuffle turns work pretty well. They are also good because you can’t do them if your stance is too far back.
This last week my wife, daughter, and I took a trip to British Columbia to do some skiing.
We stayed in a condo at Silver Star as our central base, and then drove to Big White and Revelstoke for a day each. Here are my quick thoughts…
Silver Star
Silver star is 22 km from the town of Vernon. We stayed in a condo on the hill above the village (not on the ski hill side) above the Silver Queen lift. It was ski-in ski-out if you are willing to do a small bit of climbing on your skis.
The village is pretty tiny, though there are 3-4 places to eat. All are pretty much exclusively run by young adults from New Zealand, Australia, or other ex-British colonies. This is a pattern all over BC.
It was late season, so the snow wasn’t great on Monday. The snow off of the comet chair was okay, the snow off the lower Silver Woods Chair was not. We took one trip over to the backside, which involve some long green runs. The snow there was uniformly awful; it had the wet and refrozen surface that we all hate, and the grooming ridges had set up very hard. We went back on the front side for the rest of the day. It was decent for spring skiing, and I spent a bit of time skiing Attridge face and Christmas bowl.
Friday was a different story; there was 6″ of new snow. We headed back to the very empty Alpine Meadows chair, and did laps. I mostly skied off of Ridgeback, and found anywhere from 4″ – 6″ of untracked, with a few deeper spots I the trees. It was obviously very nice. When that got skied out a bit, I headed more to the left and found some glorious turns on untouched snow on the Fastback run. And then I found out why; those runs only feed below the village on the entrance side, so it’s a cat track out, a trip up the Silver Queen lift (back by our condo), and then cat tracks to get back to the Comet six-pack, and then some skating to get back to the Alpine Meadows chair. That took a bit of time.
After lunch we headed to backside to ski Eldorado. This is marked as a blue, but it is really a very long cat track with a couple of blue pitches on it. It’s there so that more advanced terrain can be accessed. This is the same story for Aunt Gladys on the other side. On paper, there is a ton of terrain on the backside, but they really need two or three lifts to make it accessible without a lot of traversing.
Solo after the others headed back to the front, I skied Cantastic glades at the top, which still had some very nice snow on them, and then ducked into Doognog, a double-black with a thin entrance. And it lived up to the billing; it was tight, bumpy, and steep. Most of the new snow was scraped, so I sideslipped the tight sections and very carefully skied the rest.
With one more run in my legs, I decided to head down 25 north and sunny ridge. These are real blues and had some nice snow on them. Then I made the mistake of turning off into Sunny Glades, and they lived up to their billing, with about 9″ of the gloppiest snow you have ever seen.
Access back to the front side is via a very long run and sometimes flat run “last chance” or a tee bar. I took the t-bar.
I think it’s a pretty decent mountain to ski at, and would be a great family mountain. The backside has potential, but all of the traversing and cat-tracking got on my nerves. Village is a little small but was okay (though don’t think you can buy groceries at the grocery store). The condo we got was nice and fairly cheap, and Vernon is close enough if you need civilization.
Silver Star is a member of the Powder Alliance, which means you get to ski free if you have a Stevens Pass Season’s Pass. This is a really nice benefit that saved us quite a bit of money.
Oh, and if you get the chance, do the sleigh ride to dinner. The sleigh ride was fun and relaxing, and the food was pretty good.
If you like Nordic skiing, there were a *ton* of trails around and a lot of extremely fit skiers. They claim to have the largest network of groomed trails in North America; they have 55 km of trails and you can dual-pass to get another 50 if you would like. There was also some fat biking.
Big White
Big White is the big daddy in the neighborhood. It is big, with 15 different lifts, and a whole lot of different terrain. If you want the resort experience, this is a good place to go.
There is a fair bit of terrain variety, but on the day we were there, we ran into fog at the top of Powder chair. This is a common enough experience that the resort is nicknamed “big whiteout”. Having never been there when the top was clear, I can’t tell you what it is like, but there isn’t a ton of high-level skiing here. It’s a great intermediate mountain, however, and there is a ton of on-slope housing.
Even with the amount of available slopes, it actually felt crowded, though we never had much of a wait for a lift. We skied the Snow ghost & ridge rocket blues, spent some time playing in the glades off of the black forest express. I also recommend a trip through the skiercross/boardercross course in the Telus park; it is a lot of fun.
Big White runs from about 5000′ to about 7600′ at the summit, if you could see anything when you got up there.
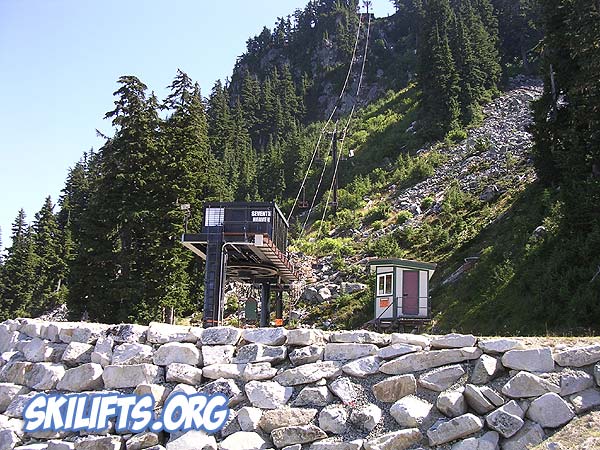
Revelstoke
Revelstoke is north and east of Silver star, conveniently located in the town of Revelstoke. Revy – as you have to call it if you have any aspirations of coolness – has the most unassuming base area I have ever seen:
There’s a small parking lot, a small base building and an attached hotel, all plunked down in the outskirts of a small town. The base area is only at 1,680′, and given that it was late March, there wasn’t really much of what you would call snow left there. There is a small magic carpet, and a single gondola. This Gondola takes you on a 4-minute ride up the hill, up to Revelation lodge at about 2300′. There is a small magic carpet there (both for skiing and getting back to the gondola). It was technically possible to ski down from there to the base, but we did not attempt it.
If you hop on the upper Revelation Gondola, it will take you on a 9 minute ride up to Mackenzie outpost at about 5000′. There are a number of blues and blacks below the Gondola but the snow didn’t look great on the way up, so we opted to skip it, and we skied down to “The Stoke”, which took us another 2000′ up the hill to 7,300′. And then we skied.
The lower slopes looked sparse because of a fair bit of rain the night before, but that gave us 8-10″ of fresh on the top. We came down Critical Path, which has the distinction of being the steepest blue that I have ever skied. The snow was soft, and once I got a bit warmed up, we had a nice time. We also skied snow rodeo a couple of times before lunch. These are *long* runs; Stevens Southern Cross is about 1700′, so the Stoke is about 20% longer than that, and if it was mid-season with good snow, you could ski the rest of the way down to revelation lodge, something like 4500′ of vertical. Which, honestly, is a bit nuts.
It didn’t take long to tire ourselves out, and we gondola’d back down to Revelation Lodge for lunch. Here you have a lot of choices; you can go the cafeteria, or you can go to the cafeteria. Revy is not currently a place with a lot of dining options.
After getting our food from the British/Aus/Kiwi staff, we headed back up the gondola and back up “The Stoke”. We were headed to the North Bowl. There are two ways to get there; if you like really steep double blacks, you hike up the Lemming Route or traverse over to the edge. I am not good enough to do that, so we skied the top bit of The Stoke and took the Ripper Connector, a blue. And we skied, then we skied some more, and then we skied still some more. I can’t find any elevations, but my guess is that we dropped a bit over 3000′. Powder bowl only has three runs – all blue – with a lot of “glades”. I put quotes there because they aren’t really gladed enough for me to really be able to ski them. We skied a bit of the edge and then under the chair a few times, until or legs got tired of trying to turn into the now heavier-than-normal snow. The Ripper chair is only 1600′ in elevation, and at the top you can see the runs on North Bowl, which look ungodly steep to me, and at least 1500′ long.
Come ski here only if you like steeps. The blues are fairly steep, and the greens are only cat tracks.
And – if you want a little more experience – they offer cat skiing packages that take you outside the ski area. And – if you still want more – Selkirk Tangiers Heli Skiing leaves from the base area.
The whole experience is a little hard to wrap your mind around. They have big plans to add more lifts, on slope housing, the usual resort things.
The school that I teach for has a Freeride team – they ski all over the mountain (including cliffs for some of them). The last lesson day of the season they have an informal competition, and, for the second year, I volunteered to take pictures of them. This lets me keep my sports photography skills up, and lets me work with a great group of kids. Oh, and it excuses me from helping out from helping out with the other “last day” activities, though I still found time to reprise my role of “Mr. Catsup” in the hot dog line.
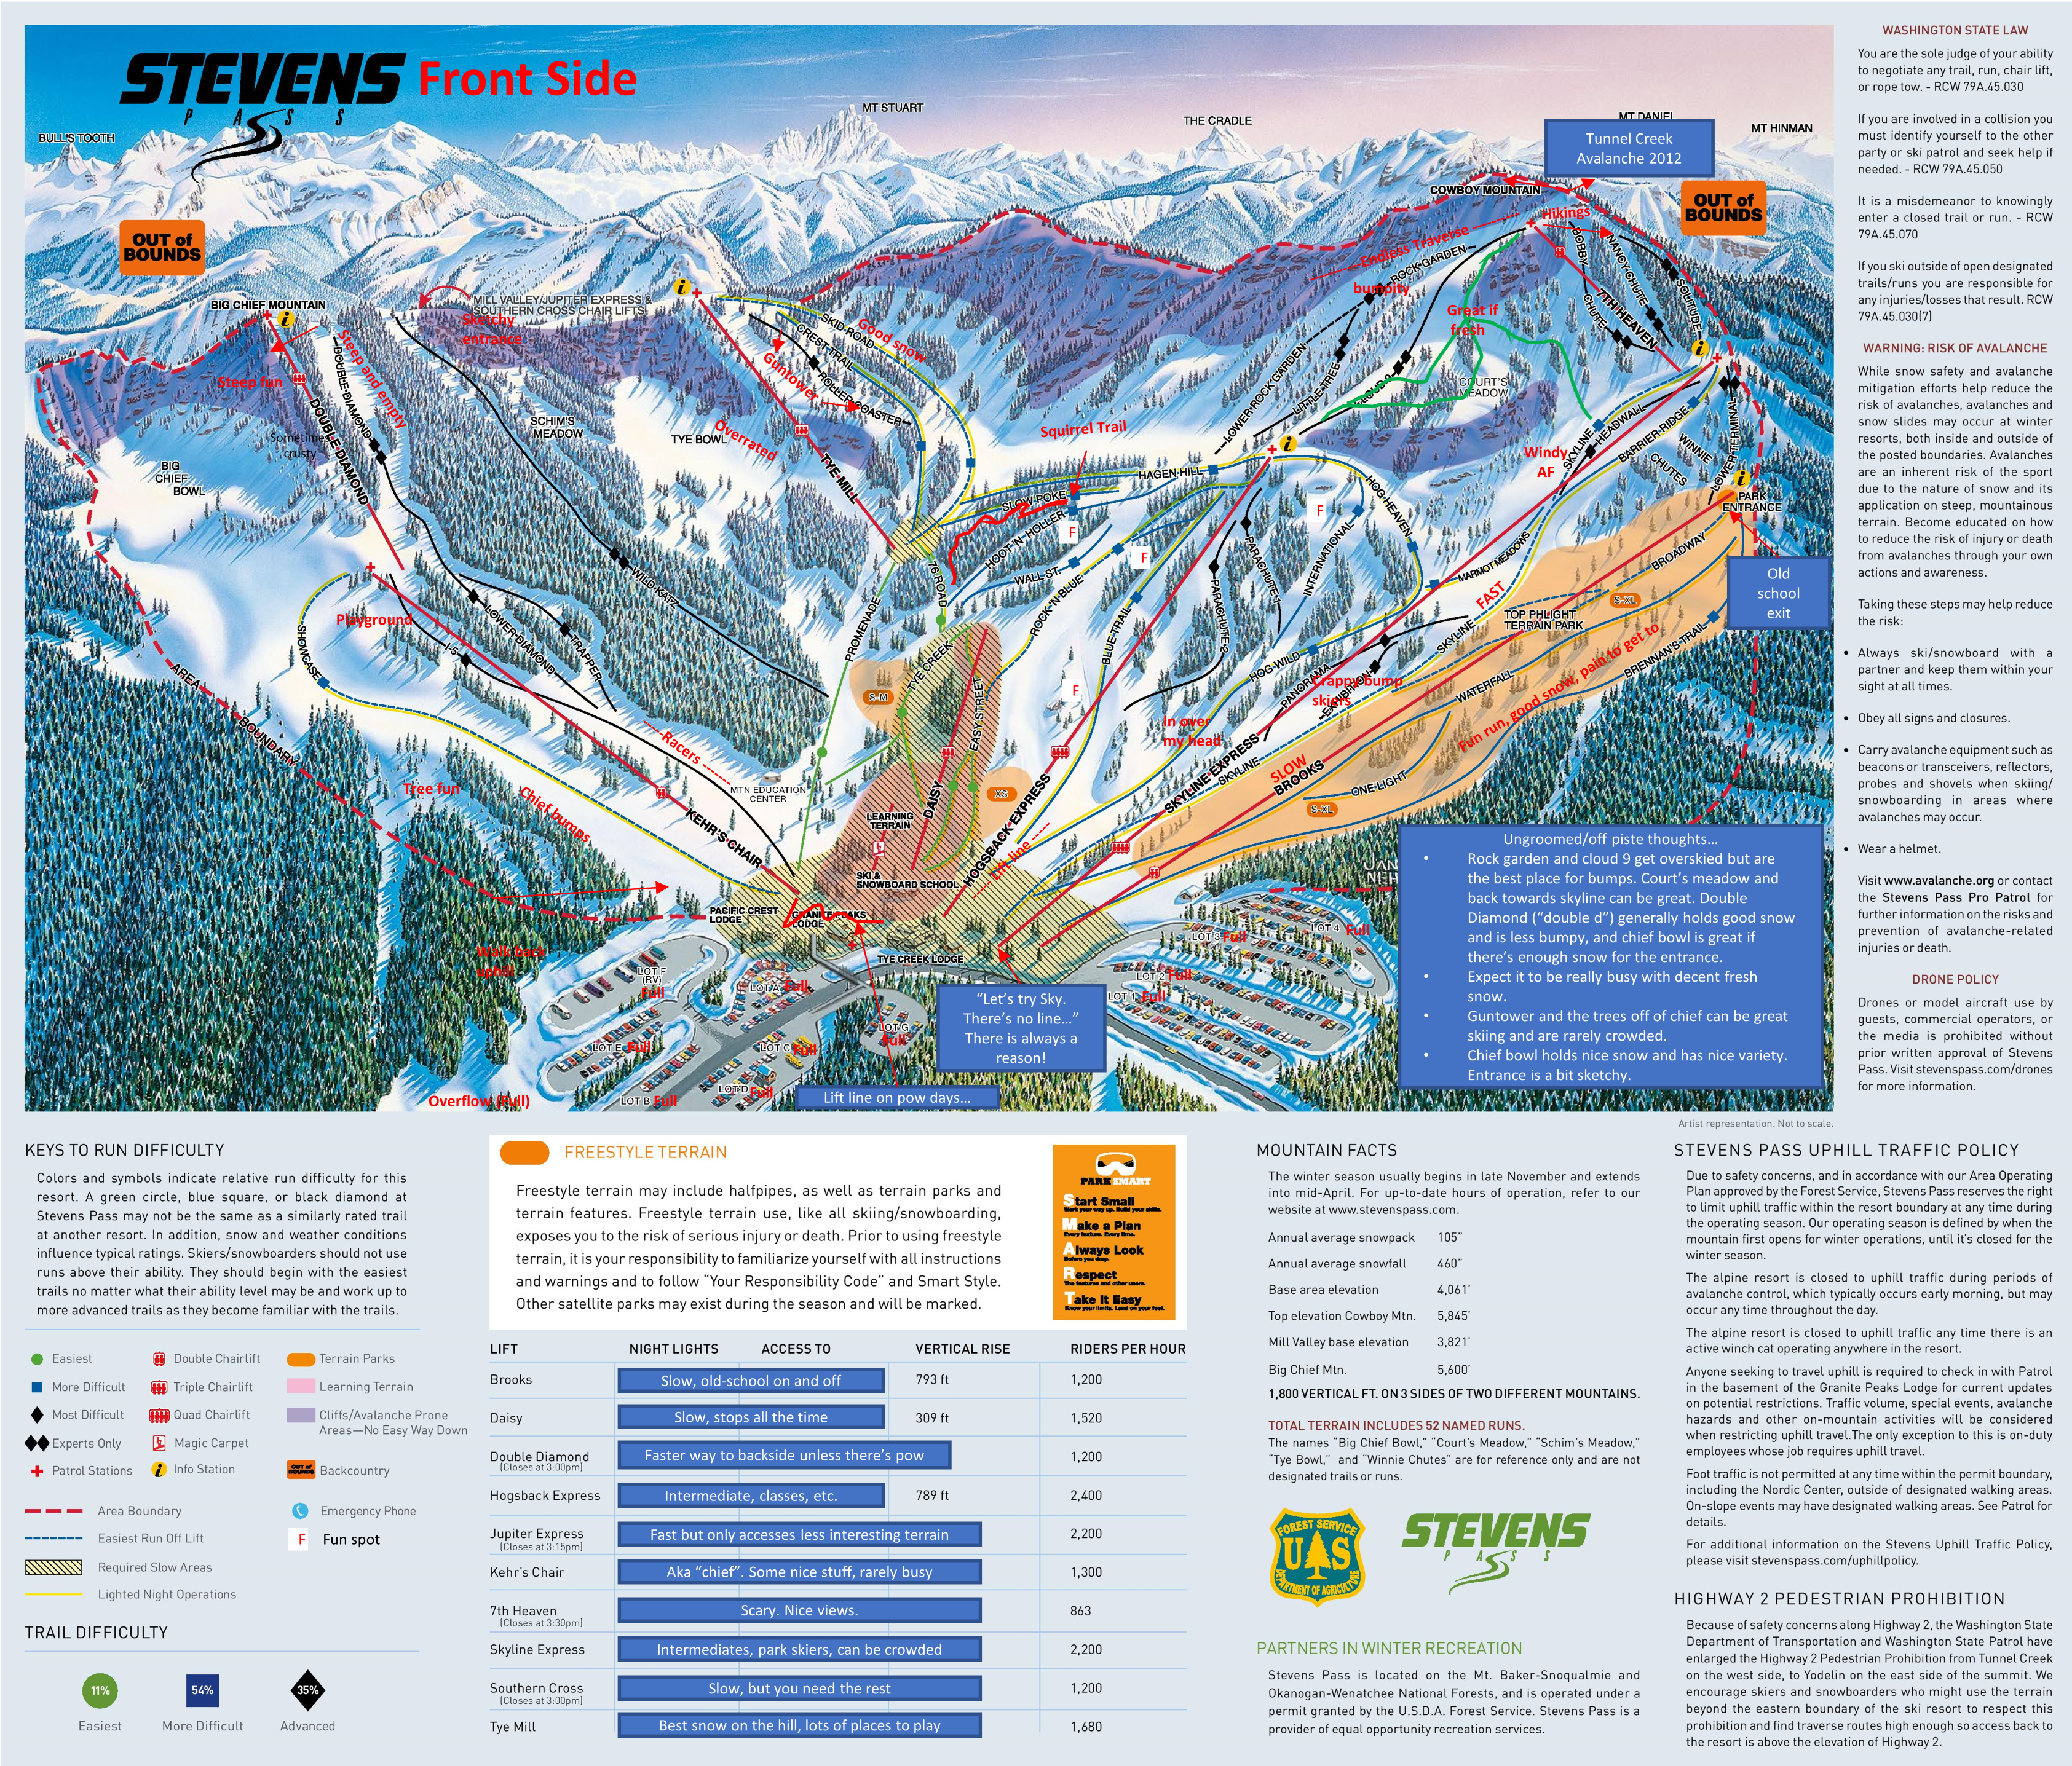
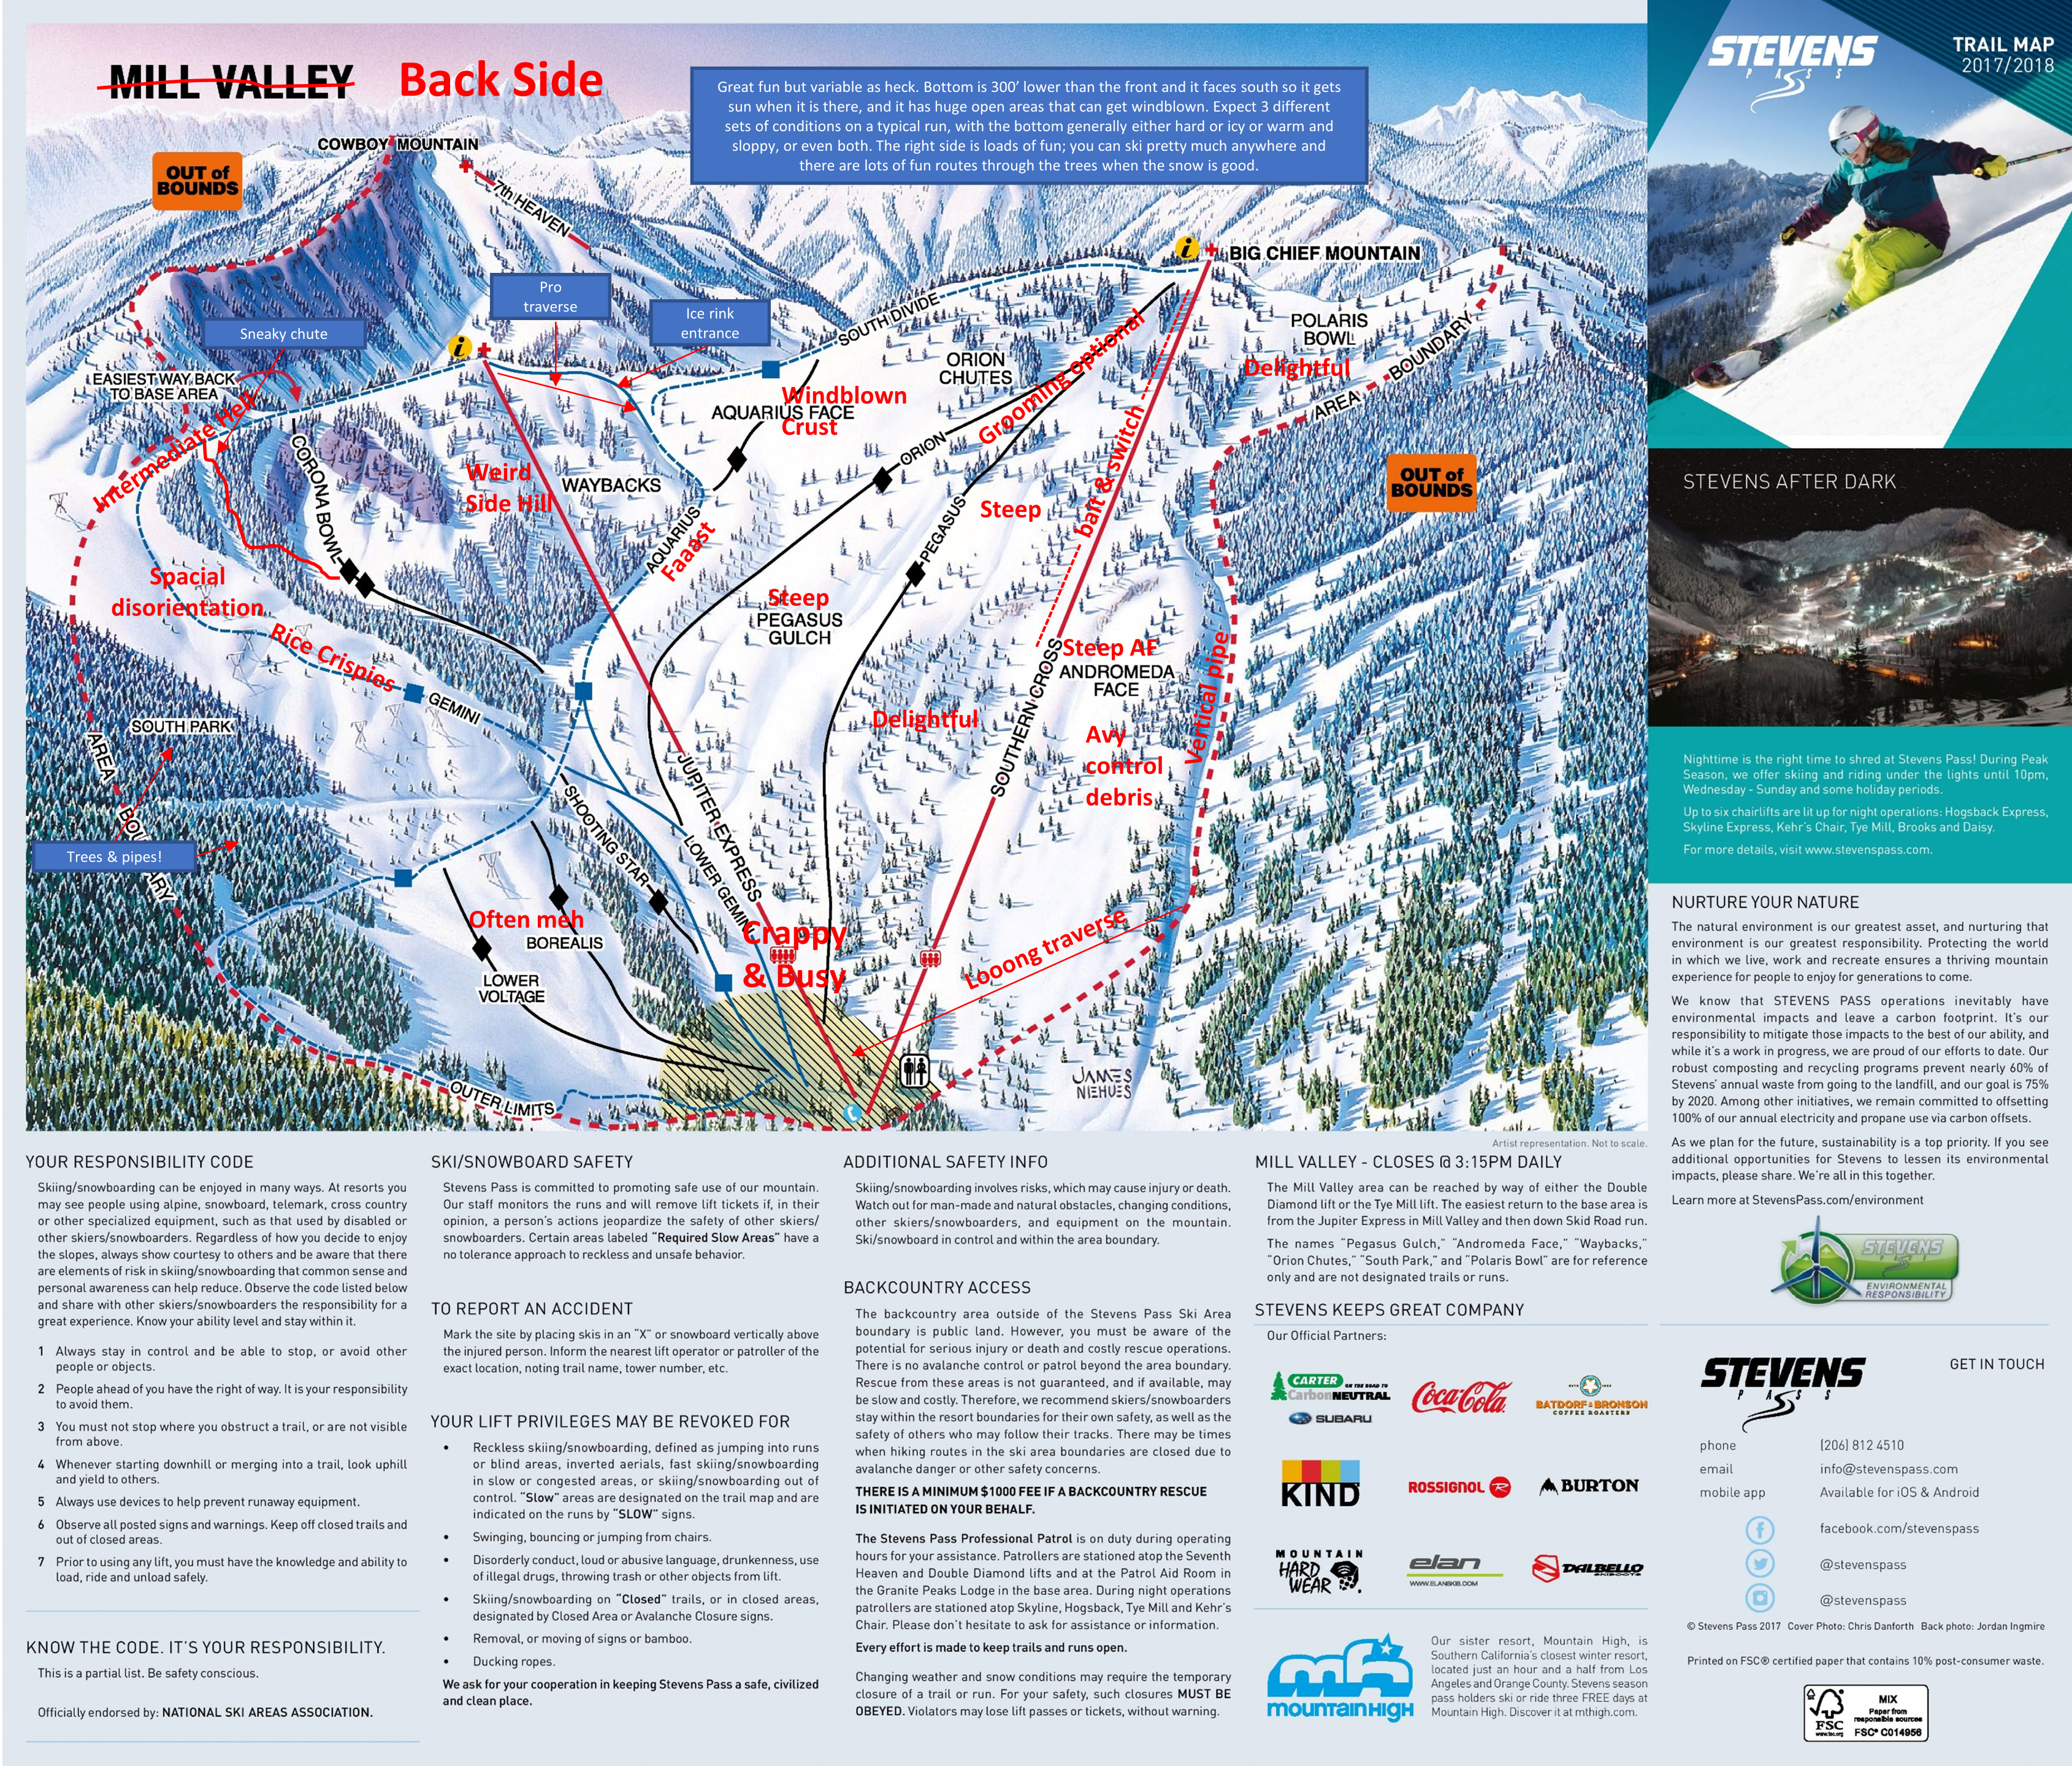
The chosen location for the competition was 7th heaven, a double-black diamond section at the top of Stevens pass.
I am a decent off-piste (“ungroomed” for the non-skiers and/or less pretentious among you) skier. By “decent”, I mean that I can get down most slopes that don’t involve the words “drop” or “cliff”, and that I ski them with occasional flashes of competence. It’s a little harder to ski with a 5lb camera (Canon 7D + 70-200mm F2.8L 2.8 IS II lens) on my chest, but it’s not too bad.
After a warm up with the team on Big Chief (where there was some surprisingly nice powder (and no, I just can’t call it “Kehr’s Chair”…)), we headed over to Skyline, and then up the 7th Heaven Lift (yes, it is as steep as it looks), which is 4 years older than I am but luckily, far less cranky. The original plan was to head over to the side of Rock Garden (a bumped but not super-steep run), but there was a fair amount of skier traffic, so we headed down Cloud 9 and hooked back towards Meadows above the Skyline run, to a steeper and less bumpy run.
There was some very nice snow; the kids skied down to get the feel of the run, and I skied down to set up above a small clump of trees.
Shooting on a steep slope – this one looked to be around 45 degrees – takes a bit of preparation. Actually, just taking off your skis takes a bit of preparation, lest you sink in and slide down the hill, and I spend 5 minutes carefully down the snow to try to get a 12” wide platform I can stand on. Then, I take my skis of – carefully – and stuff one at each end of the ledge so people can see me, and then enlarge my ledge with my boots. I get the camera out, get it set up, get my shooting gloves on…
And then I wait. and wait some more. The kids need to ski down to the bottom, and then cycle up two lifts, then work their way back around to this slope. The time that it takes is directly proportional to how cold it is, and since it’s pretty darn cold, foggy, and lightly snowing, it takes a long time. Eventually they come back, and the shoot goes well; I shoot for 20 seconds, wait for the kid to ski the bottom half and be scored, and then shoot the next kid. I think I’m doing pretty well but I can’t really tell; the eyepiece has some snow in it and there is a lot of frozen snow on the camera and lens. My hands are pretty frozen even with gloves on them. (editors note – they came out quite nice. See gallery here).
I finish shooting, check signals with the two coaches, and get ready to leave. The camera goes back on the chest carrier, coat closed, and gloves on. I pull my goggles down and find that they are totally ice-covered, but a minute of scraping with my fingernails fixes them up. Skis on, and I’m almost ready to ski out – after I demolish the ledge that I built, so that nobody gets tripped up by it. I climb up until I’m on top of it, scrape snow down into the ledge, and then compact it a bit.
To ski out requires a small traverse, then a short tight-ish section until the slope open ups. I start to slide forward to get into position, sideslip a bit, and am surprised to find that I have fallen over backwards. Falling down is not a great idea on this sort of slope, and it’s especially bad to fall over backwards. I get up, slide forward again, make one turn, and at the bottom of the turn I lose balance and fall over backwards again. This freaks me out a tiny bit, which always inspires me to ski better. Ha ha – of course it doesn’t – it actually makes me much more tentative.
I think I know what is going on, but to fix it I will have to pull my skis off, and since I’m in the middle of a tight section without great visibility from above, it’s really not a great idea to stop. I muddle my way through one turn, do a huge (and unstable) traverse, and then stop and pull of my skis.
I find what I expected. The bases of my skis were facing uphill, and they got the same coat of ice on them that my goggles did – but the ice was only on the front of the skis because the back half was stuck in the snow. The meant that whenever I went to push them sideways, the front would stick and the back would slide downhill. I scrape them off with a plastic piece on my gloves, and finish the slope.
So – Important Safety Tip – it’s not a great idea to leave your ski bases exposed when you stick them into the snow.
Last year my family decided to try the ski instructor thing, and spent the year as cadets for Olympic Ski School. We’d taken lessons from Oly for a long time, and after topping out in their classes got asked to try teaching.
This year, we all have classes on our own. I have a class of level 1.5 kids – 4 and 5 year olds.
PSIA (Professional ski instructors of america) uses a 9-level scale to classify skier ability. Level 1 skiers have never skied before (or, perhaps, have only been on skis a few times).
The kids in my class have been on skis a bit but aren’t quite up to a level 2 class. This isn’t surprising – 3 and 4 year olds don’t have a lot of coordination and may not be able to progress too much in their first year.
I have 5 kids scheduled in my class, and a cadet (who I’ll call Rosemary) to help me. Four of the kids show up, we put on our skis and shuffle out to the beginner area.
This will be the first test of the 4 days of clinics that I did in early December. I worked with a great instructor last year, and after a lot of experience teaching other things, I don’t tend to get very nervous.
My first task is to assess the class. I talked with all the parents before hand and from my discussion with them, all the kids should be at a roughly compatible level, but parents often don’t do a good job of matching their kids to the description in the ski school pamphlet. All the instructors will do this and determine whether we can shuffle students around to better equalize the skill level in classes.
I watch the four kids shuffle over to the beginner area. This is the first evaluation step – you can tell a lot about how comfortable the kids look with these weird heavy things attached to their feet.
We start with a straight parallel run down a slope that is just steep enough for them to go forward. They look fine doing this. Next we send them down and ask them to do a few turns. E, J, and A do these turns well, but K says that he doesn’t know how to turn. We talk with him a bit (hard because he’s not very talkative right now), so Rosemary says she will work with K while I take the rest up the magic carpet (aka “conveyer beltâ€). If they do well enough on this we’ll head up the chair lift. They do nice wedge turns coming down the steeper part of the magic carpet, and my evaluation is that they’re good enough to do daisy. As the last one comes down, one of our level III instructors comes over and says, “take them up Daisyâ€. We talk a bit about K and he goes over to give Rosemary a hand (it’s a bit hard to start that way as a cadet).
We end up taking two trips on daisy during the remainder of the lesson. We’re working on linking turns, and we start moving into the next part of the progression – doing straight runs (“french friesâ€) across the hill, and then wedge (“pizzaâ€) for the turn.
Next week, we’ll spend some time working on vertical motion, and starting that vertical motion by standing tall on the uphill ski. This will help the uphill ski start carving around the turn *and* unweight the inside ski, so that the kids will start being able to match the inside ski to the outside ski as part of the turn.
It was a lot of fun and a nice challenge to do this – I stopped coaching soccer when my daughter entered high school, and I’ve been missing that sort of interactions. The kids are a kick and I enjoy being silly with them.
Late in the lesson we had to stop for a bathroom break (not uncommon in this age group), and then headed in for lunch. I was originally scheduled to have the afternoon off, but I ended up getting a second gig – I’m assisting with my wife in the afternoon of her 4-hour level 1 class. We spent a couple of hours working with kids on the magic carpet – a lot of running around in ski boots and picking kids up.
Then we spent an hour or so at a preparation clinic for our upcoming level 1 instructor test in February.
We skied a few hours Sunday morning, but didn’t last long. We are really tired.


