Monthly Archives: February 2010

Sports shooting #8 – Evening and night games

My first year or so, I was shooting my daughter’s lacrosse team, which played on weekend afternoons. Then, when my daughter entered high school, she switched to playing games that are in the late afternoon, early evening, or night. There are significant challenges to shooting these games, and there are some weird things that can happen that are very confusing.

This is where it gets expensive. My first year I was shooting with my Rebel XT and 70-200mm F4L, and in most of the games I was done by halftime because there simply wasn’t enough light to be able to get any decent results. I upgraded to a 40D and the F2.8 version of that lens, which gave me about 2 more stops, which is the difference between 1/800th (tolerable), and 1/200th (not even close). This year I just upgraded to a 7D, which should give me another stop, perhaps 1.5 stops.

And I’m sure I’ll still be complaining that I don’t have enough light. It’s just really hard to get the kind of results you can get during the day. Though I will say that having the equipment that lets me be functional at night provides much more flexibility during the day – instead of being stuck at F4 @ 1/800th, I can go to F8 or shoot closer to 1/2000th if I want to.

I like to think of these as three different environments, though you may get all of them in a single game.

Last afternoon (before sunset)

There are a few obvious things here. As you get closer to sunset, you are going to have to deal with less light. If it’s cloudy, you will start with less light but it will generally hold up a bit longer, while if it’s clear the light can go off really quickly. Consider shooting shots during warmup, and try to get a lot of the action early, especially if your gear doesn’t do well in low light.

You will generally want to shoot with the light source at your back, though sometimes you may want to break the rules:

This is shot almost straight into the sun, and then I used a fair bit of fill light in lightroom to bring out the players. If you look at the original, it’s pretty noisy, but it works well in B&W, and I like the outline of the sun in the hair.

This time of day does encompass the golden hour, and sometimes you get lucky, and the sun gives you perfect lighting. Not only is it nice and warm, but it can get inside helmets or headgear because of the angle.

Dusk/Twilight

At this point you are either contending with rapidly waning light or a mix of natural light and artificial light. The light will be changing pretty rapidly, so you may need to play around with your ISO settings often. The color balance may be weird, as the light from the sky will be very blue but the artificial lights usually aren’t quite as blue so it can be hard to get colors that look decent.

Artificial lights

Artificial lights are designed to make sports at night possible. They are not – unless you are lucky enough to be in a college or pro stadium where they do TV – designed to make photography work well.

There are a few things that you may have to deal with, in addition to the lack of light:

You can’t see it, but the majority of stadium lights pulse at 120Hz – they go on and off 120 times per second. If your shutter happens to open while they are off, you don’t get any light. To improve this, many places use what is called three-phase power. Instead of one set of lights that go on and off every 120th of a second, you break the lights on each pole into three groups, with the second and third group each delayed a bit from the group before. So, you never have a time when all the lights are out.

Unfortunately, this sometimes doesn’t happen. Sometimes a whole pole will be on one phase, so you may get pictures where one part of the field is lighted and the other isn’t lit at all. If this happens where you’re shooting, you have my sympathy – short of getting the lights rewired, there’s no fix.

Even with correctly wired lights, you still have the problem that during each cycle the lights heat up and cool down a bit and the color temperature shifts.

Alternatives

If you can’t get a decent shutter speed with your equipment, there are a couple things you can do. Some photographers shoot with strobes. To do that you would need decent power from the flash, a subject that’s close, and approval from the coaches.

What I do is turn the iso down and get the shutter speed into the 1/10th of a second range, and pan. You can get some nice abstract shots with this.


(12 – 5) x 0.850 = ouch

I recently finished the construction on my landscape lighting base station, putting everything into the boxes I have, and wiring everything up.

Turned the power on, pressed the buttons, and the relays worked fine. Turned on the remote, and it worked as well. Win.

And then I did the important heat test, where you grab the components to make sure that they weren’t overheating. The relays were fine, the transistors driving the relays were cool, and the avr was also cool.

Then I burnt myself on the 7805 voltage regulator. Which isn’t very surprising. The 4 relays pull about 750 mA in total, and along with the xbee and everything else, the total current draw is 0.85 amps. The regulator itself is rated up to an amp, so it’s fine, but since the input voltage is 12V, that means we need to get rid of (12Vin – 5Vout) * 0.85A = 6 watts. Not a ton of heat, but waaay too much for the regulator by itself. I dug out the data sheet, and found that the 7805 is rated up to 125 degrees C at the junction which is pretty darn hot. I modded a heatsink into the side of the case, hooked it up, turned everything on, and let it bake for a bit. My IR thermometer says that the heatsink stabilizes at about 74 degrees C. This is okay for the device, but hot enough that you don’t really want to be touching it.

So, I’m thinking about the option. There are really two that I’ve considered…

The first option would be to rework the output board. If I had been thinking ahead of time, I would have used 12VAC relays, driven then from triacs with opto-isolators that connected to the AVR. That would have dropped the per-channel current down to perhaps 24 mA, and the overall current to perhaps 200mA. But that’s still going to dissipate over a watt, and still require a heatsink – though it would be a lot cooler.

The better option is to switch to a switching regulator. Those run at high enough efficiency to not need a heatsink, and they come in drop-in replacements for the 7805. A bit pricey, but certainly a simpler choice.


Light progress

Lots of progress this week.

After teaching skiing all day Saturday, I went back to the cabin and wired up the lights in two places. I had bought some outdoor wire nuts that are filled with silicone, but they turnout not to work well at all and to be exceedingly messy. I ended up using crimp-on connectors (yellow), which should work okay in the weather if they’re crimped well. After it got dark I went into my shed and hooked up two lights there, 20 watt auto lights just hanging from the rafters.

In the morning we were tired, too tired to go skiing, so I went out and measured the voltage on each of the away locations, and found that they were both at about 8.5 volts. I moved that circuit to the 15V tap on the transformer, and then wired up the middle-distance lights, and switched them to the 14V taps. All of them look much more like halogens now.

When I got home, I finished the base station code by adding in a status light, and then started on the code for the remote. It was pretty simple, and only took a couple of hours – I was able to adapt the code that I wrote for the base station.

And now for the real test – could the remote talk to the base station? I breadboarded up the remote and got it working talking to the second xbee on the PC, and then hooked up one Xbee to the base station and the other to the remote. After remembering to reverse the transmit/receive pins, it fired up and worked first time. Press the button on the remote, the lights toggle on the base, and then the status light on the remote switches as soon as it gets word back from the base station.

I took a little trip outside, and found that the remote could still get a signal for from the base about 200′ or so away from house. That’s pretty good considering that my workbench is in an office that’s mostly underground. It’s also possible that the antenna orientation is sub-optimal – there’s a short antenna attached to the module but it’s currently flat against the module, which may compromise the dispersion pattern.

I lost control over the lights at about half that distance. I think the jury-rigged diode-drop power supply for the xbee didn’t give enough current for the remote xbee to transit consistently at full power. In the real version of the remote I plan to run everything on 3 volts from the battery, and that should work a bit better.

I’m also going to speed up the frequency of the updates that go from the base to the remote – right now they only go at 10 Hz, and sometimes there’s a noticeable delay between when the button is pressed and when the light shows up.

Here’s a picture of the breadboarded remote and the base station. Click on it for a Flickr view with some more information.

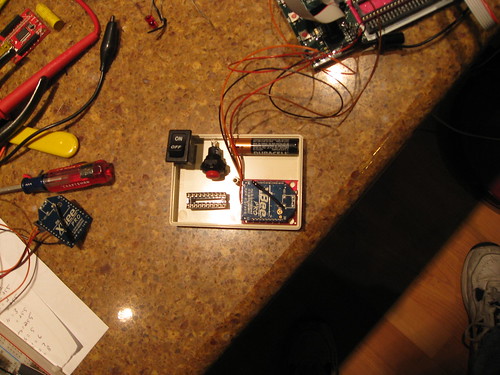
I did some test fitting of components in the case I got for the remote:

Fit test for remote components

I thought it was going to be too tight, but I think i will probably be fine. 

I really like microcontrollers – it takes a while to do the code but the discrete component count is so much smaller.

Remote bill of materials:

  1. Attiny2313v
  2. 2 AAA batteries
  3. Battery holder
  4. on/off switch
  5. momentary pushbuttons
  6. 3 leds & dropping resistors
  7. xbee pro module
  8. Case/wire/etc.

Base bill of materials

  1. 3.3V regulator
  2. Bridge rectifier
  3. 2 – 10uf filter caps
  4. attiny2313v
  5. xbee pro module
  6. 5 momentary pushbuttons
  7. 1 led & dropping resistor
  8. 4 relay sections (5V 30 amp relay, transistor, 2 resistors)