
This year marks the fourth time that I have gotten up far too early, journeyed to Enumclaw, and hauled my body around the mountain (to be fair, in 2007, road closures meant that I hauled my body back and forth along the east side of the mountain). Perhaps it is true that as one gets older, one loses the capability to learn.
The event has not been particularly kind to me. A lesser man might blame the tides of fate, the sands of time, the grapes of wrath, or the whims of mother nature. I do not. The problem is my simple lack of willingness to train properly for the event. I’m only willing to devote about 8 hours/week to training during the season, and that hasn’t really been enough to thrive on the ride. I also have had some bad luck. If you want the the details, you can find them here, here, and here.
This year, I decided to try something different. I bought a copy of Carmichael’s, “The Time-Crunched Cyclist”, went out and did a field test (always a fun way to spend 20 minutes), and started making up a training schedule. This was a bit challenging, since I lead a ride for Cascade Bicycle Club two evenings a week, and I have to figure out how to fit the workouts into the rides. This hasn’t always worked, but I can say that the loads of time I’ve spent on the intervals has made it much more comfortable to ride at my aerobic threshold than before; my legs are hurting but I’m not out of breath. When I get a bit of rest, I’ll redo my field test and write a more in-depth report.
This is also my first year “training with power”, since I picked up a Powertap hub last December. I expect to lean on it heavily to ride at a reasonable speed on the climbs.
I’ve also cut out some snacking at work and at home. Back in April, I saw 181.6 on the scale, and the morning before the ride, the scale ticked back from 170.0 to 169.8. Bike + Eric is now about 6% lighter.
My big goal on the ride is to get my nutrition better. I’ve been okay on hydration – working through a bottle of my Accelerade-based drink and a bottle of Nuun over two hours or so – but I have not been eating enough. So, I’ll be trying to eat more.
As for the ride, I plan on riding easy for the first 60 miles, riding a bit harder but conservatively up the Paradise climb, and then – assuming I’m feeling good – pushing the pace up Cayuse.
Prequel: The crisis
After leading an Eastside Tours group ride two weeks before the ride, I come home with a slight cough, which worsens over the weekend. It’s not horrible during the day, but I’m spending the nights on the couch in the basement trying stop coughing, generally for 3 hours or so.
The next week I’m in training at work, so I can’t get to the doctor, so to make sure I don’t get sicker, I find somebody else to lead on the evening rides that week. Not really… what I actually do is lead the rides, cough deeply whenever we stop, and ask the other riders to help out because I can’t talk in a loud enough voice to give directions. I finally get to the doctor on Friday – he interviews me, tells me that he’s seen some “really strange symptoms” recently, and hooks me up with a five-day course of Azythromycin and a bottle of old-school cough syrup (you know what I’m talkin’ ‘bout). This wasn’t the kind of taper I was planning to do, but I’m stuck with it, and the antibiotics do help after a couple of days. I’m not coughing my lungs up any more, but I’m a bit tired and I have a weird tightness in my right IT band near the hip, presumably from the nights “sleeping” on the couch…
Episode I: Preparation and Exploration
I get up at 3AM, eat a small bowl of cereal, get dressed, and hit the road. I arrive in Enumclaw about 10 minutes before the start, pull the bike out of the car, and do a weather check. Despite wearing my rails to trails jersey – which has lots of pocket space – I have a lot of stuff to put in it, and anything I wear in the morning I have to carry the rest of the day. My hope was to just get by with arm warmers, but 90 seconds of exposure tells me it’s a very cold 58 degrees, so the vest goes on as well. I head over to the starting line, take a quick nature break, and roll to the start line. The volunteers pull my starting tag (the track riders around the course), and I head off into the predawn, turning on my flashing LED front light. The time is 5:08.
According to reputable sources, the word “Enumclaw” translates to “place of evil spirits” in the language of the Salish Native Americans. In the gradually lightening skies, that does not seem too far-fetched.
I roll out into the darkness, a bit apprehensive of what is to come. A week of gentle tapering and illness have left me with quads that hurt, an unsettled stomach, and a sort IT band. After a few minutes, I turn left into Buckley, almost miss the same right turn I almost missed last time, and am quickly passed by a group of four. I generally like to warm up a bit before I latch onto a group, but I have a new source of information – my power meter. I hook on and find out that I can easily hang with the group at 110 watts, which is pretty easy, so I stay with them. I am expecting to roll through the group to take a turn on the front, but the guy in front isn’t budging, so I settle in at the back. We ride for about 30 minutes, hit the low point of the ride, and head left on Orville road.
At this point, the workers in the group pull off for a “nature break”. Being the first person left – and therefore the defactor leader of the remaining group – I keep riding but at a reduced pace since we’re no longer descending. I reach into my bento box and pull out a Honey Stinger Chocolate Waffle.

I bought these because they have a picture of Lance on them, and I’m hoping that they contain some of the “special ingredients” that Lance used to get from Dr. Ferrari. After a little bit, we hit some slight hills and the group breaks apart. I end following a guy with aero bars and a very creaky drivetrain. This is one of my favorite parts of the ride; on the left we can see the waters of lake Kapowsin with an early morning mist rising off of them. A group of 3 riders slowly passes us, and I notice that the last rider in the group has a very special number attached to his jersey.
RAMROD has this interesting tradition – it assigns jersey numbers by the age of the rider, with the oldest riders getting the lowest numbers. The rider who has passed me is wearing the single-digit number “1” on his jersey, and – if I recall the history of RAMROD correctly – is in the early stages of his 30th ride. After a while, he tires of the pace, and goes to the front of our group to pull for 5 minutes. He pulls off, and I’m now second-wheel to a woman in a team kit. She pulls for a couple of minutes, I prepare for my turn at the front, and in a bit of exquisite timing on my part, we hit highway 161 and turn left. This is the first real hill of the course, a short 280’ climb up into Eatonville. I make my usual “nobody told me there would be hills on this ride” joke, and she laughs. We roll into the first food stop.
I park the bike, take a nature break, eat a small blueberry scone, and then refill my bottles. I’ve pretty much hit my nutrition plan; I went through both bottles and had a waffle and some triscuits. As I’m heading out, I run into my friend Alan who has just gotten in; he left 20 minutes after I did but was riding with a group that was much faster. This will be a recurring – and expected – theme for me today. I spent 12 minutes at the stop.
The next section is 25 miles and we will climb up about 1300’ during the section. It starts with a few hills, a slight descent, and then a slow climb in the 2-3% range. I end up pulling a group at perhaps 175 watts; this is a little more than I wanted to be doing, but I keep doing it. I do eat some more, but I don’t drink as much as I should. My stomach is still feeling unsettled, and every once in a while rises above that to reach the “nauseous” level. My legs also still feel weird. This is a really pretty part of the ride, and I spend quite a bit of time looking at the scenery and chatting with the rider behind me. Pretty soon, we reach the Wildwood food stop, at 58 miles in.
It’s old home week at the rest stop; I talk with Alan, Francis, Mark, Lizza, Daniel, Laurie, and a few others who I can’t place (being a ride leader means that that I have a lot of asymmetrical acquaintances, where somebody knows me (and knows my name) better than I know them. It’s a little weird and embarrassing at first, but I’ve run into this in the past in some work-related settings). Two people thank me for my RAMROD 101 post. I do not feel as good as I had hoped, in fact, I don’t feel very good at all, but there is nothing to do but keep riding. Time off the bike = 12 minutes.
Episode II – The Test
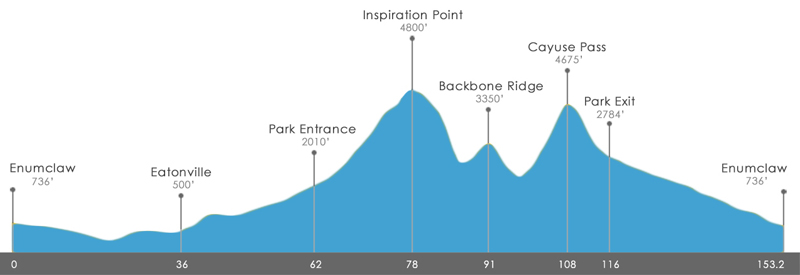
I head out from the stop, and very soon, the route enters the national park. At the entrance, they have a lane for us (we have already paid for park entrance as part of our fee). There are volunteers out to record rider numbers, so they know where to look for riders if they don’t show up (this is a significant concern; with fast-ish alpine descents and not-so-great road conditions, there are incidents, and last year a rider went off the road on one of them and ended up dying, so it’s important that they know where to look for missing riders). I don’t put a number on my bike because it gets in the way and flaps around on the faster sections, I don’t put it on my helmet because it looks stupid, but I do have my number on my back. One of the volunteers repeatedly yells “what is your number! I need your number!”. Well, first of all, all that I know right now is that my number is in the 400s, second of all, they shouldn’t listen to what I say because I might have it wrong, and thirdly, I can’t talk loudly because my throat is bothering me. If I was in a group I would have stopped to make sure, but since I’m all alone I figure that can read it from my back and I just roll through. I then roll through the RFID reader that they’re trying out this year, and I’m on the way up. The entrance to the park is at 1800’, and we’re going to top out at a little over 4800’, so we’re talking a 3000’ climb in the next 19.5 miles.
The first section of the road is about 10 miles, and has us winding through the woods and up to Longmire on a 2-3% grade. The forest canopy totally covers us, and there isn’t much traffic, so it is very peaceful. I settle for climbing at about 175 watts at a cadence of about 90; I’m a stronger climber at 80 RPM but I’m a bit concerned that I can’t push that for the rest of the day. My heart rate is about 130, which is in the meat of my range, but this feels harder than I had hoped; I think the time off and the sickness are coming back to get me. We pass through Longmire, and the grade stiffens a bit, into the 4-5% range. I stop for a minute to stretch and rearrange my food for better access. I’m probably not drinking as much as I should here. I’ve passed a few people so far, and been passed by a lot more – this is also expected. At one point, as I pass a triathlete I’ve been slowly catching for a while (the bottle holders on the back of the seat are a giveaway), I say hello, and he says, “How are you doing today?” That’s a little chatty for this sort of climb, so I take a closer look, and it’s Paul, a friend of mine. Paul is a serious triathlete – Ironmans (Ironmen?), marathons, that sort of thing – which either means I’m climbing pretty well, or he’s slow. It turns out that it’s a little of both; he hasn’t been doing as much riding as usual. I drop my pace to ride with him, and we chat as we keep climbing, which is hugely useful to me – this climb keeps going and going, and I’m keep thinking we’re near the top, only to get disappointed. We pull into a water stop, which surprises me, as the traditional water stop is at the top of the climb. I spend 7 minutes there; just long enough to refill my bottles and talk to Laurie and a few other cyclists a bit. There are two ways out of the parking lot; you can go back to where you came in and continue the climb, or you can head straight. Straight seems shorter – and it is – but what I fail to notice is that the parking lot is flat, so I have a nice 10% climb to get back to the road. Thankfully, it only takes 5 minutes to dispatch the rest of the climb, and then we are greeted by a nice section of gravel road – the reason for the water stop being lower on the climb – which is a bit of joy. It’s okay except for the one point where I hit a section of deep gravel and the bike has a different idea about direction than I do, but I roll through.
Climb stats (from Strava)
Distance: 19.4 miles
Elevation Gain: 3012’
Time: 2:02:07
Average speed: 9.5 MPH
Power: 167 watts
HR: 133 BPM
I know I wasn’t doing great on the climb and not feeling well, so I’m okay with that. It’s a PR for me only because my previous trip up was an angst-ridden slice of not-fun.

I take a picture (which comes out pretty nice for a phone), and head out to the Stevens Canyon descent. This is generally a fun descent; the grade is a fairly steady 5%, and it will take me from 4800’ down to about 3000’ in about 13 minutes; a bit faster than the way up. I would normally lightly pedal this out to keep my legs warm, but for some reason the upper right part of my right calf (near the IT band) is hurting quite a bit, and I decide to rest and coast. That doesn’t work very well either – it hurts just as much. So, I HTFU, and try to bear it on the way down. That takes me to the Upper box Canyon food stop. I grab a cookie, have some potatoes with seasoned salt (but perhaps too much salt…), and refill my bottles. I know that NSAIDS and exercise don’t really go well together, but the pain in my leg has me concerned, so I take a couple of ibuprofen and head out riding with Laurie. Elapsed stop time, 13 minutes.
Episode III – Dehydration and Disillusion
We descend another 200’, and then start the backbone ridge climb. The 2.3 mile, 563’ climb is dispatched in a hair over 19 minutes at 171 watts. I reach the top quicker than I expect, and run into one of my riding group logging rider numbers. As I head over towards the descent, one of the volunteers tells me that this crappy, torn-up, borderline-unsafe road is newly paved. The 1100’ descent is glorious; the pavement is perfect, and the 20 MPH curves that used to be torn up and bumpy are smooth and easy. The only thing that would make it better is if I felt better, but even so, it is over too soon.
Which brings us, finally, to Cayuse Pass. I ride the first 3 miles – a bit of a preamble – and then I’m in the meat of the climb. 8.8 miles, 2500’ of climbing, but at a 6% grade, steeper than Paradise was. Status check: I’m hot, I’m dehydrated, and I don’t feel very good. Mood=cranky, which is normal for Cayuse, but makes 90 minutes of climbing seem daunting.
So, I take the climb a little bit at a time. I’m riding at 6MPH at around 170 watts, which means it takes 10 minutes to climb a mile. I ride a mile, stop to drink and rearrange my food and have a little snack, ride a mile, spot an empty patch of shade desperately in need of an occupant, etc. As I climb, I’m listening for a very specific sound – the sound of falling water. When I hear it and feel a cool breeze, I pull off to the side, set my bike carefully into the ditch, take off my helmet, and carefully go on a short hike over to the waterfall (If you haven’t tried to hike over loose rock wearing cycling shoes with cleats on the bottom, give it a try). To reach the water requires me to basically stand in the stream, so I get wet feet, and then I reach down, grab handfuls of water, and throw them onto my head, my front, my back. The water tastes salty because I am pretty salt-encrusted at this point, but it makes me so feel so much better. Back on the bike, and back to the same scheme – climb a mile, take a break, climb a mile. The cooling effect from the waterfall water lasts about 20 minutes, then I start getting hot again. I am not the only one taking these short breaks, where we get to admire the scenery, and the others slogging their way up. We are little islands of suffering, each emptying a personal basket of pain, coming together and drifting apart.
Several days later, I reach the water stop, where I toss my accelerade and refill one bottle with water so I can pour it on myself in the future. I sit down and stretch for a minute. I run into ex-Eastside Tours ride leader Dan, and we chat for a bit. On the way out, I say, “only 3 miles, right?”, and he replies, “4 miles”…
Drat.
Back on the bike, but the grade drops down to 5%, and the combination of that with pouring water on me allows me to ride a whole 23 minutes without a break. Then 15 minutes, then one final push, and I finally come to the highway 410 junction sign, and I roll into the water stop. A very quick stop, and I roll out down towards the deli stop.
I’m hot, tired, cranky, and as soon as I start heading down, my leg hurts again. But, 12 minutes at 30 MPH and 8 minutes at 20 MPH takes me to the deli stop.
The deli stop features custom sandwiches, and is one of the nice things that make RAMROD different. But… and there is a big but… the deli stop sometimes works well, and sometimes doesn’t. In this case there is a long line in the sun, and it’s moving slowly. I grab my nuun and try to rehydrate as I wait for my turn. The problem is easily apparent; you have to wait for the person to get your bread, then you have to wait for the next person to put mustard on it, then you wait for your meat, then for your cheese, and finally for your tomato and lettuce. This is the kind of thing that drives me crazy; a little optimization would easily double the throughput and get rid of the line. Then there’s a volunteer in charge of chips doing nothing because she already has 50 servings ready. I open the coolers to grab a drink, find one is full of juice, and the other has 8 cans of Coke. I can’t drink the coke because fructose doesn’t sit well with me, so I look around, spy a bunchy of diet coke in the refer truck, and tell a nearby volunteer that the there is no diet coke in the coolers. She pulls out one can, hands it to me, and goes back to what she was doing.
Drives. Me. Crazy.
Finally provisioned with food, I score a chair near the amateur radio setup (no cell phones for most of this core so local amateur radio “hams” do communication for the ride), eat my sandwich, chips, drink my pop, and try to recuperate. The deli stop is always a place of bittersweet feelings; no matter how you feel about your performance so far, you have survived it, and the hardest work of the day is done. On the other hand, you have 36 miles to go, and it’s hot, and there’s always a headwind.
Episode IV – A New Hope
After 60 minutes off the bike, I pull the bike off the rack, roll back out onto 410 and head towards the finish. This is a nice section; it’s pretty consistently downhill for about 17 miles, and – unlike the big hills of earlier – this section is more about power/drag ratio and less about power/weight ratio, which is a better fit for me. I’m cruising along, making okay time, hoping that a nice group will pass me and I can hop on. For the first 9 miles or so, I have no luck; I pass 6 or 7 tired souls, but none of them look able to ride the pace I’m currently at, and nobody passes me. I start to get depressed; the flats in the last 20 miles are going to uncomfortable if I am alone.
Then, I hear a bell next to me, and a group passes me. They are going a bit faster than I would like, but, as the old say goes, “coming down the 410, wheel-suckers can’t be choosers”, so I jump and get on the back of the group. Normally, just jumping on without asking would be a breach of etiquette, but it’s pretty much expected on this section of the ride. There are three of them; two of them wearing Speedy Reedy team kit, and another one (friend?) in blue. We’re heading down at 24-26 MPH, which wouldn’t be very impressive on a downhill, but the headwind today is pretty intense. The guy in blue is in front; he peels off, as he drifts back, I tell him “one more on the back”, and he slots in behind me. I tag the guy in the front “Puller”, because he’s working hard and doing a nice job; very predictable pace, and it’s easy to sit behind him. He pulls for perhaps 7 minutes – a long time in this wind – and pulls off. His teammate immediately jumps the pace up 2 MPH (rookie mistake), and I pull up close behind him to prepare for my turn at the front. Four minutes pass, and he’s starting to tire out and slow down, but he stays out there. Another minute goes by, Puller pulls out, rides forward next to teammate, pats him on the back, and they exchange a few words. Puller drifts back, ding’s his bell, and his teammate (who is now tagged “Trainee”) pulls off, and I’m on the front.
The wind is honking bad; I take a quick look at my power meter, and see that I’m at about 250 watts, which is okay for the two-minute pull I have in mind. I concentrate on being smooth and predictable. Riding smoothly has been a goal for me for quite some time, and two years of being in front of groups rides on the flats have improved my skills, so – if I do say so myself – I’m pretty good at this. Looking at your GPS to figure out how much time has passed is a bad idea at the front of a fast paceline, so I count revolutions of my pedals. When I get to 180, I check my mirrors, look over my shoulders, and pull off the the left. As I drift back, I get a “good job” from Puller, and I settle into the back, rehydrate, and wait for my next pull. “Blue” spends about two minutes before he drifts back, which makes me happy – he’s about at my level – and we continue the rotation. On the first half, because of the descent and the headwind, I’m only using 100 watts to stay in the pack, but 250 out front, which is a huge difference (and the reason I really wanted a group for this section). After what seems like a very short time – time travels quickly for me in a paceline), we’re in Greenwater, where the grade flattens out, and in this section, there are even a few uphills. I am grateful that the pace slows to something reasonable – more like 17-20MPH – because the paceline advantages go down as it flattens, and I’m getting a bit tired from my pulls. My toes are also really starting to hurt; wet feet do not improve the foot/shoe interface.
We eventually get to mud mountain dam, and head over towards the descent. Puller and Trainee talk about racing on this, which has me a bit apprehensive; the descent here has a couple of tricky corners, and I don’t think I’m up to “race speed”. Puller is in the front; we descend quickly but conservatively in the tight places, and pull out onto the flats. If this were a just world, the ride would end right here, but we still have 4.5 miles to the finish. Puller pulls for a bit and hops to the back, Trainee pulls for a few minutes and then blows right by a left turn. It wasn’t particularly well marked, but from second wheel I saw a group of riders make the turn 45 seconds earlier, so I figure he’s just living up to his tag. I can’t safely turn in time, but Puller and Blue make it, and keep riding up the road at a reduced pace. I follow Trainee in a U-turn, and we head back, but he’s clearly tired and the headwind is still there, so I pull him back to Puller and Blue. We cross the highway, turn into the school, stop at the finish line to have our tags pulled, and Puller introduces himself (I *think* his name was Jay), and we thank each other for the help in the group (I got more benefit going from solo to a group of four, but going from three to four also has a decent benefit).
I roll to my car, throw the bike in the back, take off my still-wet-from-the-waterfall shoes and socks, and drive around to the parking lot, so that I can head in for a shower. Another diet coke, some chips, and I head for home.
Epilogue
Statistics:
| Distance: | 149.5 miles |
| Elevation Gain: | 9740’ |
| Rolling time: | 9:50:03 |
| Elapsed time: | 12:16:46 |
| Average speed: | 15.2 MPH |
| Average HR: | 125 BPM |
| Weighted Average Power: | 158 watts |
| Garmin Calories | 12530 |
| Powertap KJ | 5235 |
(Note just how bad the Garmin calorie model is. Even if you factor in driveline losses (which bump the KJ number up to 5500), and adding in basal metabolism (12 hours * 100 cal/hour = 1200 calories), you only end up with perhaps 7000 calories expended. So, if you have a Garmin 500/705, don’t trust the model very much. The newer models have an option to use a better model that should yield better results).
While I was climbing Cayuse, a made a pact with myself – a pact to recognize that I don’t train in a way that works for this ride, and to just admit that and stop doing it. And I felt that way until I got out of the shower at the finish line. But in writing this, I found that the physical memories are gone; I have a hard time remembering just what was making me cranky during a specific section, so we shall see, as they say.
My overall feeling was that my performance really wasn’t any different than my 2011 ride, but the data tells a different story. I was 1 minute slower on Cayuse this year, but 20 minutes faster on the Paradise climb, and 4.5 minutes faster on the Backbone ridge climb. Overall, I took 42 minutes of my overall time, and pushed my average speed a full 1 MPH faster. So – despite how I felt – I did improve quite a bit.
I certainly wasn’t properly hydrated on Cayuse. Some was probably stomach weirdness after being sick, some was probably bad implementation on my part. If/when I do the ride again, I’m going to have to be much better about that section.
I made a second pact, one that I will volunteer to run the deli stop next year and fix it. That one has a better chance of happening.
What I carried
On the bike:
- Seat wedge
- Multi-tool
- 1 pack sport beans (emergency food)
- tire levels
- Spare tube, CO2, inflator
- Patch kit
- Blinkie
- Wallet
- Keys
- Garmin Edge 705 GPS
- CycleOps PowerTap (okay, in the rear hub)
- Small LED front light
- Salt tablets
- Phone
On my person
- Arm warmers
- Vest
- Sunscreen (purely decorative, since I always forget to use it).
- Assorted Nuun tablets (mix multiple flavors in one tube)
- 5 ziploc snack-size bags of my custom Accelerade mix (180 cal/bottle)
- Beef jerky
- Honey stinger waffles, 3 (160 cal each)
- Reduced fat triscuits (160 cal/10 crackers), two bags
- Reduced fat cheese-its (160 calories/40 crackers), two bags
Nutrition and Hydration Plan
My goal is to hit around 250 cal/hour on the ride. Enough to keep my blood sugar up, but light enough to not do an impression of a 40 lb sack of concrete in my stomach.
I typically go through a bottle of my drink mix and a bottle of Nuun every two hours. That’s 90 calories/hour.
Let’s do some calculations. For each hour, I’ll get 90 calories from my nutrition drink, so I need 160 calories from something else. That means a waffle, or a little bag of triscuits or cheese-its every hour. Plus what I supplement from the food stops.
About the data
All data is collected with a Garmin 705 GPS and a CycleOps PowerTap power meter.
I used three programs to analyze and reduce the data:
- Garmin Training Center, which runs on my laptop. This is probably the least useful of the programs; I only used it to pull the ridiculous Garmin calorie number.
- Strava. Strava provides a wealth of data. If you have a power meter, it’s worth it to upgrade to premium.
- Golden Cheetah. Golden Cheetah is a freeware program that runs on a variety of platforms. It is uneven and opaque, but has some really nice analysis features. If, for example, you are doing an interval workout, it can easily pull out your top <n> minute intervals from your ride and let you explore them.
About the author
Eric rides a 2004 Trek Madone 5.2. Clothing by deFeet, Cannondale, and Pearl Izumi. Hair by crystal clear cascade snow runoff.


