
A number of first-time RAMROD riders have asked for my advice recently, so I thought I would save some time and write this up.
After you’ve read this, you might want to read my ride reports as well:
Congratulations on choosing to try RAMROD. If you you have never ridden a long race with big mountain climbs, this ride is likely to change the way you think about climbing, challenge, and cycling in general.
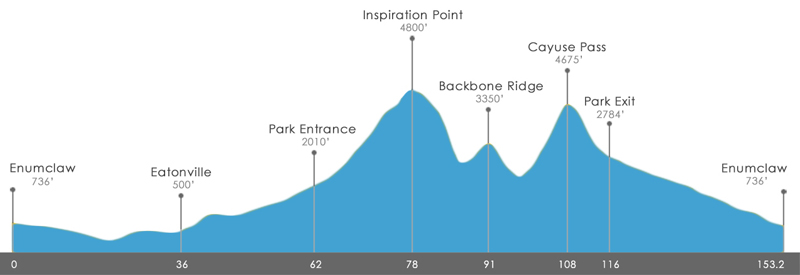
First off, a bit of clarification on the ride statistics. In the olden days, the RAMROD course went all of the way up to the Paradise visitor center before descending back down. A while back, the Park Service decided that having the bicycles up there was becoming an issue, so the climb up to Paradise now stops at inspiration point and skips the last little loop up to the visitor center and back. The ride description, however, has not been updated. This means that instead of 155 miles and 10,000’ of climbing, you are looking at 149 miles and 9300’ of climbing.
Preparation
A few thoughts on preparing for the ride…
Because it starts so early, it’s going to be a little cold. But in the afternoon it’s going to be a little hot (see Packwood forecast here for Cayuse conditions). Planning for both can be a bit of a challenge. You can go with the normal arm and/or leg warmers, or you can wear something disposable (like an STP tyvek jacket or a thrift store coat) and lose it at one of the food stops.
It will be a bit dark at 5AM in the morning. If you are going to start then, it would be a good idea to have a blinkie in back and a small white LED for the front.
I also recommend bringing a change of clothes and a towel; you can shower in the school when you’re done, and it’s so nice to be clean and cool for the drive home.
Nutrition & Hydration
This is a long – and often hot – ride. When a ride is 5-6 hours long, you can get away with not keeping up on your hydration and nutrition. On longer rides, there is less margin for error. This is not the time to make big changes to your plan, but here are a few things to think about:
Food – Start eating early, and eat all the time, aiming for 200-300 calories/hour. You probably don’t eat and drink now when you are climbing, but you will need to do that on these climbs.
Water – Drink water – or preferably, something with electrolytes in it often; more if it’s hotter.
Salt – You can lose a lot of salt, especially if its hot. Look for salty foods to eat, or use other salt supplementation. A drink like Nuun is better than water, but may not have enough electrolytes to keep you going. I’ve you are a salty sweater (if you can feel the salt crystalized on your face after long rides) I recommend a electrolyte tablet, like Succeed S-caps or Rocketlytes. I’m not a fan of endurolytes as they don’t have that much salt in them.
Overview of the route
RAMROD has three main sections; there’s a commute to the start, a hard mountain section, and then a commute back to the start point.
The commute to Eatonville (33 miles)
The course opens at 5AM. I tend to start right around that time, because I’m a big and not-particularly-fast cyclist, and RAMROD is beyond what I usually ride, so I like to be conservative. If you do century + hard climbing rides, you may choose to start later. If it looks like the weather is going to be hot, you may want to shift earlier.
Make sure to roll through the actual starting line so that the volunteers can pull off the tracking ticket part of your ride number. Not to scare you, but there are parts of the ride where you could make a bad choice and end up off the road where you wouldn’t be visible to others, so the organizers track the start and finish of all the riders. Making sure to go through the finish line is equally important.
After a few miles with an annoying amount of truck traffic, the route will turn left and head towards Eatonville. This left turn is about the only place you could easily make a wrong turn. Once you turn, you’re in for a pretty section to ride through, and an important decision.
You can choose to ride this section as a warm-up section at your own pace, or you can shop for a paceline to make it easier and faster. I do this by riding around 3 MPH slower than my target rate; if I want a 19-20MPH paceline, I ride at around 16MPH. If I ride faster, it’s harder for a paceline to catch up to me, and it’s more likely I’ll ride the whole section by myself. When a paceline passes me, I have a look at it and decide whether it meets my requirements.
It is very easy to ride too hard on this section of the course, and regret it later. Keep that in mind.
You are going to be a little sleepy and probably not that hungry during this section. Make sure to eat and drink anyway; you don’t want to get behind on calories or hydration.
The Fun Part
We have now reached the meat of the ride. For the next 88 miles, you are going to either be climbing or descending, and given the speed differences of the two, most of the time will be spent climbing. It starts with some short steep hills, and then just a slowly increasing gradient (elevation plot here). Be careful with your effort here; the section until the food stop feels mostly flat but in fact it’s a 1-3% climb, so if you have your mind set on 19MPH in the flat, you may cook yourself.
You have about 1300’ to climb before the next food stop. When you get there, walk around a bit, stretch, eat something, and make sure you have plenty of fluids. In the next 15 miles you are going to climb 2800’. You will enter the national park, and the first few miles after that is pretty easy, but then it kicks up to the 5-6% that it will hold all the way to the top (If you look at the official course elevation profile, there appears to be a very steep section right before the top. This does not exist in my memory or in my strava plot; I think there’s a slight kick-up there but it’s nothing like what the profile makes you think).
Paradise climb
My advice for the climb is simple. Ride your own pace, switch hand positions often, stand up often, and don’t be afraid to stop to stretch and/or rest if you need to. At the top there is water and a nice photo op (several, in fact), but don’t dawdle (feel free to frolic or gallivant); the next food stop is only a quick descent away….
Stevens Canyon descent
If you’ve ever watched the Tour on TV, you’ve seen mountain descents. Now, it’s your turn. Stevens Canyon is what we call an exposed road; there is no guardrail for most of it, the pavement is what I would call “variable”, and there is one tight hairpin a couple of miles in. It is also a lot of fun.
Enjoy it, but be careful. Note that there may be other riders who wish to descend much faster than you. My last trip down I was hovering around 30 MPH for most of the descent.
A note for descents in general; road conditions can be variable, so pay attention. Look for signs at the top of the descents, but don’t assume that the lack of the sign means its perfect. Also watch out for wildlife.
At the bottom, you’ll have another food stop. Make sure to fill your bottles and eat something salty.
Backbone Ridge
This is a small “cat 3” climb, and after the HC one you just completed, it probably won’t seem too bad. In 2011, I had just gotten settled back into climbing when I found myself at the top. After this, there’s another nice descent.
Cayuse Pass
Which, after 93 miles on the bike, brings us finally to Cayuse pass. Your challenge is to climb 2400’ over the next 11 miles. The first three miles are pretty flat, so it’s really 2300’ over 8 miles. That sounds relatively easy, but reference the distance you’ve already ridden, and remember that, unless you are pretty fast, it is now early afternoon, and you are dealing with the weather on the south side of the mountain. Eighty degrees is common, ninety is possible, and in 09’, it was over 100.
After the first few miles, the climb is quite exposed, so you get little respite from the sun, and the gradient is dead-steady. There is typically a water stop 6.8 miles into the climb, and, if the weather hasn’t been too hot, you may find a waterfall to stand in to cool off before that.
So, basically, this climb is going to suck. It’s not about gear ratios, it’s not about pacing yourself, it’s just about enduring the suffering. It is *hugely* important to remember to keep eating and drinking in this section. Yes, I know how bad 105 degree accelerade tastes, yes, I know that you could brew tea with the contents of your water bottle. You have to keep eating and hydrating. Even if you prefer liquid nourishment, this isn’t a bad time for some solid food.
Eventually, you will top out where Cayuse pass hits highway 410. There will be water there. Just as you had 8 miles to climb up Cayuse, you have another 8 miles to travel, but this time it’s down, down, gloriously down, and since you are on the north side, it will likely be a bit cooler.
After 20 minutes or so (less if you’re faster), you will come to the deli stop, where you can get a custom deli sandwich, a can of pop, and assorted other snacks. Take the time to get a sandwich and sit in the shade a bit; you have done the hard part, and all you have to do is get back home. Fuel up, sodium up, hydrate, and savor the moment, because it isn’t quite over yet.
Commute to Enumclaw
This part looks easy on the map. It’s only 36 miles, and you are going to lose 1600’ along the way. However, what the maps and guide don’t tell you is that there is *always* a headwind during that section. It is much easier to ride in a paceline during this section, but beware: most people are as tired as you are, and some are more tired. Be careful, and remember that you may need to decide to hop out of a paceline if it’s getting dicey.
Near the bottom you will have a left turn towards Mud Mountain Dam; pay attention and make sure you do it safely. This will lead you to a bit of a curvy descent; pay attention and don’t go too fast. At the bottom, you have just a few miles left to head back to the high school. And then you are done.
Congratulations.
So, what do you think ?