Browsing posts in: CAD

Finishing touches–USB charging station part 4

I spent a bit of time tuning all of the joints, cleaning out the dog bones so that they would look nice, and doing an overall sanding of all the plywood. Then it was on to gluing. This was done in sections so that it could be easily clamped together:

IMG_9186

IMG_9187

The top and back had to be glued all at once, and then clamped. I used a lot of clamps

Finishing was next. I decided to use a water-based polyurethane that I already had:

IMG_9188

If you look closely, you will see the base hovering above the platform. I build a little stand using the incorrect base piece I built earlier and some standoffs made of machine screws and nuts. That way, I could finish the bottom, flip it over, and finish the parts of the top that were not done. Finishing the inside of the cubbies was a significant pain in the butt.

After the finish dried, I sanded down the raised grain that water-based poly gives you and then put on… well, I was going to put on a second coat and then realized that I didn’t need the protection, so I called the finishing done.

I wanted to have some padding for the cubbies to help hold the devices in, so I bought some felt at the fabric store. The pieces needed to be cut into simple rectangles – which would have been pretty easy to do with an x-acto knife, but when you have a laser cutter hanging out under the garage, there’s an easier way.

IMG_9189

Felt is pretty light and the laser cutter has air assist to clear away the smoke from the cutting, so you need to hold it down. The magnets are carefully aligned so they don’t overlap any of the cuts.

IMG_9190

An action shot of the cut.

IMG_9192

And the result. Somewhat surprising to me, there was absolutely no charring at all on the felt; it looks like it was just cut with a very accurate knife.

IMG_9194

And here we are with the felt installed. There is no felt in the bottom since that part is just a pass-through for the cables (yes, it could have been more elegant). Putting the felt in was *interesting*. I’d peel of the backing, put it adhesive-side up on the appropriately-sized piece of cardboard from a Digi-Key box, and then, with the unit upside down, carefully lift it up to align the felt with the edge, and then press it down. It worked pretty well.

IMG_9195

And finally, it was time for installation. The first shelf peg fit perfectly, the second one was offset by a bit, which means my measurements were off a bit. I enlarged the holes and it was fine. The bottom holes… well, they were off by about 1/4 inch. Which is a bit embarrassing. I did a bit of modification to two of the shelf pins with a grinding wheel in my Dremel to make the cylindrical part a bit longer so they would stick farther into the shelve, drilled a hole through the shelf below to add a grommet, and installed the hub. Here you see it charging my cell phone. I bought some more cables to use but they’re currently all in use for another project, so that’s why there is only one device.

Overall, I’m pretty happy about it; the project looks decent (if you like through-tab designs; I could have done a hidden tab design but chose not to for my first project) and I learned a lot about how to do the design and how to use the Shaper Origin.


A few cutting remarks–USB charging station part 3

In our previous episode, we had just finished cutting the hub portion of the station.

Now, it’s time to cut the remaining parts. I started by cutting the biggest part – the base. It’s about 8″ x 10″, and it has 17 slots in it and 4 holes, and each of those need to be cut in two passes. I decided to cut all the interior holes first in two passes, and then cut the outline. So, I started at the bottom and cut about 13 slots, and then I found that there were four slots missing.

When somebody added shelves to the design, he forgot to do the cut operation with the new shelves, so there were no holes there. Which means that the design needs to be redone, and since shaper doesn’t support an “update my design” operation, I had to abandon that section, though I did manage to cut a shelve out of it so it wasn’t a total loss.

The rest of the cutting was pretty repetitive. The shaper mostly worked okay, though it crashed a number of times and hung a few times as well. The back has 7 holes and a bunch of tabs and the shaper crashed on the last cut. Then I rebooted and found that both the workspace and the placement information is stored in non-volatile memory, so as long as the crash doesn’t damage your workpiece, you can continue.

Eventually, I finished cutting all the pieces, and started cleaning them up:

IMG_9176

The shaper uses an upcut spiral bit so that it can easily pull the sawdust out; that cuts well, but leaves a fuzzy edge to the cut. I tried an offset technique where you do the initial cut a bit to the outside of the final line and the second cut right on the line, but the results weren’t any better. I’m going to explore whether a nicer bit would give a better result, but the result here is really worse than it looks. A couple of minutes with some 220 grit sandpaper and it cleans up nicely.

IMG_9180

A bit more time for cleanup, and I had a bit pile of parts:

IMG_9181

So, is this going to actually work, or was all that effort for naught?

Well, guess what?

IMG_9182

The fit of the tabs was very nice and it looks pretty good even without any glue to hold the parts together. Success!

IMG_9183IMG_9185

Next up is to look at all the joints and do a bit more tuning on the fit, especially on the hub holder in the left of the last picture.


Givin’ the dog a bone–USB charging station part 2

One of the realities of doing CAD work is that the real world sometimes intrudes…

Your laser cutter – for example – is limited to cutting a given size of material, and only in one plane. And it isn’t a perfectly thin cut, there is a little width to the laser beam.

For router-based machining, one of the problems is that the cutter is round, and often the cuts you would like to make are square. Here’s an example:

Image result for cnc dog bones

The part on the left is what you designed, and the part on the right is what you got when you cut it. There are a few approaches to deal with this; you can cut the corners out with a knife or saw, you can just pound the parts together and hope the material yields, or you can change your design so that the corners are cut out. It looks like this:

Image result for cnc dog bone examples

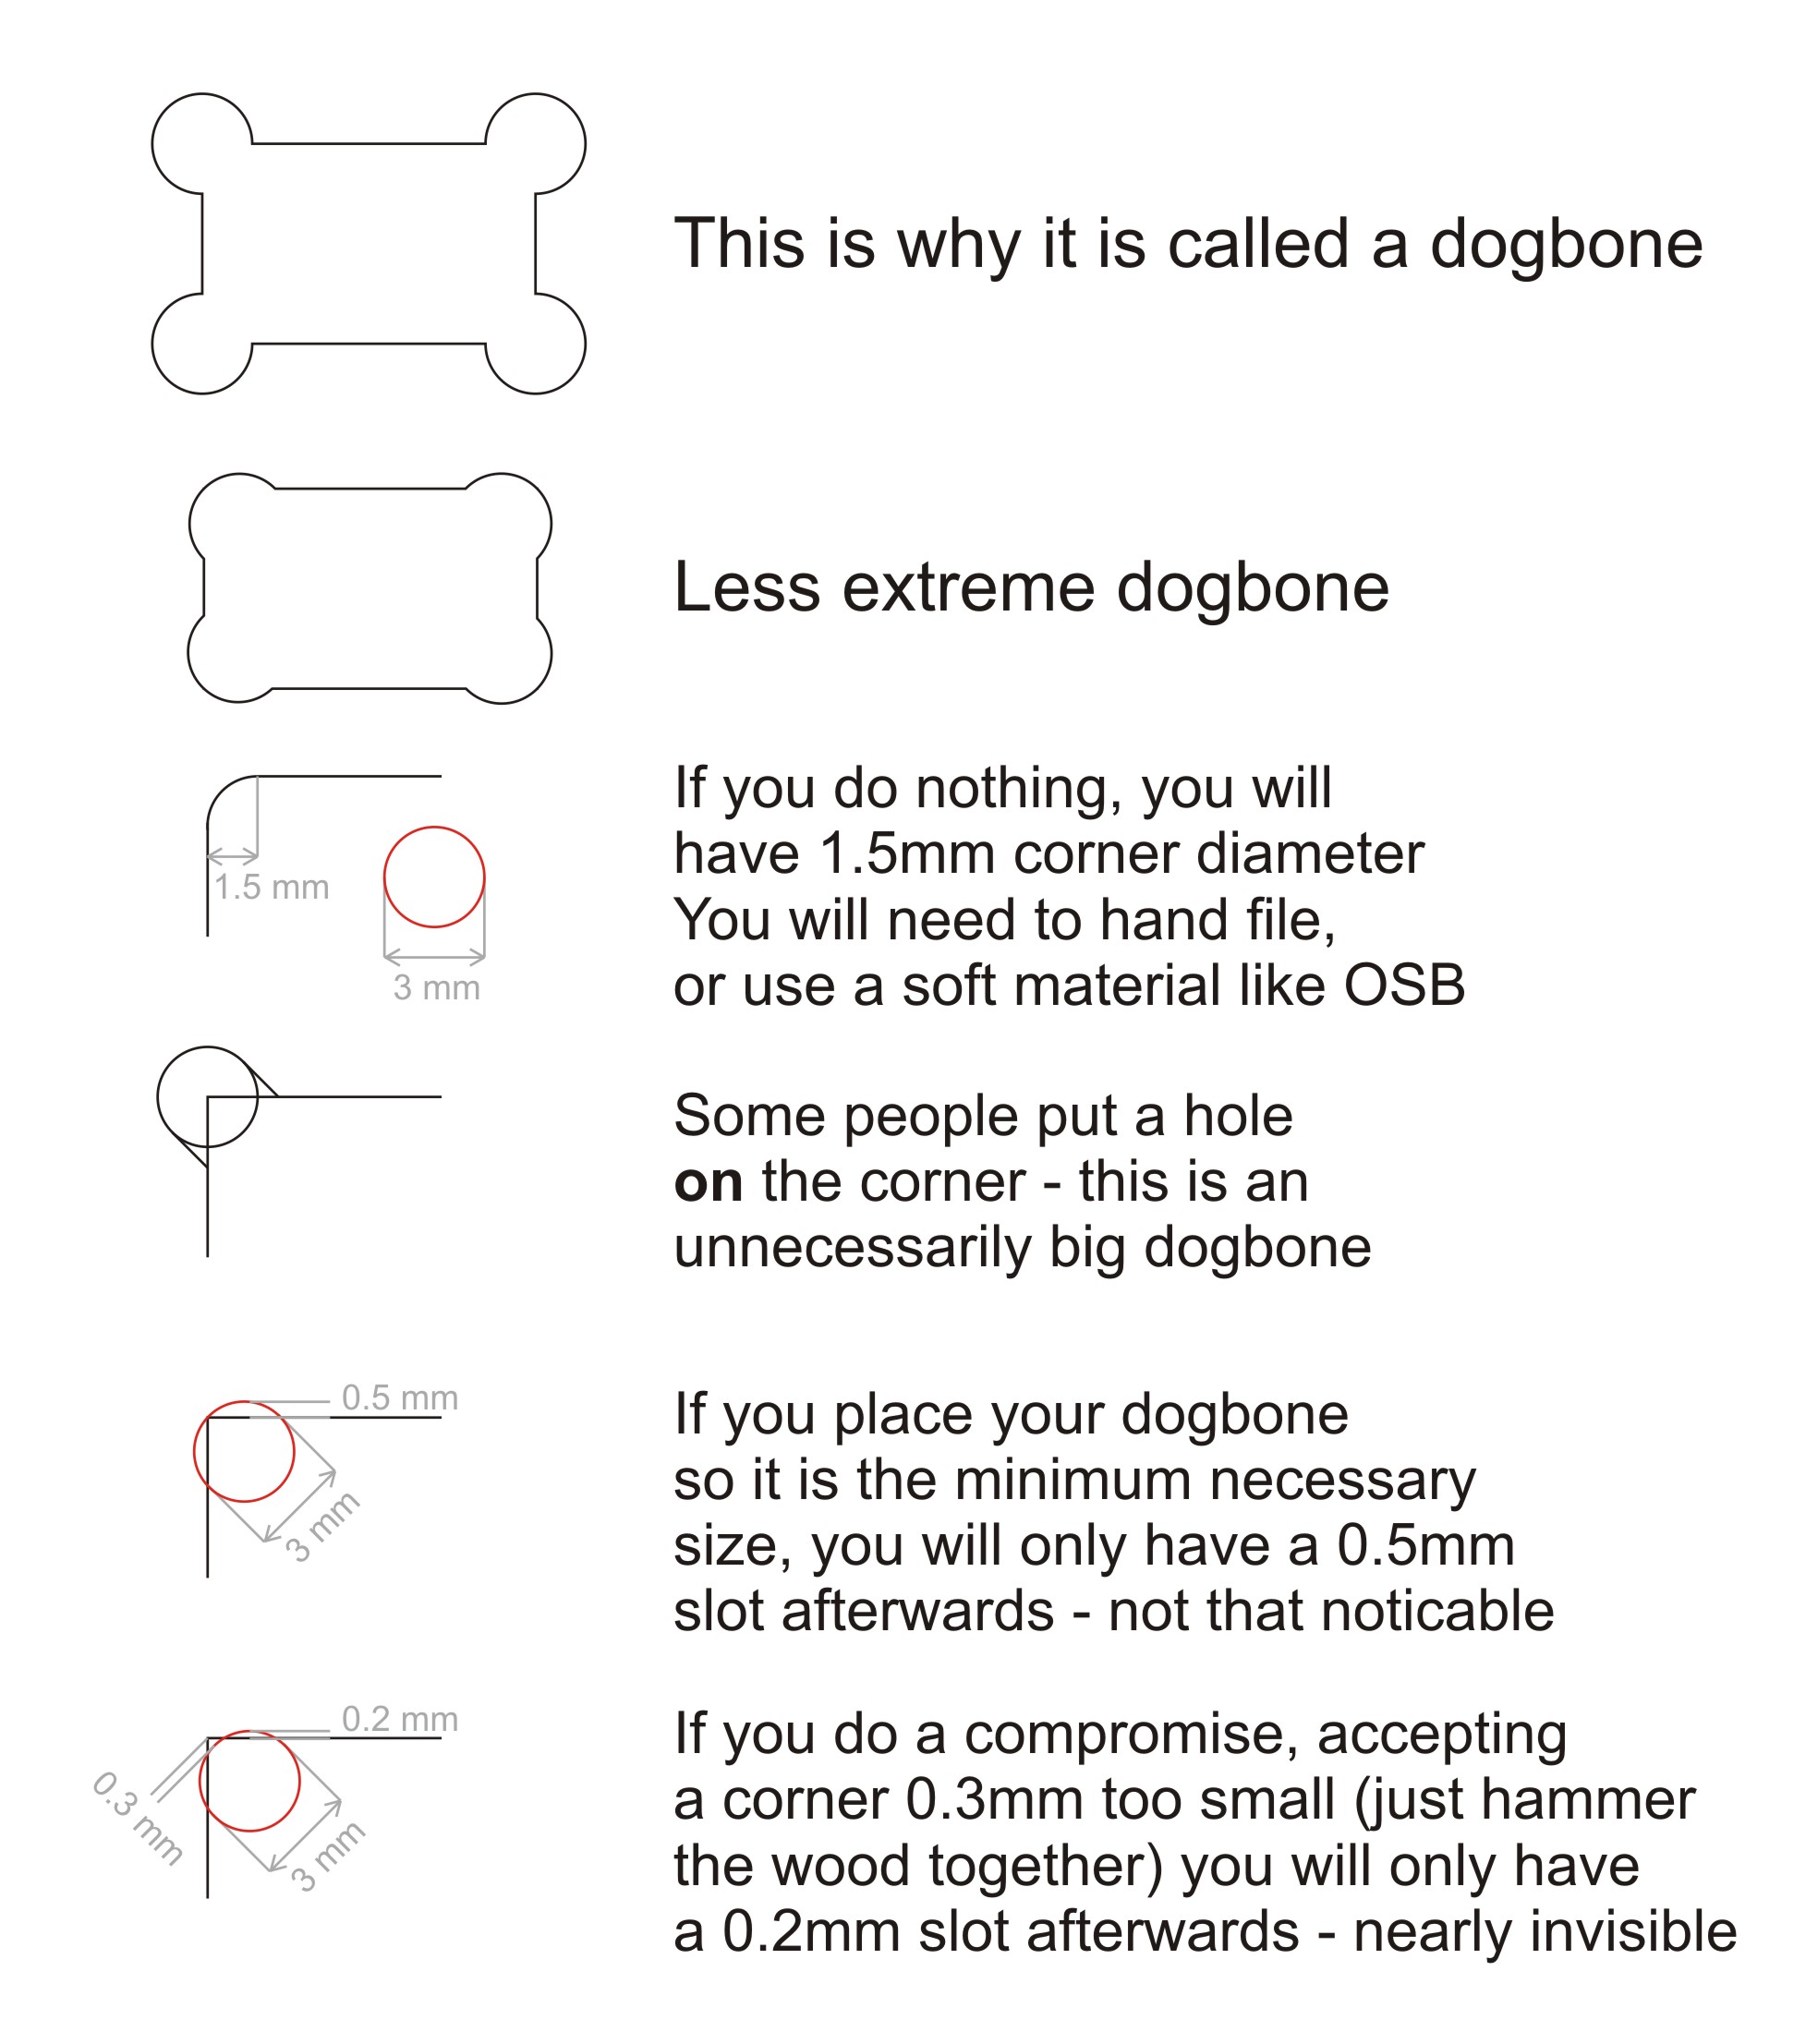
Hence the name “dog bone”. With the Shaper, there are a few ways to do this; you can either modify your design to include the dog bones, or you can do them on the tool, one at a time, kind of by hand. Since there are hundreds in this design, doing them on the tool did not seem very exciting.

There is an add-in for Fusion 360 that does dog bones, so I installed it and tried it on a few designs. Like lots of freeware, it’s a bit challenging; you either have to pick every corner where you want the dog bone, or you can let it pick the corners that need to be modified but this only works if the corners are vertical.

Oh, and it takes a long time. A *long* time. Like 5 minutes for a panel with just a few cuts if you mark them by hand, or 20+ minutes for one with lots of holes (19) where it figures out which corners to modify. This is made much more annoying because Fusion 360 does something that I thought wasn’t supposed to be allowed under Windows UI guidelines any more; the status bar that it shows brings the window to the foreground and selects it. Since this is happening about every second, you can’t do anything else on your computer while the dog-boneification process is underway. Which kindof gets in the way of making good progress, since you need to go and do something else.

About this time I needed to get some wood for the shelf, and I needed to know how much and how I would arrange it the cut pieces on the board. I found this tutorial to be very useful in understanding how to do that, and ended up with a nice layout on a 24” x 48” sheet that used a bit more more than half of the space.

Went to add the dogbones by selecting all 13 pieces in the and kicking off the add-in. An hour later it was still running. Two hours later is was still running, much more slowly. Left it overnight and came back to the autodesk crash dialog.

About this time I was really thinking of just using the Glowforge and forgetting about dogbones, but the whole point was to use the shaper, so I pressed on.

Went out for lunch, picked up some stock (birch plywood that was 4.7mm thick), rolled back to my 3-d layout, set the thickness of the stock, and went through and did each of the dogbones by hand-selecting each corner. After that was done, I ran the Fusion 360 plug-in for the Shaper Origin, which generated SVG files that I uploaded to their website (you can use a USB key if you’d rather). I was going to do the bottom part of the design; the last wide shelf and then the pieces that hang the hub underneath that, four pieces in total.


image

At some point, Fusion lost the material selection for the one piece, and I was too lazy to fix it.

IMG_9171

Here is the setup. Sitting on the router table portion of my BT3000 table saw, I have an extra ikea shelf (melamine and very flat), a sacrificial piece of MDF on top of that (you need to cut just through the material), and then the birch plywood on top (that piece was about $8). Across the wood you can see the “shaper tape”; this is how the vision system on the router knows where it is. The basic process to cut is:

  1. Move the router around so that it locates all of the domino-shaped shapes on the shaper tape.
  2. Load a design (in this case, from the online pieces I uploaded)
  3. Set the cut parameters (the size of the cutter you have in the router (1/8” in this case), how deep you want to cut on this pass (I did two passes, one at 0.125” and one at 0.2”)
  4. Do a “z – touch” so that the router knows where the top of the material is and can therefore judge depth.
  5. Move the router so that the line you want to cut is inside the circle.
  6. Turn the router on (using the physical switch on the head)
  7. Press the cut button (green button on the right handle), and wait for the bit to plunge into the work.
  8. Navigate the router around the cut.
  9. Press the retract button (orange button on the left handle), and wait for it to retract.

At that point, you can move to another cut that needs to be made or change parameters and recut the same line (deeper, for example).

This worked really well, except for two issues. The first was that on my second cut, something went wrong, and on the cut, the router plunged the bit as deep as it could and then the software crashed (you can see the burned hole near the bottom of the workpiece). I had to turn off the router, pull it carefully out, and cycle the power on the shaper to get back. The second was my fault; I cut all the way through an outline before forgetting that the piece I cut had a cutout. Oh, and the software crashed again when it was just sitting there; the image on the display is a static one before I moved it to make the picture nicer.

And the result is…

IMG_9172

IMG_9173

What do we see? Well, the first thing you’ll notice is that there is a lot of fuzziness on some of the cuts. The shaper uses an upcut bit, so that’s pretty common. The fix is to do the first cut at a bit of an offset back from the line and then do the final cut without the offset. Overall, the lines look really straight, which is remarkable given that a human is moving the router around.

What else do we see? Well, the joints don’t look very good, and there is a distinct lack of dogbones on them.

It turns out that I outsmarted myself. One of the tricks with dogbones in wood is to set the cutter size slightly smaller than the actual size of the cutter; that makes the dogbone a bit smaller but it still works since the wood has a little give to it. But… the Shaper knows the size of the cut you are asking it to do and the size of the cutter, so it just avoids cutting the dogbone path. I cut them by hand with a utility knife, but I was short of time so this is the result I got.

Finally, a couple of action shots with the hub in place:

IMG_9174

IMG_9175

Up next is to redo the dogbones for the remaining pieces *again*, and the cut them using the offset to see if I can get nicer joints.


Fusion 360: USB Charging station part 1

With a new Shaper Origin joining my Glowforge in the workshop, I decided it was finally time to break down and learn a real 3D modelling program. Autodesk provide a free year’s subscription to Fusion 360 and it looks like I can keep using it for hobby use, so I decided to learn it.

It took a few days, but I finally understand what I’m doing and can make decent progress. The really cool part about fusion is that your design is created from a series of steps and that series of steps is preserved in a timeline; if you discover that you made a mistake in how you defined a shape (fusion calls them “bodies”) two hours ago, you can go back to that step in the timeline and either modify the step that is there or add in a new one. This is a hugely powerful paradigm once you get used to it. It also lets you define parameters such as the width or height of a design, and when you change them it walks through all the steps and updates things. Or, you can say that you want to do a project in 1/4” plywood, but when you measure it it turns out to be actually 0.23” thick.

After watching a few tutorials, I decided I needed to do a project for the shaper origin, and that project would be a USB charging station to go in our walk-in closet. We have a shelf with predrilled 5mm holes that I am going to mount the charging station on.

The first step was to order a hub, and I picked up a RavPower Nexus 6 charger; it will spread 60 watts of power across 6 ports.

I did two different designs before I settled on one that I liked.

I started with four holes that should line up with the holes in the cabinet side:

image

Basically, the location of the holes is constrained by the measurements, and then the rectangle around it gives a given border.

The first shelf is added, along with tabs that will connect it to the other components. To get these views I’m rewinding the timeline to show what the design was at a certain point of time.

image

Now it’s time to duplicate the shelves.

image

A singled command called “pattern” did that; I selected a 1×8 pattern and the offset between each of the shelves.

A view from the back farther along:

image

I added a top and a back to the shelves. There are now a series of cubbies which is where the devices to be charged will rest. There are holes in the top and back where the tabs from the shelves will stick through, and holes in the back for the charging cables. This is done by subtraction one body from another, using the “cut” operation.

The section for shelves is completed. Now we need a spot for the usb hub. It will live in a box under the shelves, with a hole in the back for the power cord. The size of the hub was measured with a set of calipers, and then I entered it directly as a parameter for the design.

image

It looks like I perfectly sized the base for what I wanted, but in reality I did the shelves and usb hub box and then went back and changed the number of pins that the design covered.

The reasons that the tool is called “Fusion” is that it is a combination of design, rendering, and analysis tools. Since it’s going to be made out of wood, here’s a nice render of the result done in pine:

image

Basically the hub lives at the bottom, the wires from the hub go out the back through the bottom cubby, and then back through the individual cubby holes. The cubby bottoms will have felt in the bottom, which I’m sure I could define if I wanted to.

To build this, there are different ways to proceed. Shaper provides an add-in that lets me select on component and export it as an SVG that the tool will understand. There are 7 parts that are unique, and then 7 shelves that are identical.

I’ll write more when I’ve had a chance to get some material and do some cutting. I’m going to start with 1/4” plywood and use the shaper, but I could also use the glowforge to make this from as well.

With a bill of materials add-in, I can get an export that I can turn into a parts list. If everything fit perfectly, it would take 2.68 square feet for the whole thing, so if I go with a 2×2 piece, things will *probably* work out.

image

More when I have some wood cut. My plan is to start with a cheap wood (maybe mdf) first.


Pages:12