
Today my daughter and I went to the Museum of flight to take some pictures and to do the space shuttle simulator experience. At the end of the shuttle program, the museum of flight put in a bid to get one of the 4 shuttles. They did not win – the 4 shuttles are on display in New York, Washington DC, Cape Canaveral, and Los Angeles. You can go look at them there.
The museum of flight, however, got something more unique. It got the space shuttle full fuselage trainer. From the outside, it’s a mostly shuttle-shaped object made of plywood and steel, minus the wings.
The cool part is that for the small fee – okay, the rather large fee – of $30, you can take a tour of the shuttle cockpit. We paid our money and were scheduled for the 10:45 tour. Tours are limited to 6 people per tour (more on why in a minute), and you may need to book ahead. There are a lengthy list of restrictions; you need to be able to move around and deal with climbing in tight areas, and you can’t be too tall (they say 6’4” max).
Pictures are explicitly allowed. I’m going to be talking about what’s in the pictures; some came from the tour, some came from the internets, but a lot was already in my head.
I’ve always been a space guy – I watched the Apollo landing when I was 5 and have scrapbooks from Gemini before that. I’ve seen lots of pictures inside the shuttle, but I’m pretty excited at seeing real hardware.
You enter by sitting down and sliding into the round hatch. It’s not particularly difficult, but there isn’t a ton of space. That puts you in the middeck. There were 7 of us (5 guest, two guides), and there’s not a lot of spare room to move around. They do have the hatch to the docking adapter (for docking with ISS) open, and that takes up floor space, but my first impression is that it’s really, really tight. The mid-fuselage of the shuttle is about 17’ wide, but you need to fit the pressurized cabin + insulation + structure inside of that, and my guess is that the inside is maybe 15’ across, and that’s before they start putting stuff on the walls. A 737 is around 12’ inside, and it’s maybe a bit wider than that, but not much. The front part of the middeck is given over to floor-to-ceiling storage boxes; they are about 18” deep, and that leaves you with perhaps 8’ from the cabinets to the airlock wall in back. So, something like 100 sq ft or so.

Here’s a picture. I’m standing pretty near the entrance hatch, the storage cabinets are obvious in the middle of the picture, and the curved wall in the back is the outer wall of the cabin. Human to scale; the overhead is something like 7’5” from the floor, and is festooned with velcro to hold cabling.
In a full flight (7 astronauts), three of the astronauts would get to look at these storage bins shaking all of the place during launch. There are no windows on the mid-deck.
Soon after I took this picture, we split up the group; the other 3 tourists went up to the flight deck, and we stayed down on the middeck, took pictures, and listened to our guide.

Here’s one facing the other way; the lockers that were on the left in the previous picture are now on the right. The switch panel is on the outer wall of the cabin, and the section to the left of that sticks out a fair bit.

A better picture in the same direction. The section labeled “Potable” is the water dispenser in the galley. That’s the whole galley; perhaps 18” by 36” in side. It has a little oven in it. To the left is yet another storage space.

Here’s a closeup of the panel. Galley stuff across the top, and then the rest is all about the airlock – heaters, lights, that sort of thing. There are additional airlock controls (for oxygen, mostly) in a panel at the top of the waste disposal cubicle.

Facing aft, looking through the docking adapter into the payload bay. Did not get to meet the alien visible in the center of the picture. To the right of this is the ladder up to the flight deck, and then the space toilet shoved in an alcove. There isn’t really room for a door, so there’s a privacy curtain to sort of block the view, but I’m sure there are few secrets between astronauts in the tight quarters.

Detail of the hatch cover, which is lying on the floor. It would present no problem in space, but it’s a bit inconvenient on the ground.
We had about 10 minutes in the middeck, at which point the other tourists came down and we climbed up to the flight deck. This is the whole reason for the warnings and restrictions about physical capability in the description; the ladder is tiny as is the hole you need to fit through. You climb partway up, sit on the edge and then lever yourself over and crawl to the side. Then you can stand up. Very carefully.
Even with a bit of a hunch, the only place I can stand up is directly under the two view windows; they look direction up and are around 16” square. I can turn around if I am careful. Soon there are 3 of us up there, and we get the spiel on the cockpit. They have the commander and pilot’s seat section blocked off, we can’t more fore any more than we are and without a wide angle lens, I can’t take any real pictures. It’s maybe 4’ by 3’; perhaps a bit more. It reminds me a bit of the Los Angeles class submarine we toured in 2000 or 2001, but it’s way tighter.
Here’s a picture I pulled from the net:

This is facing aft; the controls here are all related to payload; the control in the middle between the windows is for the arm. My head is stuck up under one of the windows.
Here’s pretty much what it would look like if you could take a nice picture of it:
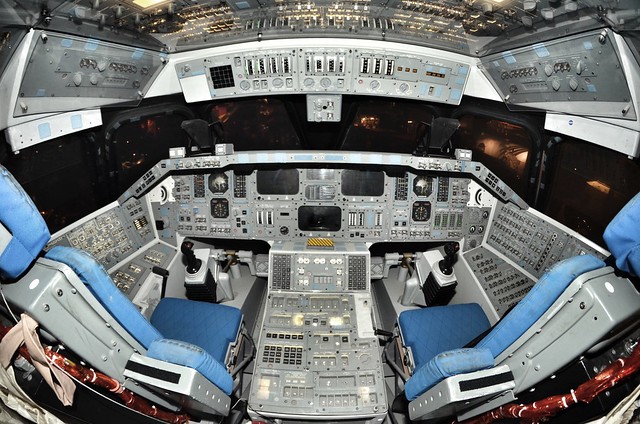
The seats on the tour aren’t quite as nice and the console in the middle is covered with plexiglass to protect it, but this is pretty much it, though the trainer has the new “glass cockpit” displays instead of the original ones shown here. There are switches and circuit breakers *everywhere*. I start taking pictures of panels:

The intercom system control panel. I did not see an iPod dock connector.

Pretty sure this is about the controllers for the commander and pilot.

Gauges and controls for the auxiliary power units. The APUs use hydrazine (nasty stuff) to drive a turbine that turns a hydraulic pump, generating hydraulic pressure to move the flight surfaces (elevons and rudder). They are only powered during liftoff and landing. There are 3 separate APUs (redundancy), hence the 3 sections. I really like the analog bargraph displays.

Downlink data multiplexer. Takes various data feeds and puts them together so that the data can be sent back to the ground.
This is all late-60s early 70s tech.

Flight computer with keyboards. Okay, so, that’s what we were told, but in fact this is really just the terminal for the flight computer system. There are, in fact, 4 computers scattered around the avionics bays that work redundantly and participate in an interesting voting scheme, plus a 5th computer with separately-developed software that can handle ascent and reentry only. In the original versions, they could only hold one program at a time (in core memory), which made having the fifth computer (with the reentry code loaded) ready at all times a very good idea. They were later upgraded so that they could hold whatever the current phase was (ascent, on-obit, ISS (presumably)) plus the descent phase code.

The rest of the center console. Big and clunky. It has all a lot of useful controls; you can shut off the main engines or manually command the solid rocket boosters or external tanks to separate (if you have to do any of these you are probably already having a bad day); you can see how the radios work, or you can set up how the RCS controller works (used only in orbit).

Control panel on the commander side, mostly covering HVAC (I think NASA calls this “environmental”). On-orbit, the shuttle generates a lot of heat (people & electronics), and needs to cool down. It radiated heat through large radiators on the inside of the payload bay doors; the controls on the right side that talk about “rad” or “freon” are concerned with controlling that. If the doors were closed, they boiled anhydrous ammonia (also nasty stuff); that’s what the NH3 boiler controls in the lower right deal with. There’s also a flash evaporator that seems to deal with boiling off water (H20) to get rid of heat. The shuttle generated power from hydrogen/oxygen fuel cells, so it always had extra water.

The left side of the same panel. This has water loop pumps and fan controls; fans are very important because there is no convection in zero gravity so you can easily get very localized hotspots. Also pretty important for people sleeping so they don’t accumulate a cloud of CO2 around their heads.

More water controls

Close up of one of the computer entry panels, this one on the starboard side behind the pilot’s seat (there is a commander and a pilot who can both fly the shuttle; there is no co-pilot because no astronaut wants to be labeled such ways).

My favorite panel; the video processing unit. Hey, they have wireless!

A few switches and a bunch of circuit breakers. Heater for the O2 tank, the smoke detectors, and the fire suppression system; they all have breakers here.

Copilot’s (I mean “pilot’s”) panel. Top left panel is a bit like the service panel in your house, but more complicated. Controls what power-supply circuits (“busses”) are energized, and there are a lot here. Just to the right of that is the CRYO panel; it’s all about the cryogenic (ie really really cold) liquid hydrogen and oxygen that are used to feed the fuel cells. Three sets of H2 and O2 tanks, heaters, and controls for the fuel cells themselves. I guess the guy on the right has all the power (ha ha). The panel below is about hydraulics, APUs, that sort of thing.
Those are all the panels I grabbed; I missed some commander-side ones. I didn’t get the aft payload ones because I was too close and they were covered by plexiglass. There are also all the overhead controls that I couldn’t get a good angle on, and there are a ton of switches there. Each pilot has controls over their audio feeds, and there are additional computer controls and a lot of controls for the OMS (orbital maneuvering system, used to change orbit and deorbit the orbiter) and RCS (reaction control system, used to rotate the shuttle and make small changes in position (such as docking with ISS)). Both systems use propellants; there is a fair bit of redundancy and this is where the controls all reside.
All too quickly, our time was over, and we contorted our way back down to the now very spacious middeck, and exited in the approved NASA manner (grab the bar above the hatch and slide out feet-first). We went into the payload section of the trainer (not part of the tour).

This picture is looking forward, through the docking adapter at the storage bins in the middeck.
If you want to see my full-resolution pictures, you can see the gallery here.
I also highly recommend the National Geographic gigipan series. See the space toilet (aka “Waste Collection System”) in all of its glorious detail (you can see the ceiling control panel if you zoom in).
So, what do you think ?