
I recently spent some time in metal shop.

No, not like that. More like this:

I have for the last – well, let’s just settle on “many” – years been working in wood, and if I do say so myself – and I do because there’s nobody else around to say so – I’m pretty good at it. I can do carpentry well, finish carpentry okay, and I dabble in cabinetmaking, though I’m only okay at that.
And I’ve worked in concrete and tile a bit, but there’s one area that I haven’t done much in. Metal. I’m okay with a drill press, a hacksaw, and an angle grinder, and I can identify lathes, mills, and welders in a lineup, but I don’t know how to use them.
Okay, that’s not quite correct. I like to read and my mind soaks up a lot of useless facts, so I have a lot of theoretical understanding of machine tools and zero practical experience. I mostly regret my inability to weld.Welding is, after all, what separates humans from the other animals.
I decided to do something about my lack of metal experience, which led me to a bunch of web searching, and, finally, to the Metal Shop class at Makerhaus. The class meets for 5 Saturdays from 9:00 AM to 12:30 PM. It was pretty much exactly what I wanted, except that it’s in Fremont. Have you ever heard the joke about the man who stops by the side of the road and asks a farmer directions? The farmer thinks for a while, and finally says, “You can’t get there from here”. That’s what it’s like to get to Fremont from my house.
The weeks before I order the materials for class:
- A 2” aluminum rod 12” long
- A 2” x 24” piece of steel (3/16” thick IIRC)
- A 4” x 12” piece of sheet metal (also steel)
The first week finds me in a class with 6 other students, with various levels experience; some have never done anything shop-like, and others have taken classes before.
I should probably note that the previous picture is not, in fact, the Makerhaus metal shop, which is smaller and quite a bit cleaner. Here’s a quick tour, though it’s a bit more lived-in now. It contains the following tools (strangely, I couldn’t find the list on their website):
Main room:
- Drill press
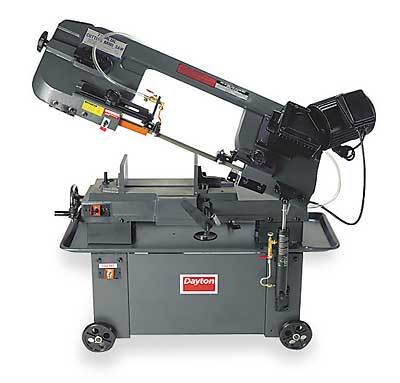
- Horizontal bandsaw
- Lathe
- Magnetic brake for bending sheet metal, a pretty nice one.
- A manual shear for cutting sheet metal, also pretty nice.
- A big vertical mill.
Hot/Loud room:
- Belt/Disc sander (for smoothing and preparing metal)
- Air compressor (for the wood shop as well IIRC)
- Sandblasting chamber.
- Welders (2 MIG, 1 TIG)
Both rooms have appropriate benches and there is some auxiliary equipment (welding jacket and helmets, clamps, etc.). There are some community tools outside the shop in a rolling tool chest; they are the quality that you would expect from tools that are used by random people.
The first day is about introduction and safety, and our instructor Alex walks us through each of the machines, showing how to set them up and how to perform various operations. Oh, and telling us how we can hurt ourselves on each of them. His introduction is good, but I’d also like to have some guides to read before each class to remind myself on the basics, and perhaps links to some online videos. We ended the first day a bit early after going through all the tools.
The second day is getting started on the project. The project that Alex gave us is a candleholder with a welded steel frame and turned aluminum holders for the candles – which would let you use all the tools – but you can choose another project if you would like.
This is probably my biggest complaint about the class; it would have been very helpful to have an idea of the project scope ahead of time. If I had known that, I would already had something in mind and would have saved a couple of hours. I think it was harder on the other people in the class; I’m used to taking a concept and iterating on it a few times, so I got to something that would work quickly. It would really help to have the basic project and some options available online.
I choose to do a modification of Alex’s design. It’s going to have a frame welded together out of the steel, and I will turn and machine the aluminum into candle holders.
At this point, I don’t remember what I did on which day, but I’ll talk about each of the parts from start to finish. In reality, I jumped back and forth between them, but I think this will be a bit clearer.
Frame
I do a few drawings, and then mark the steel and cut it to length on the horizontal band saw. It’s an interesting machine; you lift the blade up, and then in comes down under gravity with the rate fine-tuned by a valve. I cut out the lengths that I need, and then take them into the hot room. I square up the cuts on the sander, and then bevel the ends so that there is room for the weld bead.
I do a test weld with some scraps. We’re using MIG welding; there is a spool of wire in the welder that feeds out when you hit a button on the welding torch, and that wire is energized. Assuming the workpiece is grounded, you touch the wire to the metal and it arcs, vaporizes, and melts the material that you are welding along with the wire. The “IG” part of “MIG” means “Inert Gas”; while the wire is feeding through the torch an inert gas (CO2, argon, some other gases, or a mixture (I told you that I had lots of theoretical knowledge…)) flows to the welding spot, pushing the oxygen away and facilitating a nice weld. You can control how much voltage is put into the gun, and the feed rate of the wire through controls on the welder. With a bit of adjustment, I get a decent – if a bit big – bead across the metal, but the weld I tried between two scraps looks really rough (who did that weld? Vandals?)
I move onto the welding the frame pieces. I get acceptable results (enough penetration for the weld to be solid), but the bead is pretty big and not very even. It’s really hard to see what’s going on; the welding helmet auto-darkens to keep from frying your eyes (a good thing), but all you can see is a green light where the arc is and a bit of a glow from the melted metal along the weld line. The second one is a bit better. I then move to the 90 degree joins where the candle holder will attach to the wall. My results here have the same problem as before, with a lot of extra metal at the join, but the penetration is okay. I realize afterwards that I had the wire feed a little high; a slower feed rate would have gotten me a good weld with a smaller bead. I think. I also think there may be a small welder in my future.
I decide to do the rest of the finishing for the frame at home, as I have the right tools and I think my drill bits are in better shape. I drill three holes to mount the candle holders, and then countersink them on the back (so I can use flush screws), and then two holes on the upright that will be used to mount to the wall.
The rest of the work on the frame is grinding and finishing. I do a fair bit with a metal grinding wheel in my angle grinder, do some research on what to do next, and buy some sandpaper flap discs.

I use them to finish grinding off the welds – the 90 degree ones are especially fun – and then work to get an even finish. I stop at 80 grit, partly because I like the look, but mostly because I’m not sure I can get a better finish, and at this point the roughness looks intentional.
That pretty much completes the frame. Here are a couple of pictures. It took about 15 minutes of grinding on each of the 90 degree beads to make it look that way. I do like that, unlike wood, if your weld is good, you pretty much end up with a seamless look where the weld was.
Back and underside. The holes are countersunk to use flat-head screws. You can see the still-a-bit-ugly weld bead on the right side.

Here’s the top/back side. The weld was done from the underneath, which is why there is a visible join line. If I had been smarter, I would have welded across the top and then ground it down for a nicer look.

Close-up of one of the corners. I’ve cleverly drilled the mounting hole so the candle holder will mostly cover the ugly seam.

Candle holders
My design for the candle holders is three 2” sections of aluminum bar. This is a bit complicated because I need enough room to chuck the bar in the lathe, but it can’t be too long because the lathe isn’t great, so I settle on one 7” section (which I’ll machine two holders out of), and then one 5” section (which will give me the third holder). The lathe looks like this:

We’ll start with the lathe. It holds a cylindrical piece of stock (we call that a “rod” or “bar”) in a chuck and spins it. In the middle is the carriage, which is a very sophisticated and precise tool holder; it has wheels that you can turn to move the carriage left and right (x axis), front and back (the y axis), and a third bonus axis in the XY plane that can be adjusted to different angles. I start by “facing” the end of the stock; turning it to get it flat. This is done by carefully moving the tool until it starts to cut on the end, and then turning the wheel to push the cutting away from me (towards the center of the bar). Move a fraction to the left, and repeat. Keep doing this until you’re satisfied. How well it works depends on how much metal you are trying to take off, the angle of the cutting tool (which is just a pointed metal triangle in this case), and the speed at which you turn the crank (also known as the feed). After a couple minutes, that is done, and I move to cleaning up the outer part of the cylinder. You do this in a similar manner, except you advance the tool away from you until it starts cutting and then turn the X-axis crank to move the tool to the left. Advance the tool and repeat, until the cylinder is round and you are okay with how it looks. Your initial cuts are pretty quick, but you need to go slow on your final cuts as the tool is actually cutting a spiral, and if you advance it too fast it’s pretty obvious.
This is what it looks like when I’m done:

To make the holders look all fancy, I cut grooves into them. I lay them out and mark the aluminum with black sharpie, and then turn some shallow grooves about 1/4” wide at the end of each piece. I do this three times, and I’m done with the lathe. Here’s a blurry picture of the grooves (better pictures later):

I need to cut the sections that are turned so that I can keep machining them. I think it’s common to do this on the lathe with a parting tool, but we don’t know how to do that, so I cut two off with the horizontal band saw. This is very slow going, and they get so hot I can’t hold onto them, so it’s a trip to the dunk tank outside to cool them off.
I should probably clarify that I mean something like this:
.jpg)
not this:

I don’t want to hog the band saw because there are other students who need to cut up their metal, so end up doing some careful research at home, and cutting off the remaining one on my DeWalt chop saw. You *can* cut aluminum with a good high-tooth-count (80 or so) carbide blade if you keep the feed rate slow, and it only takes about 3 minutes to cut all the way through, which is faster than the band saw. Note that even with a shop vac hooked up, you’re going to get aluminum all over your garage.
And it’s off to the vertical mill, which looks something like this:
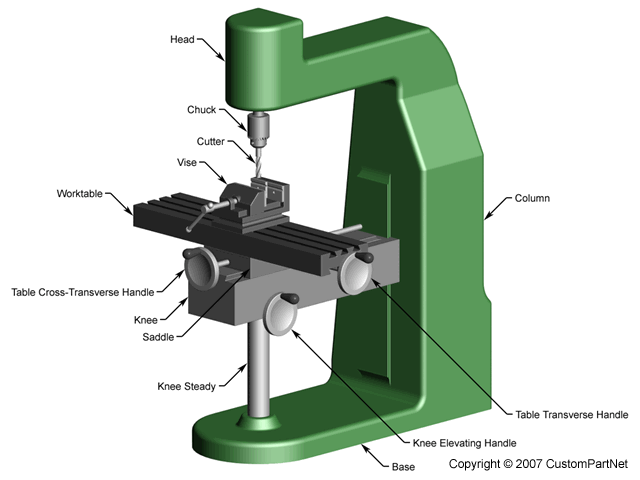
There is a spinning cutter that is mounted vertically (like in a drill press). You clamp your work into a vise attached to the worktable. There are handles on the mill that allow you to move the table left and right (X axis), in and out (Y axis), and up and down (Z axis). You can also move the cutter itself up and down (Z axis). The Makerhaus mill is old, big, and weighs at least a ton; it has controls to do CNC (computer-controlled) machining that we won’t be using. It looks exactly like this:
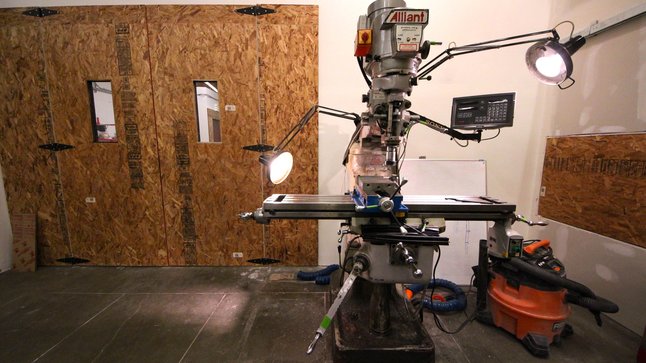
I take my three turned pieces to the mill. My plan is to flatten off part of the circle on all three of the holders. I put in a couple of spacers to raise the stock to the proper height and clamp it in, putting the flat ends against the clamps. I will be using an end mill to do the machining. End mills look like drill bits except they are flat on the bottom and they are made to cut moving to the side.

End mills come with different numbers of cutters (“flutes”) and you use them for different purposes. In this case, I’m using a 4 flute 1/2” end mill. I put it in the mill, and then crank the vertical adjustment to put the cutter approximately where I need it to be.
Ready to start, I call Alex over for some advice on how big of a cut I should take, he shrugs, I choose something relatively light, and as the cutter touches the metal, the metal rotates up, jumps out of the clamp and lands on the floor a few feet away. Alex reaches up and turns off the mill, and I turn to him and say, “Well, that was exciting…”. Apparently, my idea of clamping pressure isn’t enough, but luckily the aluminum is soft (compared to harder metals such as steel), so the mill just took a few nibbles out of the end, and I’m planning on machining the ends anyway. I put it back in the clamp, and get to machining.
The basic process is:
- Zero out the Z axis measurement.
- Move the cutter down until it measures a reasonable amount (I really don’t know what’s reasonable, so I’m doing light cuts. I’m pretty sure they are lighter than they could be).
- Using the wheels on the table, move it back and forth under the cutter until the cutter has covered the whole surface.
- Repeat steps 1-3 until you get tired.
This is all done by hand, and is a fair bit of workout if you are moving fast. It takes me quite a while to remove all the metal to take off about a third of the cylinder. My last pass is very light, so that the cutter will leave a nice finish on the piece. I convert my plan from machining all thee holders to just one; the other ones just get two flats machined into them.
After I’ve done this on the holders, I need to machine the ends. Some are rough from being cut, and others have a lathe finish and I want them all to match. The operation is the same as I’ve been doing, but luckily I don’t have to take much metal off and this doesn’t take too long. I choose to machine in a spiffy spiral pattern, which leaves the holder looking like this:

Finally, I’m ready to machine out the holes for the candles, which will be 3/4” in diameter. This is going to be complicated; I’ll use a series of drill bits moving up gradually in size, but I’m going to need to use an end mill because a) there are no drill bits here bigger than 1/2” and b) I want a flat bottomed hole. I’m going to have to proceed through a series of bits:
- 3/16” drill
- 3/8” drill
- 1/2” drill
- 5/8” two-flute end mill
- 3/4” four-flute end mill
To make sure I stay on the right spot, I won’t touch the X and Y controls. Each operation becomes the following:
- Lower the table so that I can fit the bit in the mill.
- Put the bit in the mill (this is a bit involved – you choose the collet that is the proper size for the bit, put it in the collet nut, install that in the mill, put the bit in, and then tighten it)
- Raise the table so that I can drill deep enough.
- Zero out the Z axis measuring device.
- Start up the mill.
- Set the speed on the mill (around 2000 RPM to start).
- Drill the hole, stopping perhaps once to clean the shavings off the bit.
- Stop when the hole is the proper depth (I aimed for 0.6”)
- Turn off the mill
- Clean off shavings from the bit
- Lower the table so I can get the bit out.
- Remove the bit, take the collet out.
This repeats for the 5 different bits, and I do it once for each of the candle holders, so that’s 15 bit changes. Here’s an annoyingly blurry picture in the middle of the process:

I get a good workout cranking the Z axis up and down. About 90 minutes later, I’m finished, sweaty, and the holders look like this. You can see that there is a slight burr around the hold; I need to touch that up with a dremel.

Only one bit of work left; to drill some holes in the holders and cut threads into this. I bought some nice flathead brass screws and figured out which tap to use. A test hole in one of the leftover pieces of aluminum to make sure I had the right size drill and the correct tap, and then I started on the holders. The holes were quick to drill, but the tapping is slow; do a quarter turn, back off, another quarter turn, and repeat, until it gets harder to turn. Unthread the tap, clean off the chips, and repeat the process until you get deep enough.

All that is left is the final assembly, and we’re finished:


Full gallery is here.
As far as the class goes, 8/10, recommend.
So, what do you think ?