Browsing posts in: Uncategorized

The word for the day is “Thixotropic”

I had a small gluing project to do today; I needed to attach a small 3d printed pad eye to the back of my animated LED snowflakes (project info here). The pad eye looks like this:

image

The pad eye is printed out of PLA and is about 1.25” inches across. I needed to attach it to the back of a printed circuit board. Which would make my adhesive choice seem simple, but there are two complications:

  1. There are wires soldered onto the PC board and that part of the board is not flat.
  2. The boards are waterproofed in epoxy, and the coating is has some variation – perhaps 1/16”

That means that I need an adhesive that will bond well to the PLA and epoxy and fill the gap in between the two surfaces.

My first thought was to heat up the hot glue gun and use it. It works fine as a gap filler, but it’s not great in a thin layer between two big surfaces; it’s too easy to have the glue cool too fast and not really bond to the surfaces.

My next thought was to use epoxy. I have several epoxies in my workroom; they are the small hobby shop versions that come in small tubes or bottles. I really don’t like them very much; it’s hard to get the mixture ratio right and in this application they tend to be too runny. And they smell.

Out in the garage I have my serious epoxy:

That’s leftover from a custom subwoofer project I did a while back. It’s really easy to use; one pump of resin plus one pump of hardener and just mix it together. I have the 206 hardener, which is classified as a “slow” hardener; 20-25 minutes of pot life (useful life after you mix it before it starts to thicken up too much), 10-15 hour cure, 1-4 days to maximum strength. The nice part about serious epoxy is that it’s tunable; you can use the 205 fast hardener which cures in 6-8 hours or the 209 extra slow hardener with much longer pot life and a slower cure.

Anyway, I really like this epoxy, but it is really runny, so it won’t work for this application.

Or will it?

Welcome to the wonderful world of epoxy fillers. There are a lot of different fillers out there – here’s a nice article by System 3 (another epoxy company) that describes them and why you would use them – that can modify the properties of epoxy considerable. For this use, I am interested in fillers that modify the viscosity of the epoxy, and specifically interested in fillers that make it thixotropic.

A thixotropic fluid is one that flows when you apply stress to it and then stops flowing when that stress is used. The most common example used is catsup, but I think that peanut butter is a better example; you can make it flow around but when you are done, it sticks where you want it. And it’s sticky, like epoxy. That is a wonderful property for an adhesive; just stick it where you want and it will stay there until it cures; no drips or sags.

There are a few common thixotropic fillers; ground silica (known as cab-o-sil or aerosil), plastic minifibers, and – my personal favorite – wood flour.

image

This particular wood flour came from the little bag on my random-orbit sander, which is why I like wood flour; I generally have it sitting around. Note that it needs to be very fine; sawdust from cutting will probably be too coarse. The wood flour will make the epoxy wood colored; if you would prefer it to be closer to clear, the ground silica or plastic minifibers will work better.

Mixing it is pretty simple; mix up the epoxy, add a little wood flour, mix it up, and examine its physical properties. If it drips off of your mixing device, you need more wood flour. If it sticks like the aforementioned peanut butter, you are done.

image

I like to use small plastic cups for my epoxy mixing and plastic silverware; they are easy to find and disposable, and since I use the dispenser pumps to get the right amount, I don’t need to do any measuring in the cups.

All that is left to butter the epoxy onto the PLA pieces, gently press them in the proper position, and wait for the epoxy to cure.

image


Sufferin’ Summits 2018 – Smoky summits with rain on the side…


Exposition

As some of you know, Sufferin’ Summits is a stupid idea I had 4 years ago that I’m still paying for 4 years later… It all started with a simple idea – could I create a ride like Ronde PDX – where “Ronde” means “A dance in which dancers move in a circle”, and PDX refers so a “Private Data Exchange”, a way of exchanging data without being burdened with all of the downsides of the public internet.

Where was I? Oh yeah, the ride. So, anyway, I came up with the outline for a ride, and it was pretty stupid. And then I went out and rode a bunch of hills and figured out a way to make it stupider. It is simply the hilliest ride that I could cram into 55 miles, something around 9000’ of up. And it turns out that it’s worse than Ronde PDX, though they do have a second day (okay, so, technically, there *is* a route for the second day of Sufferin’ Summits, but I am just not quite stupid enough to publish it, let alone ride it the day after).

For the first couple of years I did some light marketing of Sufferin’ Summits to the local community, but now I just kindof let it sit out there, the lesser-known, poorly behaved, and frankly less attractive cousin of Passport2Pain. I tell people that it’s because I want it to have that “underground” mystique, but the reality is that I’ve worked with people who organize big rides and I’m far too lazy to put in that much effort. So, it typically pulls in 20-30 people, and that’s just fine; I get to ride it with a few friends and look publicly stupid to the rest of the cycling population. Win win in my book. The ride is technically unsupported though my lovely wife has hosted a snax table at the halfway point the past two years.

I generally spend quite a bit of time in these hills on the Saturdays during the summer, and I felt pretty good about my fitness this year. But, there were two possible flies in the ointment, chinks in my armor, or bats in my belfry:

The first was that we had been treated to an extended run of “Wildfire Smoke”, and let me be clear that it was it was not the Tony-award-winning production that we had been promised. It was on hiatus Thursday night, but came back for an encore presentation the day of the ride. It was officially in the “unhealthy for sensitive groups” category, which – among other things – says that if you experience shortness of breath or unusual fatigue, you should contact your health provider.

I’m not quite sure how to apply that advice in practice, since “shortness of breath and unusual fatigue” bears an uncanny resemblance to the my written mission statement for the ride…

The secondary issue is that because of the crappy air quality, my training for the past few weeks has been a lot lighter than usual. I’m a fan of a nice taper in general, but two rides in two weeks is a bit extreme.

Anyway, that’s enough foreshadowing for now…

Friday night, we watched the Hawks extend their perfect preseason record, and then I headed to bed. That 5:30 AM alarm was going to come soon enough. And yet, it didn’t. Because I could not get to sleep, and 2 AM found me on the living room couch, reading (“Crash Test Girl” by Mythbusters alumnus Kari Byron is pretty good, and “Year of the Cow” (Stone) is a fun mix of history, science, and cookbook). So, anyway, I got off the couch at 5AM and then proceeded to not make my usual breakfast of bacon, eggs, and berries, because I typically do these rides (mostly) fasted. My food bag has one Honey Stinger “waffle” (mostly emergency carbs), a small bag of cheez-its, and a small bag of extra mixed nuts (that’s what you get if you take mixed nuts and add more nuts, right?). One water bottle has water, the second gets a serving of Biosteel hydration powder mixed into it, which I’ve been experimenting with for electrolytes recently. You know that it’s good because a) it has Calcareous Marine Algae and 2) the “mixed berry” flavor I have tastes remarkably like the cough syrup my parents gave me when I was a kid. On the way out I mix up two scoops of SuperStarch with half a scoop of endurox in a failed bid to make it more palatable; two scoops of highly educated cornstarch in a glass of water tastes exactly like what you think it does.

Oh, and I grab 12.5 macadamia nuts and eat them on the way out of the door because macadamia nuts.

The ride starts at a park in Issaquah, and I expect that the smoke is going to affect the turnout. We end up with 13 of us at the start, which is a few more than I expected. I ask how many people are doing the ride for the first time and then give a quick pre-ride briefing, which mostly consists of an assertion that while experience would lead one to expect that the first half of the ride is worse than the second half, experience would, in this case, be a poor guide.

Did I mention it was cold? Two years ago we started at 9 AM and it was 95 degrees when we finished, so the official (which only means “ride with Eric until you get tired of his slow pace”…) start is now 7AM, and it’s 54 degrees out right now. That is a great temperature for climbing but a crappy one for descending; you will still be sweaty at the top. I’m wearing a jersey (*not* my Sufferin’ Summits jersey) and shorts, plus arm warmers and a vest. We spin out of the starting point across Issaquah, to the first climb, Grand Ridge.

Rising Action

Grand Ridge is really a warmup, it’s mostly not that hard. On the first climb, the fast group rides ahead, and I expect not to see them for the rest of the day. We head through the “Little Red Riding Hood” forest path, where the part of the wolf is ably portrayed by two short but nasty 20% climbs near the top of the section. Eventually we top out, and are rewarded by a non-existent view. We’re up around 1000’ now, and on a decent day you can see Bellevue, Seattle, and the Olympics, but we can’t even really see our next climb. My descent karma fails and I get stuck behind a car driving 5 miles under the speed limit, but eventually we get on the main drag and descend down into Issaquah proper.

Squak Mountain is next. The bottom half has a series of rollers where the steep parts are 16% or so, then we turn onto the top section. I’m climbing okay, and looking at my stats, it took me 11:05 to climb the 940’ of the main climb. That’s only about a minute over my PR, so, pretty good. The data shows I climbed at 760 meters (2500’) per hour, also decent, though my legs are only feeling average. We top out there, avoid incidents on the sharp turns of the descent, and ride over to Telus.

We go up the Telus North climb, which hits about 18% immediately, eases a bit in the middle, flattens out in the neighborhoods, has a mercifully short 24% (!) section, and then finally tops out. It’s only about 450’ total, thankfully, but it gets my attention. We head to the other end of the development, pick up a few more feet of vertical, and then descend back down. This time it’s a Hyundai driving 18 MPH in a 25 zone.

Which brings us to hill #4, Zoo hill. In previous years the route has used a convoluted route to pick up a particularly nasty climb, but I’ve switched back to the classic climb. The very bottom part is newly repaved but the crappy middle part is still it’s crappy self, the rollers are still soul-sucking, and the climb to the water tank and radio towers is its usual cantankerous self. My legs really don’t feel very good on this part, but Strava says that I pulled a PR on it by 44 seconds on the lower 2/3 of the climb. I am skeptical, given that I’m only pushing 200 watts and my heart rate is about 20 beats below my max. I’m spending a little time tacking back and forth across the hill because my legs feel weak. There’s no reason to take pictures at the top because you cannot see a damn thing, and I get cold as soon as we stop. I do note that the smoke hasn’t really been that much of an issue; it seems that once we get above the first 200-300 feet, the air is a bit cleaner. We descend down, climb up Pinnacles, descend a bit more, climb up Belvedere, and then head down and up a short and easy hill to get to Lewis Creek Park. My lovely wife is waiting there with snax, I mix another bottle of blue steel and eat a few nuts.

Climax or Turning Point

Then it’s off to hill 5. Which is really a side hill that we will climb 3 times. We start on “The Widowmaker”, which is really nasty 494’ climb; it starts at 18%, flattens a bit, and then has a full 300’ of 20% or more. At the worst, I’m riding 3MPH and 44 RPM and pushing 275 watts. It’s the “Coffin Corner” of climbs; I can’t really slow down without falling over and if I push harder I’ll burn my legs worse and may run out of aerobic capacity (ref. “Falling over”). After 10 minutes and 28 seconds of enjoyment, I top out, meet the rest of the group waiting for me, and we descend. Only to repeat the pattern; we ride up the West Summit climb, descend, ride up a short unnamed hill, then finally up the Summit climb to the top. I’m in little danger of setting PRs on these, but I am climbing at over 800 meters per hour (10.9 fathoms/moment), which is okay. My legs are really tired; not hurting, but really tired. As we reach the top of the climb, we get a change in the weather; the smoke blows away and we can see the top of the smoke across the whole region. Glorious.

Not really, we still can’t see a damn thing. What really happens is it starts to rain. And I whine about my legs, though technically speaking I’ve been doing that for the last hour, so that’s not a new thing. I make some noise about maybe being done so that the other riders with me have an “out” to quit without losing face. I pull out my stuffable vest, put it on (you probably figured that part out on your own), and we start the descent. It’s a nice 500’ descent on a mostly straight road with mostly good pavement, but a fast cold descent with wet pavement is not my preference.

At the bottom the four of us discuss what we are going to do:

Protagonist (me): Guys, my legs are cooked and I’m too cold. I’m going to bail and ride back to the start before it gets any wetter.

Antagonist: My legs are cramping and I don’t have a jacket. I’ll ride back with you.

Non Sequitur: Guys, there’s a car behind us. We should move out of the way.

Antithesis: I’m going to head down and do at least one more hill.

Consonance: I’ll join you as long as it doesn’t get too wet.

Resolution

So, we split into two groups, and Mike and I spend 10 minutes getting cold and getting back to the starting point.

Analysis

The following questions probe the heart of what we are learning:

  • Are you an insider or and outsider to the culture of this ride report?
  • What did the author want me to get out of this ride report?
  • How would the ride report be perceived in its own time period?
  • What text – exact words, phrases, or passages – causes in you a strong emotional response?

Appendix

  • 38.87 miles
  • 3:45:12
  • 2:24:50 climbing
  • 6,165’ of up
  • 10.4 mi/h average
  • 2,109 kJ
  • Strava activity

Philtrum

Eric uses: Specialized Roubaix expert, S-Works shoes, Pioneer power meter, Garmin 705 GPS, Pearl Izumi shorts, Giro helmet/gloves, and a random assortment of jerseys he’s picked up over the years.


Still Mad about You…

I recently came across a podcast where Paul Riser talked about “Mad About You”, and the obvious question popped into my head.

Would Mad About You hold up?

My beautiful bride and I enjoyed watching it considerably when we it was first on and we were in the first decade (roughly) of our marriage. But I’ve learned to approach things that I’ve liked in the past with care. Sometimes they hold up pretty well, but other times – for various reasons – they don’t hold up at all. Sometimes the memory is much better than the reality.

So, I dusted off the my search engine and found a few episodes to watch. Which gave me enough evidence to approach the wife, and we ended up watching all 7 seasons (on Starz through Amazon, which is the only place we could find it except for some really crappy quality episodes on Youtube).

And the result?

It holds up surprisingly well. Well enough that we were both sad when we finished the last season. Mad About You uniquely captures what it’s like to be in a couple; the way that the two of you are the sum of your strengths, the amount of work it takes to keep that kind of relationship going, and how things can get difficult despite both people trying their best.

And how your partner can simultaneous be somebody you can’t imagine living without and the most annoying person that you know.

There are some issues with the show; the other characters necessarily need to bring conflict in and sometimes are annoying and not all of the story lines are great – especially the cameos that feature notable actors. But they are mostly very good, and to this married-for-a-long-time guy, much of it rings true. And the humor is good.

*Highly* recommended.


Firepit rolling base

A quick little project that I knocked out in a couple of hours today…

My wife an I own a Solo Stove Bonfire. And yes, it does work every bit as well as they say.

The problem is the somewhat fickle Seattle weather; we might have a fire and then the firepit would sit outside and get rained on. It’s stainless so it’s supposed to not corrode, but there are a still a few issues. The obvious thing is to put it under cover when you are done, but it’s really really hot and I’m quite lazy.

A few days ago, I came up with a plan. I will start with the Solo Stove:

IMG_9202

My original plan was to buy some angle iron to make a frame, but walking around I found an alternative material:

Four pinball legs that I got with the World Cup Soccer ‘94 that I bought last fall, since replaced with pretty new ones. These legs were just waiting to head to the dump.

IMG_9203

and four leftover casters from my Glowforge table project. I didn’t take a picture of them.

Leg modifications

The legs need to be converted from their current form into something more like angle iron. The first step is to cut off the feet. Out comes the 4” angle grinder, on goes the accessory handle and a 4” metal cutting disk, and the feet are cut off.

IMG_9204

The process is repeated at the other end to cut off the mounting holes. The length is based upon the diameter of the solo stove, which is 19.25”. After a few minutes of cutting and a lot of sparks, we end up with the following:

IMG_9205

Next, I need mounting holes in the corner that the casters can go through. The fluted design of the legs made this a significant pain in the ass, even with a drill press. Here’s the first hole drilled with a 1/8” bit IIRC; I would enlarge it with a 2/8” bit on the way to a 3/8” bit. The drill press is a huge help in this sort of work.

IMG_9206

Next it is time to do the layout so I can mark the holes where the metal pieces will overlap and connect:

IMG_9207

This is really not precision work, though I will note that I realigned this corner because the two pieces should be symmetrical:

IMG_9208

Then, it was back to drill 12 more holes (three pass x four pieces), and then it was time for assembly, in which our caters finally make an appearance:

IMG_9209

Tighten up all of the nuts, and we have a frame:

IMG_9210

I had toyed with the idea of painting a stainless steel color, but I’m cheap and lazy, so it’s like this for now.

Beauty shot of the Solo Stove sitting in its new frame:

IMG_9211

Total cost was $2.09 for a new metal cutting blade and about $2.00 for 8 nuts, 4 flat washers, and 4 lockwashers.


Building the Globe of Fire (Dodecahedral Light Engine)…

This guide will describe how to build the Globe of fire. You will need the right tools and good soldering skills to build it successfully.

Please read through the entire guide before you start assembly.

The kit comes with the following parts:

image

  • 12 polygonal face circuit boards, each with 3 WS2812 LEDs already mounted (you will only use 11 of these)
  • 1 bottom face with a big hole in it
  • Connecting wire that will be used to connect power and a control signal to the globe.
  • 4 assembly jibs to hold the polygonal faces at the proper angle
  • 1 1/4″ bolt and nut to serve as a base
  • 1 stand to hold the completed globe up
  • Approximately 60 tiny half-circle wires, used to connect the polygonal faces together.

11 pentagonal faces with WS2812 (aka “neopixel”) LEDs already soldered on. There is an additional face without LEDs with a hole for mounting the DLE.

To build the kit, you will need the following tools:

IMG_9080

A good soldering iron with a fine tip.

IMG_9081

Fine tipped tweezers.

IMG_9111

A third hand. Assembly will be very hard if you can’t hold the pieces in places while soldering.

IMG_9084

Solder

Assembly

The globe consists of two rings composed of 5 faces each plus a top and a bottom. We will be joining together the power (VCC) and ground connections so that the LEDs all get power and ground. In addition, we will be connecting the data output from one face (DOUT) to the data input of one adjacent face so that the signals will travel correctly to all of the faces.

It will likely take a couple of hours of soldering to complete the assembly.

If you would like a refresher on how WS2812 LEDs work, there’s a good discussion on StackExchange here.

Building a ring

The tiny half-circle wires are very tiny and easily lost. Put them in something to keep them together. If you lose some, they are made out of 22 gauge solid copper wire.

Five of the pentagonal faces are used to build a ring.

IMG_9087

Every face of the pentagon has identical connections so the orientation of an individual face is not important.

The alignment clamps are used to hold the boards together at the correct angle (116 degrees):

IMG_9089

Note that the two boards are parallel and there is only a small space between them. Also note that the left and right boards are aligned horizontally; the two VCC holes are aligned with each other.

Here are two wrong ways to do it:

IMG_9090IMG_9091

In the left one, the two boards are misaligned vertically; the two VCC holes are not aligned horizontally. In the right one, the boards edges are not parallel.

The board alignment doesn’t have to be perfect, but it helps to have them pretty close.

In some orientations, the alignment clamps may contact the LEDs. If this happens, don’t push that clamp on fully; it will still work if near the edge of the board:

image

For the faces in the ring, we will connect both VCC and GND, and then we will connect the data output from the left face (DOUT) to the data input (DIN) on the right face. We will start with VCC.

IMG_9093

We will be using a connection wire to make the connection. I have tried a few different ways of doing this, and the following is what I recommend:

  1. Add solder to the hole on one side of the connection (the right side in these pictures). Add enough so that there is a ball of solder protruding above the board.
  2. Hold the connecting wire in the middle and place one end of the wire in the hole without solder, and hold the other end against the hole with solder in it.
  3. Touch the soldering iron against the end with solder and lightly press the wire into the solder. It will melt and the wire will sink into the solder. Remove the iron, and hold the wire in position until the solder solidifies.
  4. Solder the other end normally. It works best if you get the solder in position and only apply the soldering iron only long enough to melt the solder. If you apply it too long, you will melt the other end and may have to resolder both.
  5. Verify that both solder joints are shiny and have enough solder. If the joints aren’t shiny, heat one at a time until it just goes liquid.

It’s going to take a little time to get the hang of this. Don’t worry, you will get faster.

After the VCC is connected, connect one of the GNDs to one of the others. It doesn’t matter which one you choose.

After VCC and GND are soldered, remove the assembly jigs so that you can solder DIN and DOUT. This will carry the data signal from the DOUT face into the DIN face.

IMG_9114

In this detail, the right side (DIN) has been soldered, and left side is in the DOUT hole. The next step is to solder the DOUT end.

If the second end takes too long to solder, it may heat up the first end and the connecting wire may come loose. If that happens, just hold the wire to one end and heat it and wait for the heat to conduct down to the other end and melt the solder there.

That’s one face connected. There are a lot more, but it will get easier with practice.

We next add a third face using the same approach. It looks like this:

IMG_9110

Once we have three faces, assemble two more faces together. We will assemble the three and two face pieces to make a full ring. 

Make the ring

IMG_9112

Use the alignment clamps to hook the three-face section to the two-face section, and solder one set of connections between the two section and three section.

image

The last set of connections is different. Note that only the GND and VCC parts are connected; the data lines are unconnected. This is so that data can come into the ring and go out of it.

Looking at the input face, we notice that there is a connection to DOUT but not to DIN; for this face, the data will come in from a face that is not on this ring and then head out the left side of the face.

Looking at the output face, we notice that there is a connection to DIN for the data that has travelled around the ring, but no connection to DOUT. The data coming into the right face will head out of the ring to another face, either the top or a ring that will be attached below.

Adding the top

IMG_9102

We need to add wires to the top so it doesn’t fall through the middle of the ring, and each side will connect either VCC or GND. Start by adding solder to three VCC faces and two GND faces (one arrangement is shown above, but it doesn’t have to look exactly like this).

We need to prepare one connector on each side of the board with solder; either GND or VCC. Do three faces with VCC and two with GND.

IMG_9103

To keep the top face from falling through, we need to put connections on it ahead of time. Note that each of these touches the surface; that will give us roughly the angle we need.

IMG_9104

The top face is just sitting there. Check that all the connections align properly with the connections from the ring. Solder all the VCC and GND connections to the ring. You may need to heat the already soldered wires to get them to align correctly with the holes on the ring.

IMG_9105

Next, we need to make the data connection from the ring to the top. Find the face on the ring that does not have a connection to DOUT (the output face in the previous picture), and make a connection from the DOUT on that face to the DIN connection on the top face.

image

Finally, we find that face that has a DOUT connection but no DIN connections. This is the face that will connect across to the other ring. I have marked the two DIN connections with marker so we can find them later; ONE of these will be connected to the other ring.

If you have a controller than can drive these LEDs, it’s a good idea to test what you have built so far. Connect VCC to 5 volts, GND to ground, and DIN to your microcontroller, and run a program that can drive 33 LEDs. They should all light up. If they don’t, examine your solder connections and make sure that you don’t have DOUT/DIN connected all the way around the ring.

Building the second ring

The second ring is built using the same method as the first one. Do not add a top piece. 

image

This is the bottom ring and is actually upside down at this point. Eventually, we will need to make power, ground, and data connections for the whole globe. They are marked in blue on this face. Why did we choose this face? It’s the only one on the ring that has a DOUT connection but no DIN connection.

It’s a good idea to test this ring at this time.

image

This is the output face of the second ring. I have put marks on the two DOUT connections; one of them will hook up to the input face on the other ring.

image

Put the first ring and the second one together, making sure to align the rings so the face that has DOUT marked on the bottom ring is aligned with the DIN that is marked on the upper ring. Tape the two rings together. Connect those two pins together, then attach the top and bottom by connect VCC between three faces and GND between the other two.

At this point, the LED part of the globe is complete. Hook it up to your controller and verify that all of the faces light up. It should look like this (hand not included):

IMG_9120

Attaching the base

The base is purely used for mechanical support; the connections that are made do not carry electricity.

IMG_9162

We will use the special bottom pentagon; it has a hole in the middle and no other connections. Attach 5 wires to it on the GND connections, and make sure that you use a variety of GND connections.

IMG_9163

Find the spot on the bottom ring where you will attach the wires – you should have marked it before. Rotate the bottom until one of the grounds lines up with the gap between the grounds on the wire-attachment face, as shown in the above picture.

Do not solder the bottom on yet.

IMG_9164

Take the 1/4 screw and put in through the bottom face from the backside, and then put a nut on the outside face. You will want to tighten this out pretty well so that it doesn’t come loose.

And then solder the wires to hold the bottom on.

IMG_9165

Next, solder on the wires; red to VCC, black to GND, and purple to VIN.

IMG_9166

Finally, screw the base onto the 1/4 bolt, and you’re done.

Hook it up, and it should look something like this:

IMG_9168

If you’d like a more diffused look, you can put an acrylic plastic globe over it

IMG_9170

Both of these pictures are with full lights on and with the globe powered by an underpowered USB source.


Workshop finishing update

I’ve done a fair bit of work to update the workshop, but have been terrible at taking pictures. So, here’s the current state:

IMG_9073

IMG_9074

There’s a pretty new window in the bottom picture to bring some natural light into the space. The walls are all insulated with Roxul rock wool, which was a significant pain in the ass because the long wall has studs 12” on center and it doesn’t come in those widths, so I had to take 23” batts and split them. Ick. There are three new boxes for outlets, but the circuits aren’t hooked up yet. The wall is 1/2” CDX plywood, chosen because I want to have a wall I can hang things on.

IMG_9075

Here is a pretty picture with the wall painted white to make the whole room lighter.

Up next will be doing the electrical, moving the cabinets back, and working on the rest of the room.


Workshop finishing

My house is a little weird. The street is the high point of the property, and it slopes away toward the house and into the backyard, so I have a daylight basement in the back.

I also have a very rare commodity. I have a room underneath my two-car garage. The back half is full height, and then the front slopes up to driveway level.

The front half has some nice shelves that are used for storage, and the back has some old kitchen cabinets, yard tools, and some junk. The room is uninsulated and has no windows…

I have an office in the basement where my computer and my electronics workbench is, along with my 3d printer. That works great for those items, but when I bought a Glowforge, I didn’t want to have inside the house because of fumes. So, the logical place was to have it under the garage.

And since it’s winter, I’ve been freezing my butt off (in Washington state terms) whenever I need to cut things, and the Glowforge does have a lower temp limit.

So, it’s time to finish the space out. It’s going to get a window in the side wall, Roxul insulation in the walls, and CDX plywood on the walls. It *might* get roxul in the ceiling as well if it’s still too cold, and I’ve also considered a thermal blanket to separate the front section from the back if it turns out I spend a lot of time there.

Here’s the starting point:

IMG_9007

IMG_9008

IMG_9009

IMG_9010

IMG_9011


Snowflake PCBs…

The PCBs showed up very quickly. Here are front and back pictures of them.

IMG_8864

IMG_8865

IMG_8869

They look pretty nice and have holes in all the right places. Because of the design, I need to cut them apart by hand.

I used my Dremel osciallating multi-tool, but frankly I think the normal Dremel would be a better choice.

That gave me a pile of parts:

IMG_8871

Next, it was time to assemble the pieces. If everything was exactly sized, all the parts should have fit together perfectly. As it was, I had a few protrusions to file down and then I needed to file most of the pieces to get them to fit together. Took about half an hour.

And then, the first view of the snowflake board assembled.

IMG_8872

The *plan* was that there would be copper right to the edges of the boards, and then they could just be soldered together.

What the fab *did* was pull the copper back from the edge by a little bit, so there was a gap between each of the pads that I needed to solder together. The power and ground pads are pretty big, and I could easily bridge them with a bit of bare copper wire.

The signal lines were another matter. The pads are much smaller, and with the copper lost by the fab, I just had a hairline of pad to solder to. I ended up using very fine wires to bridge the gap, putting the super-fine tip on my Hakko, and very carefully soldering the wires on. It was pretty exacting work, but it got easier over time.

IMG_8873

The design was perfect except for a missing via that leaves a broken connection to the Vcc line. I fixed it with a short bit of red insulated wire.

I ordered a new hot air rework station so that I can reflow the WS2812 LEDs onto the PCBs, and I’m going to use that to solder all the little jumper wires that way.

While I wait for the new tools to show up, I’m going to write some code.


Bicycle Adventures Gulf Islands Tour–August 2017

This tour starts in Victoria, but first we had to get from our house to Victoria. Transportation from Seattle to Victoria on the Clipper was included, but the 7:30 AM departure meant we had a 6:30 AM arrival time and an even earlier meeting time. Since Bicycle Adventure is headquartered a couple of miles from where we live, we headed there first and they graciously took us to Seattle to make our logistics easier.

Us == me, my wife Kim, and my daughter Samantha.

Except the early hour, the trip up was uneventful; at 30 knots, the Clipper is nice and fast and all of our luggage and our two bikes arrived in great shape. Our hotel was an easy walk from the ferry dock, and we stashed our bikes and luggage at the hotel and had a quick lunch of wraps in a nice shaded spot under the trees. We got to know our guide, Noe, and the other two cyclists on the trip, Percy (not his real name) and Grace (not her real name).

Most of the guided rides we have done have been on the larger side – 12-25 people – and have had three guides. This one was planned with two guides, but due to logistical problems (many guides head back to other jobs in September), we only had one guide. It was a little weird only having six people total, but we knew about it ahead of time, so it was fine.

That afternoon, those using the BA bikes got fitted out and we went for a short ride; just a quick out-and-back on one of Victoria’s many bike trails. This helps those who have not been on a bike recently get their legs back and for the guide to get a better idea of what the group is like.

The ride was 14.8 miles and 334′ of up; a nice warmup after a lot of sitting on the clipper.

Dinner that night was in the restaurant in the hotel – Aura.

Pork 2 ways
ash glazed loin, 18hour sous-vide belly, pommes bouchon, charred onion, cauliflower, sea buckthorn gastrique

The tenderloin was small and quite overdone and the pork belly was underseasoned. I don’t get why you would use sous-vide on pork belly; the whole point of sous-vide is not to overcook your protein and the pork belly is all fat and benefits from higher heat. I think they got the cooking methods backwards.

Not horrible for $24 Canadian, but this continues a trend that I’ve noticed; restaurants attached to hotels tend to be a bit disappointing. That, and trendy cuisine is mostly wasted on me; after a ride I’m looking for something a little more substantial.

Day 2 – The Butchart Gardens

Breakfast this morning was eggs and bacon, and then we packed up and headed out on the ride. This ride has two legs; there is a trip from Victoria to Butchart Gardens, and then a trip from the Gardens to the ferry near Sidney.

The first leg of the trip took us along the waterfront and then up the east side of Vancouver island, and was very picturesque. BA has just started using Wahoo Element Bolts for guest navigation, and that meant we mostly didn’t have to refer to paper instructions for printed maps during the week, which was nice. We stopped at a Starbucks – of course – for a break:

IMAG0178

At that point Percy and Grace decided to van to lunch and IIRC Samantha went with them, and Kim and I kept riding. Eventually we made it to the gardens, and although we ended up having to recruit most of the staff to find the van, find them we did.

I had visited the gardens in my youth, and remembered them as very big, but apparently we just went very slow, as Kim and I went through the majority of the areas in about 45 minutes. Many of the flowers were unnaturally large; Kim guessed excellent care and lots of fertilizer and I guessed cobalt radiation, but overall the effect is very nice. Here’s a taste of what we saw (this is the “sunken garden” section).

That clump in the middle has a little viewpoint that you can climb up into, thereby reenacting the rebel lookout scene from Return of the Jedi.

At least that’s what I told Kim it looked like when we were walking by it. Let’s compare:

As you can see, a perfect match; delta differences in foliage, the height of the lookout, and the number of X-Wing fighters.

Now I know why Kim was shaking her head.

Anyway, we headed back to the van and had a nice lunch of salad and shredded chicken in the shade under the trees. Then it was time to mount up and head towards the ferry. Samantha, Percy, and Grace chose the shorter and less hilly “direct route”, and Kim and I chose the longer and more scenic route. It was nice for the first 5 miles or so, and then Kim started getting cramps in her quads.

I have a tic-tac box of electrolyte pills that I carry that were perfect for this, but I had cleverly left them in my luggage as this was a short ride for me. Kim was fine on the flats and descents, but on the steeper ups she would walk and I would push the bikes up. This gave us a bit of anxiety because we had a ferry we needed to catch – we weren’t in danger of missing it yet but it was getting tighter. At one point I saw a “Ferry” sign, pulled out the detailed map I had, and figured out we could take the direct route to get there. Oh, and we managed to reset our Wahoos to use the direct route, quite the feat when you have old person eyesight like we do.  A quick stop at a store to get Kim some salt-laden cheetos and both of us a Coke Zero, and we made it to the ferry without incident. Only to find our ferry was late, so we grabbed dinner at Stone House Pub, a pub sited in a stone house. Hence the name. I had the Stonehouse burger with cheese, bacon, and mushrooms, and a side salad. Yum.

The ride ended up with 43 miles and 2411′ of up. Despite the cramps, Kim puts in a really nice effort for the distance and amount of up.

We catch the ferry to Galliano island, where we stay in the Galliano Oceanfront Inn and Spa. It was a nicely updated but kind of older and funky place, which is at least wheelhouse-adjacent for me. Except for lighting that was never updated after the energy crisis of the 1970s (ie “dark”), it was nice place, and we had a little patio that faced the water.

Day 3 – Mayne Island

After two eggs and bacon for breakfast – you probably sense a pattern here – we grab a ferry to Mayne Island, which is a small island. We van up the first hill, and then start riding around the island. Before the first mile is done, we hit a nice 19% hill, which sets a pattern for the rest of the week. If you’ve ridden the San Juans, the Gulf island roads are both hillier and steeper. My climbing legs are fine and I overall feel good – and I know today is going to be less than 20 miles – so I spend some time working on sprinting and waiting. The morning I’m riding with the wife and offspring, so I climb and wait, and sometimes double a hill. We descend back down to the water on the East side of the island, and pull into the Bennett Bay Bistro for lunch. I have the Santa Fe salad, which is pretty good.

We climb back out for our ride to the ferry; I wait after the first hill and tell the wife I’m going to do an optional section. I ride off and immediately miss the turn to the optional section, so I just ride the rest of the route down to the ferry and the climb back up from the ferry to find the group. Percy and Grace pass me on the downhill, and after I start to head back up the hill I hit the wife and offspring. Offspring turns off towards the ferry, and I redo a little loop with the wife.

The ride ends up with 17.1 miles and 1991′ of up. Anything over 100′ per mile is pretty hilly, and though I missed the optional part – which was only about 3 miles long – I did a nice hard ride. We ferry back to Galliano.

Dinner is at the Atrevida – which Google translate tells me means “cheeky” in Spanish – restaurant where we are staying. I order the Goat Cheese Wild Mushroom stuffed chicken breast.

Cheeky it is, for when my plate shows up, it is a breast with a small thigh attached to it, and it can’t weigh more than 4 ounces. There is a tiny amount of stuffing, and as far as I can tell, no goat cheese at all. The wife takes pity on me and gives me a piece of her rack of lamb, which is nicely done. I go back to the room and snack on the bag of nuts that I brought along, because I’m still hungry. I’m now 2 out of 2 for disappointing hotel food.

Day 4 – Galliano Island

Today we are going to ride around Galliano Island. I decide that two eggs isn’t enough so I order 4 eggs and ham, and gladly eat the 4 eggs and bacon that show up. They’re nicely done, so I’m fine with it.

My plan today is to ride solo in the morning and take it from there. I’m going to do the long spine and then an optional section and maybe a quick out-and-back before our lunch at lover’s leap.

The first climb is over pretty quick; I feel a bit heavy in the stomach from the big breakfast but that settles down and I start making time. I hit a turnoff down to the water and head down and the crappy road gets crappier and crappier, deteriorating into totally torn up pavement at the bottom. I take a picture at the bottom, and then head back up the crappy road and back onto the route.

IMAG0181

Very soon, I turn right onto the optional section which resolves into a steep climb; the Garmin says 13-15%, and that’s pretty much what it feels like. It then settles down into a generally down but sawtooth profile, and after about 3 miles of that:

IMAG0183

I can fit the bike under it, so it obviously doesn’t mean me. Another mile or so, and I come to a signed private drive. While I’m generally adventurous (not really, but that’s what I tell myself), ignoring that sort of sign in a foreign country seems like the wrong thing to do. I don’t think organized group rides should involve that sort of thing.

I ride back and hit the main route where the van is waiting and Percy and Grace (still not their real names) have just arrived. My family has turned down the turnoff to the water I did earlier, so I head back to find them.

I blow by the turn, ride for 5 minutes, stop, pull out my map, ride some more, and finally get about halfway back to the end before I figure it out. I turn around and time-trail my way in the correct direction, and get to lunch about 10 minutes after my family pulls in. Lunch is wraps (again), so I eat the filling of a couple of wraps, drink a caffeine free diet pepsi (ie brown flavored water), and rest while the rest of the group watches a pod of orca go by, trailed by an assortment of whale-watching boats.

The family gears up and heads to the northeast end of the island. We drop the offspring at the van on the way back, and then head out on the last 13 miles with the wife. Kim does well until we descend to Montagne Harbor and need to climb back up; there’s a steep hill (say, >17%) that climbs up about 300′. I scout ahead while Kim walks, and then I return to tell her that it’s not that far, and pretty soon we are at the Hummingbird Inn to load the bikes up and have a snack before the ride back to the ferry. I have the traditional post-ride snack; a diet coke with a side order of cole slaw.

Given my extra bit of riding, I end up with 50.7 miles and a significant 4745′ of up for the day. 

Because it’s past labor day (many restaurants have closed) and we have a tight timeline to hit the ferry, we get dinner from an Indonesian/German food truck on the ferry dock. I play it safe and have a decent hamburger. We get the ferry and head over to Pender Island, where we are staying at Poet’s Cove Resort & Spa, “where inspiration lives”, along with a bunch of people with really nice boats. Apparently the poetry gig is paying better than I thought. The rooms are nice and we have a view of the bay, and they also feature sliding doors that lets you sit in the bathtub and look out at the bay.

Which is fine in concept, but they decided to use doors with slats that face down and frosted glass in the shower area, which means that you can’t use the bathroom in the middle of the night without lighting up the whole room.

Things like that really bother the designer in me.

Day 6 – Pender Island “make a choice” day

I like time on my bike more than most people, but after 4 days of riding, I’m ready for a day off the bike, and today is the day. Today’s breakfast features a custom omelette with a lot of veggies, and since omelette was small I add a plate from the buffet with some more eggs, some bacon, and 12 blueberries. We van over to the harbour to Pender Island Kayak Adventures, and spend a really nice three hours paddling with a great guide; definitely a nice and relaxing experience. I also learn that paddleboards are called “SUP” in Canada; I had previously refrained from asking, “What’s SUP?” to my companions with great difficulty.

Lunch is at the Port Browning Marina. Service is a little slow but I really like my steak salad, except for all of the tortilla chips that I forget to ask them to leave off. We van back and have the afternoon to ourselves; I gaze longingly at my bed and decide instead to head to the fitness center for a light workout and then a soak in the hot tub.

Dinner that night is it Syrens Bistro & Lounge in the resort. We get a place on the terrace, and I order an artisan green salad and the sockeye salmon.

I feel compelled at this point to engage in a brief exposition on the proper cooking of salmon.

The proper way to cook Sockeye is to heat it so that it is barely set on the interior, just enough so that the interior texture is no longer raw. It is delicious.

Before you accuse me of stacking the deck by ordering the salmon, I do not expect the Sockeye to be cooked properly. What I expect to get is what I call “tourist cooked”, which is the way that you cook salmon if you are serving it to tourists who might not like their salmon to be “raw”. Instead of just set on the interior, it’s cooked so that the interior is obviously done. If you think of it as the “medium” of steak, you’re pretty close. The texture suffers, but it’s okay.

What I get is the salmon equivalent of a well done steak, way past tourist. I do applaud their consistency; our guide has salmon that is cooked the same way. I really should send it back, but I eat it anyway. About 10 minutes after that, my salad shows up.

So, that’s a perfect 3 out of 3 in poor dining experiences at the places we stayed at, a pretty strong confirmation of my theory (p = 0.05).

Day 7 – Pender Exploration

Our last day dawns a bit wet, and it’s still misty outside.

I have my very predictable omelette/eggs/bacon breakfast, though I think “what the hell?”, it’s vacation, and go “outside the box” and have pineapple instead of blueberries.

The original plan is to bike a little, do a hike and eat lunch and the top, and then bike to the ferry. But the road are a bit too wet to ride, so the Gunnersons van up to hike. We start turn off at the eponymous Mount Norman Access Road, and start the hike.

It turns out it’s really more of a climb than a hike; with a lot of steep. After maybe 25 minutes and 600′ of elevation gain, we top out, walk to the observation platform, and take in the beautiful view at the top of Mount Norman (do you think the other mountains make fun of him?):

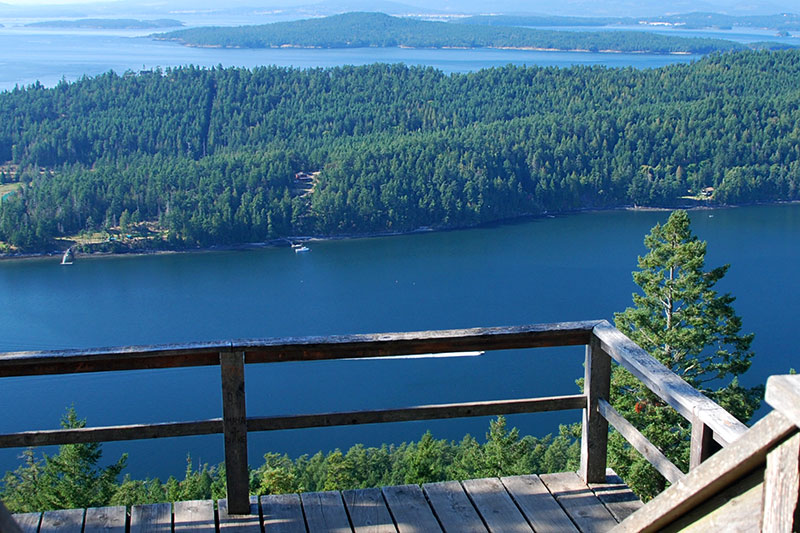
Or we would have done that, if it weren’t a foggy day. What we did instead was look out at a vast sea of whiteness, watching for the short periods of time where trees or water were vaguely visible.

But it was still a nice hike. We returned to the resort for a quick lunch, and then it is back on the road. Kim and I are the only cyclists for the day. One side trip takes us to a view, another takes us to a park that we are unable to locate, and we roll off of South Pender Island onto North Pender Island, and hit a killer hill.

Which makes me happy.

I haven’t mentioned it earlier, but Kim and Samantha have really been excellent sports on what has been a trip with a lot of steep hills, and not just steep in the 10% range, but steep in the 13-15% range, with a few steeper.

This is a honest 20% climb, but short, and we are soon rolling into the village center, where the van has just arrived. I drink a coke zero while the others snack on more carb-laden fare (okay, I had two pieces of gluten free peanut butter brownies, which were pretty much like eating peanut-flavored sugar cubes), and we headed out for the last little ride to our destination:

The Otter Bay ferry terminal.

We get there about ten minutes before the van shows up, and then the bikes go in the trailer and we get in line.

The ride for today is another short one; 16.4 miles with 1427′ of up.

I’ve been meaning to mention the ferries; the BC ferries run some very tiny boats, and then the run some big new boats.

That clamshell in the front is raised up for loading, and the lowered down for the trip. That allows them to operate ferries in much rougher weather than we see in Puget Sound. In the middle of the entrance, you can see a raised part sticking up.

The ramps lead down to the second car deck which is underneath the main one. Load it up, close the ramps, and the lower car deck is totally enclosed. A neat design. All the exterior doors on the passenger decks are heavy and power operated so they can seal tight.

The ferry ride takes us to Tsawassen, and we overnight in a hotel near the airport. In the morning, we leave at 6AM to van back to Redmond. Our border crossing takes two minutes; I am grateful that it is short but wonder what our border agent was thinking letting a van and a totally enclosed trailer through so quickly.

Totals:

Miles: 142
Up: 10,933′

Overall, it was a nice vacation. I liked the rides but the ferry logistics can be a bit tedious at times as you have to get to a specific place at a specific time, and I would have liked more bike time – or at least more options – on a couple of days. Our guide was great.


DORMAR Rider’s Guide

DORMAR is a backwards version of RAMROD. It differs from RAMROD by going the opposite direction and by being a totally unsupported ride. You will need good fitness and self-reliance to complete this ride successfully. DORMAR is 152 miles with a little bit more than 10,000′ of climbing, including two major mountain passes climbs.

The start

The ride starts in the Enumclaw Fairgrounds parking lot, at 45026-45098 284th Ave SE, Enumclaw, WA 98022.

The starting time is “Whenever you want”. I’m planning on starting at 5AM to get as much done before it gets too hot

The Route

You can find the RideByGps route here. You can download a route for your GPS from it; figuring out how to do that is left as an exercise for the reader.

A preview of the route is here. Please read it as it has important information.

Turn-by-turn instructions


Mileage Action Notes
0.0 Right
0.2 Right Highway 410
40.2 Right Highway 123 (Cayuse)
51.1 Right Towards Paradise
51.1 Water! Bathrooms!
70.1 Right Towards Paradise
72.2 Left Visitors Center
72.2 Left
74.5 Right Main road
74.6 Left Longmire
83.7 Store!
104.1 Store!
108.7 Right Eatonville – Alder Cutoff Road
115.9 Right Washington Ave
116.1 Stop Deli Stop (Cottage Bakery)
117.2 Right Orville Road
126.2 Right Store! Orville Road
135.4 Right Highway 162
136.4 L & R Onto Trail
142.0 Left Emory
142.0 Right Store! Highway 162
144.3 Left  Buckley
146.0 Right Enumclaw (410)
148.9 Right Warner / SE 456th
150.6 Left 248th
150.9 Stop Done!

Important notes

  • A blinky rear light and money are REQUIRED to get into the national park.
  • Pay attention to the lack of water stops at the start of the ride, and make sure you plan accordingly.
  • This is a long ride; make sure to turn your GPS to smart recording to save battery life
  • The descents will be long and fast. Please choose an appropriate speed.

Pages:1234567...15