Field test…

The forecast is pain…

As part of starting a new training plan, I need to do a field test. A field test is a great way to determine your current level of fitness, and therefore very useful when setting up your training ranges. I haven’t done a field test since 2006, not because it isn’t a useful activity, but because it hurts. A lot.

A field test involves the following:

  1. Warming up thoroughly
  2. Riding as hard as you can for 8 minutes
  3. Recovering for 10 minutes
  4. Riding as hard as you can for 8 minutes
  5. Crawling home.

8 minutes is right in the pain sweet-spot; short enough that you have to be working very hard to go all out, and long enough that it goes on forever.

So, anyway, I did the test, and ended up with the following results:

Date Description Duration Distance Work Avg power Max power Avg HR Avg Speed Avg Cad 95% HR
5/4/2013 FT #1 8:00 2.7 122 254 545 155 20.6 102 163
5/4/2013 FT #2 8:00 2.9 122 255 434 156 21.7 102 164

As test results go, these are pretty good; note that the average power, average heart rate, and average cadence are very close. It was a bit windy, so the speed was different between the two efforts. I’m not terribly excited by the average speed, but I do know at a high cadence – which was deliberate – I’m not as fast. I am disappointed by the 95% heart rate, because the last time I did the test I was able to hit 172, and the decrease is another sign that I’m not getting any younger (Max HR goes down as you age…)

Anyway, that gives me an 8 minute average power of 255 watts, which – applying the usual conversion factors – suggests 243 watts for 20 minutes, and 232 watts for 60 minutes.

After the field test, I took the rest of the day off. I’ve tried riding after a field test in the past, and it’s really not a very good idea.


Big Stupid Climb 2013

9 steps, turn. 9 steps, turn. 39.

9 steps, turn. 9 steps, turn. 40.

40/69 is pretty close to 40/70, or 4/7, and since 1/7 is about 14%, that means I’m a little over half done. My legs are burning. It seemed like a good idea at the time…

That’s not really true. It – where “it” is climbing up Seattle’s tallest building – had seemed like a moderately stupid thing to do.. That was why I signed up. Everybody should do something in their life that is, to the general population, more than a little stupid.

I’ve done a bunch of these on my bicycle, but given the limited amount of time I have to train and my constitutional laziness, I’ve pretty much maxed out what I can do there with moving into “really stupid”.

This event, however, seemed like the right amount of something different. Climbing up stairs is a little like climbing a hill on a bike, especially if you stand up on the bike. I regularly double-step run up the stairways I encounter during the day, and last summer when we did a cave tour in Idaho, I did 400-some stairs, all doubled. Seems like I could do 1311 stairs at once, and 788’ of vertical doesn’t seem like a lot; I’ve done 10x that in one day on the bike.

That sort of overconfidence is part of what makes it stupid, as is overlooking the fact that I won’t be in good shape in April. So, I signed up, joining a team organized by somebody who works at my company.

I’m cranky. This was expected; in virtually every event I do, I get 75% done, and I get cranky. My pace is designed  – to the extent that I could plan for an event I’d never done – to make the effort not be too sucky, but a) it’s hard enough to pick a good pace when you don’t understand what the event will be like, and 2) hard efforts always hurt. My legs are getting shaky and I am no longer doing doubles. The numbers keep (slowly) counting up, and I start to feel a bit better. I pass a few people – there’s nothing like the suffering of others to make you feel better – and finally, I am on the last flight. Just a few more stairs, and…

“Honey?”

“What?”

“I’m going out to run some errands.What do you want for lunch?”

“Whatever. If you can wait for me to finish, I’ll go with you.”

“What are you writing?”

“I’m pre-writing my report for the Big Climb. It’s easier if you have a script”

“Cool. When is that, again?”

“Three weeks from Saturday”

“Hmm. Aren’t you going to find it hard to climb 69 flights of stairs while at the same time skiing in Montana?”

Crap. I signed up for the climb in the fall and forgot about it when setting up our ski trip.

Now, one could argue that signing up for an event and then scheduling another activity 500 miles away on the same day is a wonderful example of “stupid”, and I would not be one to disagree, but it wasn’t the kind of stupid that I was looking for. That kind of stupid I did every day. Friends had sponsored me for the climb, and, while it was for a good cause, I knew that if I pressed them, they would admit that their real goal was to see me suffer. And I felt obliged to satisfy them. But this was our first ski vacation in 7 years, and it wasn’t really feasible to move it around.

I couldn’t be in two places at once, but perhaps I could suffer in some equivalent way…

Stupid Big Climb

It’s April 14th. The weather looks kindof sunny at 7AM; it may rain, but it probably won’t be much, unless there are thunderstorms, in which case we’ll probably get hail like yesterday. And it’s 37 degrees. Welcome to springtime in Washington.

I had hoped to get by with arm and leg warmers, but it’s too cold for that. I don a long-sleeved base layer, jersey, winter jacket on top, shorts and winter pants on the bottom, and feet with neopreme booties on my feet. I carry some lighter clothes in case it warms up, a light shell in case it rains, bottles of accelerade mix and Nuun, and a baggie of triscuits. Given my current weight, I’m guess Eric + bike = 210 pounds or so.  I head out of the house around 8AM.

Prologue

3.5 miles

The prologue takes me to the beginning of the event; it’s a time to stretch my legs a bit and try to get warmed up. I’m not as cold as I expected to be, but on the downhill, my face tells me that, yes, it is in the 30s. I’m feeling okay. My legs are a big sluggish after hard rides on Tuesday and Thursday.

I turn on my nano, and hear the following:

My baby took our love
And then she rolled it up
Rolled it up a hill
Like a ball of snow
Like a snowball grows
Until it gets too big
Until she lost control

And it rolled back down

She took a tiny bit
And rolled it up again
Slower than before
She went a step too far
She had to let it go
I saw it go straight down
My baby turned around

Started up again
Started up again
Started up again
Started up again

which seemed like a perfectly descriptive description of what was to come. Except for the snow and losing control part.

Marymoor Westside

76 steps, 95’

There is, AFAIK, no official name for these stairs, but they are on the west side of Marymoor and near a park named “West side park”, so I’ve chosen an obvious name.

There is space to roll your bike next to you while you climb, so that’s what I decide to do. The stairs are made our of wood, and the sections between them are also sloped, so you’re both walking up hill and climbing steps at the same time. There are, however, only 76 of them, so they go by pretty quickly. I top out, and get back on the bike.

Portage #1

3.0 Miles

I am now on the first Portage (rhymes with “triage”) section of the event. After a somewhat painful climb out of the neighborhood, I wind my way into Redmond and take Willows road to the North. I have a bit of hydration on the way there.

Willow-Rose Hill

114 steps, 62’

Another small set of stairs, this are hidden up just south of where the Pro Sports Club Willows location is. They are made out of steel, and are a bit hard to climb with my cleats (SPD-SLs, if you wish to keep track) because the stairs have the metal on edge. I put my bike on my right shoulder, and climb on up. I try to do doubles (two stairs at once) but end up running out of breath, so I slow down to singles.

Portage #2

3.8 Miles

Another steep climb out of the neighborhood, and a bit of tootling around puts me on 132nd, heading north. I work my way west, under 405, and towards the next climb.

Forbes Creek

210 steps, 132’

Our next climb is a set of wood stairs that look nice from the bottom. Looks, however, are deceiving; they aren’t terribly regular, sometimes tilt left or right, and sometimes have puddles in the middle of the flat parts. I pass a couple coming down with a dog on these. I carry my bike on my left shoulder this time.

Portage #3

1.7 Miles

Happily, not a steep climb at the end, but some flat and then a nice gradual descent, and a quick section, which takes us to…

Forbes Creek

210 steps, 132’

Yes, up the same set of stairs again. Apparently, the organizers needed a bit of additional elevation, and these were the easiest to do twice. The climb is just like the last time; I get out of breath, the puddles are still there, and I meet a couple coming down with their dog. I think that it is a different couple, but I’m not sure.  I carry my bike on my right shoulder. I have a short piece of foam pipe insulation on the top tube, and that is helping protect my shoulder.

Portage #4

11 Miles

By far the longest one of the day, this takes me from the top of Market hill in Kirkland all the way to the Mercer Island business district. This involved a couple of actual hills, which I haven’t been riding up today so far. My legs feel okay, but I’m a bit tired, so I have some more triscuits and nutrition drink along the way. I’d always wondered why the Mercer Island business area is so concentrated in one part, and when I rode through it today I realize that it’s down in a bit of a hollow, doesn’t have any views, and therefore the land was cheap compared to the areas with views.

Mercerdale

315 stairs, 232’

There are a bunch of different stairs here; this section has the most elevation gain.

They look so nice when you approach them, with a nice grassy lawn and nice guardrails. Don’t get complacent; not only is this the biggest climb of the event, it has the most challenging stairs. It is really hard to get into a rhythm on these stairs; they will have 4 stairs, then a flat spot, then 2 stairs, a flat spot, etc. Sometimes the rise is 7”, sometimes the dirt has washed out a bit and it’s 10”. I have one incident where I whack my toe on an extra-high stair and almost manage to trip. There’s no real way to double these, so I just walk them up. Inexplicably, there is typically one guardrail on the end of the step, and the other is about 3/4 of the way towards the other end.

Portage #5

7.7 Miles

The weather has finally warmed up, all the way into the mid 40s, and I’m hot and sweaty. If I was smart, I would have done this at the bottom of the climb, but I wasn’t, so I stop to switch from fleece hat to headband and from full gloves to lightweight ones. The official route here follows the I-90 trail back to the east, but I recommend using the traditional north island bike route instead of the main route. I had one close call on this section; as I’m approach a sport where people are waiting for the bus (and riding on the sidewalk because that’s where the trail is here), a guy walk out towards the curb looking down at his briefcase.

Back over the bridge to the mainland, and then a quick few miles to the start of the last climb. Note that the indicated route has some gravel path to ride on; I felt okay on my 700x25mm tires, but thinner ones might be a handfull.

Kelsey Creek

163 steps, 142’

Not only are these the last stairs, they are the best ones of the day. They are made of wood, but with a very consistent spacing and small landings when they need one. They can easily be doubled if you have the legs for that. I walk up the last flight, take a small path up to the street, and I’m done.

Epilogue

4.3 miles

The epilogue takes us back to our starting point. It start with a nice steep 12% climb, and then brings us back to 140th in Bellevue, and from there, it’s a familiar route to finish.  I have a bottle of Endurox, take a shower, and head to Qdoba for lunch.

I’m pretty happy overall. I felt strong most of the way, though I did go anaerobic on every one of the climbs and had to slow down a bit. I did this on a lark, but I might choose to do it again.

Here are some stats:

Vertical: 795’
Portage vertical: 2038’
Total Distance: 35.9 miles
Maximum Gradient: 102%
Garmin calories: 2406 
Portage kJ: 1266
Moving time: 2:49
Total time: 3:15

Map

(click to go the Strava ride description)


Tree of Lights V2.0

It is holiday lights time, and there have been a couple of upgrades. One of my favorite displays is a “tree of lights” – a 15’ tall pole that is attached to one of my fences, and has branches and ornaments, all made out of lights. There are 16 channels for the lights, and it’s driven by a Motorola 65HC11-based controller, connected to solid-state relays.

V1.0 had served faithfully for a decade, but it was showing its age; the ornaments on it were made of lights hot-glued to armatures that were made of wire. They took a *long* time to make, and they were very fragile. And if they burnt out, it was really a pain to try to fix them. In the picture above, there is supposed to be a 50-light yellow ball at the top, but it burnt out.

Oh, and the whole thing drew about 600 watts of power at the peak, which is quite a bit these days. It was time for a re-imagining. I ended up doing the following:

  1. Upgrading the center pole from 1/2” conduit to 3/4” conduit. The original was pretty flexy and made it difficult to hold up while the guy wires were attached, but the 3/4” is a screw-together version that is very strong.
  2. Upgraded the light strings (5 branches, 2 white strands, a “trunk” strand) to LEDs.
  3. Replaced the top yellow ornament with a custom-made 34-LED ornament.
  4. Replaced all of the ornaments with custom LED ornaments made out of 5mm LEDs inserted into 1/8” sheet plastic. See more details here.
  5. Made all the ornaments detachable, so they can be removed and stored separately.
  6. Moved all the low items up higher so that they are visible above my truck.

I attached the whole thing to the back of my house for the build:

The central pole has 3 guy wires near the top, and then on each side there is a branch wire that comes down at about a 40 degree angle. The branch lights, white lights, and ornaments are all attached to the pole and the branch wires with zip ties.

Despite limiting the brightness of the LEDs in the ornaments (most are running at 2-3mA when they could run at 30mA), they put out a lot of light. The blue snowflake puts out enough light that it casts a shadow onto the road about 40’ away. All of them look very nice except for the Orange LEDs, which just don’t put out the light the way the others do.

I made one mistake in the reworking; my recollection was that I had 8 ornament channels and 1 channel for the strands of white lights, but it turns out that I had 7 ornament channels and 2 white ones, so the ornament that I hooked up to the white channel does not flash with the others. I could dig out my hc11 code and programmer and deal with it, but this one is fully programmed in assembly and I don’t think I’m that interested. I will likely repurpose one of the ornaments elsewhere.

I have one electronics issue. The strands are all controlled with solid-state relays, which worked beautifully with the incandescent lights. On the LEDs, OFF is not off, there’s enough power leaking through to light the LEDs dimly. After a bit of research and consultation, I found that most SSRs have a “snubber” circuit that lets a few mA through even when off, and that’s what’s going on here. Apparently Vishay uses a different design for some of theirs and they have very low leakage currents. My options are to put some load across to pull down the voltage, or to switch to different SSRs.

Getting decent pictures are very challenging; the tree puts out so much light that the contrast is huge. By turning my exposure compensation down quite a bit (two stops), I was able to get something. Note how dim the other lights appear, and how washed-out the leds are; they really put out a lot of light. The blue snowflake makes some bushes about 60’ away noticeably brighter when it is on; when I get some time I’m going to have to pull it off and cut the brightness down, because it’s just too bright compared to the others.

I also shot a bit of video with my 5D. It doesn’t really do the display justice, but it will give you the basic idea.

Tree of Lights from Eric Gunnerson on Vimeo.


Almost-free Extension Cord

SeGiven that it’s the Holidays, there’s a good chance that you are putting up some lights. Which means you need extension cords. If you are running LED lights, you want an small, flexible, extension cord that can carry a small amount of power – 100 watts or so.

You cannot buy such an extension cord, because somebody would plug a hair dryer into it, melt it down, and catch their house on fire. Which would be bad.

There is a way around this. If you put a fuse in the extension cord to limit the current, you could use smaller/thinner/cheaper wire. In fact, whenever you plug one light string into another, you’re using the first string as an extension cord. If you have any old light strings lying around, it’s easy to convert them to extension cords.

Step 1: Gather your materials

You will need one incandescent light string. You can probably find one that isn’t working for free.

and you need a few tools and materials:

Clockwise from the left, there is a wire crimper, crimp-on connectors, a wire stripper, diagonal cutters (aka “wire cutters”), and a hot glue gun.

Step 2: Getting rid of the lights

Light strings are built in the following manner:

  • There are two wires that go from one end to the other (so you can plug in the next string).
  • There is one wire that has all the lights on it.

At the start and end of the string, there are special light sockets that have 3 wires going to them. If you have a double circuit (100 light) string, you will find the same sockets in the middle.

Start with the second light (*not* the one with three wires going to it, and cut the wire next to the socket:

Do this for every socket that has two wire going into it. Once you have done this, remove the lights from the string. If the string is loosely twisted, you can just pull it out, but if it’s a tight twist, you may need to unwind it first. When you are done, you’ll have a nice pile of lights and very short pieces of wire:

Not sure what to do with all of these. Any ideas?

Step 3: Getting rid of the 3-wire sockets at the end

Now that we’ve gotten rid of all the bulbs, we need to fix the ends. First, we cut off the 3-wire socket:

There was a wire from this light to the other lights that I already cut off. These two wires are connected inside the socket, so we merely need to remove the socket and connect the wires together. I did one version where I just filled the socket with hot glue; it works okay but the socket can still catch on things and looks kindof weird.

Step 4: Connect the wires together

First, strip about 3/8” of insulation off of the wires:

After you strip the wire, twist the stripped ends tightly. I like to bend the stripped wire over so that it is half the length but twice the thickness so it fits in the crimp-on connector better.

The connector is then crimped on:

Do the same at the other end, and the connection is completed:


If you don’t want to use crimp-on connectors, you could solder the wires together and use heat-shrink tubing to insulate. If you take this route, make sure that you know how to do a very good solder joint, and I would probably go with two layers of heat-shrink tubing.

Step 5: Insulate and waterproof

Plug in the hot glue gun and let it heat up.

Hot Glue Gun Safety

Hot glue is – not surprisingly – very hot. It is also extremely sticky, so if you get any of it on your hands, it just sits there and burns.

Try not to do this, but if it does happen, spread out the glue across as much skin as quickly as possible. This will spread it out and cool it down quickly.

Bend the wire to one side, squirt some glue in, and then bend the wire back and squirt the wire in from the other side. Allow it to cool off, and then do the other end of the connector.

Another option is to use silicone. This is a better solution – the silicone is flexible and will fill gaps better – but it takes a bit of finesse to get it to fill all the gaps and you have to wait for it to cure, so I use hot glue instead.

Once you have end done, do the other one exactly the same way.

Step 6: Do the center portion

If the set you are converting has two strands, there are two 3-wire sockets in the middle:

Fixing this is simple; you just need to cut off both of the 3-wire sockets, and then connect the two wires together. If you want the extension cord to be shorter, you can cut the wires to whatever length.

All that is left is to connect the sections of wire together. You can cut them the same length, but it’s a little nicer if you offset things a bit:

The closer wire is about 1 1/4” shorter than the long one. Cut both wires like this, and then join them together:

Note how they are nicely offset.

Step 7: Enjoy

You may now enjoy your extension cord. Total cost was about $0.50 for the connectors (they’re cheaper in bulk), and a few cents for the hot glue. The plug has a couple of 2 amp fuses built into it, so it is safe to use; just don’t use it with too big of a load or you will blow the fuses.


Make your own LED Ornaments…

I have an old holiday light display – a tree of lights – that I am refurbishing. It features ornaments that are made out of lights. In its first incarnation, these ornaments were made from incandescent light strings hot glued to armatures made out of wire. They took a long time to build, the lights were always coming loose from the armatures, and if the lights burnt out, it was a huge pain to try to replace them.

This time, I wanted to do something different, and decided to build my own ornaments out of high-power LEDs, mounted in plastic sheets.

Step 1: Create a pattern

The first step is to find a pattern for your ornament. You will need a simple outline for it to work well. You can find numerous examples on the internet; I ended up using cookie cutter outlines as they were simple and easy to deal with.

Once you have the pattern, you will need to enlarge it to the desired size. I did this by importing the picture into PowerPoint and then expanding it.

If you are doing an ornament that is symmetrical (such as a star), you may want to import one segment of it and then mirror it so that all segments are the same.

I used Visio for all of this because it made it easy to put a scanned pattern in the background and overlay it with the locations of the LEDs, and then hid the scanned pattern when I printed it out. Any drawing tool with layers should work well for this.

Step 2: Determine the placement of the LEDs

To create the outline, the LEDs need to be evenly spaced along the shape outline. You could use a flexible ruler for this:


I used a three-sided ruler, which allowed me to use different scales to get the number of LEDs that I wanted.

If you use a straight ruler such as this, you will need to bend it around the curve rather than just measuring from point-to-point.

You will also need to figure out how many LEDs you want. This is a tradeoff between cost and the quality of the outline. I ended up with 41 red LEDs for my candy cane. The number is important; go read section 8 and make sure you understand how it impacts the number of LEDs.

After I stepped along the outline, I scanned the pattern back into the computer, and did a cleaner drawing.

Step 3: Transfer the pattern to the plastic

I picked up some pieces of 1/8” plastic from my local TAP plastics. The pattern is taped to the plastic, but then I need a way to transfer the pattern. I used an automatic center punch, a really cool tool that you press against the material, and a spring will load up and then release a hammer and drive the tip in. This gave me nicely visible marks on the plastic. You could probably use an awl or a nail and a hammer and get similar results:

After marking each point, we remove the pattern, and we are left with a marked piece of plastic:

Step 4: Drill the holes

This step is a bit problematic. The LEDs that I am using are 5mm in size, and it is hard to find metric-sized drill bits. The closest fractional size is 13/64 = 5.16mm, which will be a little bigger than I would like. It’s also only available as standard twist bits, which can crack plastic when you drill it.

I ended up buying a 5mm end-mill off of Ebay; this got the size exact but was a bit problematic because the end mill would skid around a bit at times. It was manageable in my drill press but would not have been good with a hand drill. If you do go the end-mill route, make sure to get a split-tip version.

As backing, I used a piece of Azek PVC trim. After 43 holes, we have the following:

Getting the plastic prepared was a considerable effort. If I had it to do again, I would probably create the pattern in software and have it laser-cut instead of drilling it myself.

Step 5: Select the LEDs

LEDs have a number of different properties that we need to consider:

Color

The “standard” colors that are easily (and cheaply) available are red, green, blue, yellow, and white. You can find some other colors, but they may not be as bright. The yellow that I used was labeled as “amber”.

Brightness

Brightness is usually measured in Microcandela (MCD). Anything over 1000 mcd is pretty bright.

Viewing Angle

LEDs are brightest when you look directly at them, and get less bright as you move off to the side. Different LEDs do this differently, and this difference is roughly quantified by the viewing angle of the LED. If you want to know the details of how the light drops off, the data sheet will show the details. For ornaments, I’d recommend angles of at least 30 degrees.

Forward Voltage Drop

Forward voltage drop is determined by the construction and chemistry of the LED, and generally varies from color to color. This will be listed as a single value on the data sheet, but if you dig deeper there will be a graph that shows how the voltage drop varies as the amount of current changes.

Acceptable Forward Current

Acceptable forward current is the amount of current you can push through the LED without compromising its longevity. The data sheet will also talk about this value. Note that this is not the maximum current.

LED Choice

After looking at a bunch of different choices, I ended up settling on the following LEDs, all from Digikey:


Color

Part #

Forward Voltage

Price

Red C503B-RCN-CW0Z0AA1-ND

2.1V

$0.15

White C513A-WSN-CV0Y0151-ND

3.2V

$0.24

Blue C503B-BCS-CV0Z0461-ND

3.2V

$0.16

Green C503B-GCN-CY0C0791-ND

3.2V

$0.24

Amber (yellow) C503B-ACS-CW0Y0251-ND

2.1V

$0.20

Orange 754-1271-ND

2.0V

$0.31

The first five are all made by Cree, and I’m pretty happy with them. The orange is a bit disappointing; it is advertised as a 20 degree LED, but if you look at the graphs, it’s really only about 14 degrees, and I really doubt the 4200 mcd brightness that Kingbright claims.

The prices listed are for singled LEDs; there are discounts for larger quantities.

Superbrightleds.com carries some additional colors (violet and pink), but they are pricey.

For the candy cane, I ordered up 50 red LEDs, so that I would have a few extra.

Step 6: Wire up the LEDs

The LEDs will be wired up in series. Depending on the type of LEDs you are using, their color, and the number, you may be chaining all of them together, or you might be creating separate circuits. If you are using multiple colors, multiple circuits are a good idea, as the brightness at a given current may vary drastically between colors. See Step #8, Choosing the Dropping Resistor, to figure out how many circuits you use.

Each of the LEDs has a long lead and a short lead. To chain them together, adjacent LEDs must be connected from short lead to long lead. Here is approach that will help you keep them straight:

  1. Bend the long lead at a right angle.
  2. Snip off both leads, leaving them long enough to go from one LED to the next. This distance will depend upon how far apart your LEDs are in the pattern.

I did this for almost all of the red LEDs at once.

Now we can start chaining them together. Take one LED, bend the long lead to the side, but only trim the short led. Put that in a hole with one of the prepared LEDs next to it:

Once they are in, bend the vertical LED from the first led towards the second one, and solder them together.

Put another LED in the next hole. Align it towards the last LED, and then bend the vertical LED of the last led over towards the new one. Solder them together.

We continue the process all the way around the outline, until we get back to the beginning.

Step 7: Building the power supply

There isn’t a traditional power supply in this project; we are going with a transformerless power supply, one that drives the LEDs directly from the 120 VAC wall supply, just the way commercial strands of LED holiday lights do.

CAUTION

This project involves line-level voltages that could injure or kill you if you do not take proper precautions. Be careful and thoughtful.

Now that that is out of the way, the power supply is very simple. The incoming AC power goes through a full-wave rectifier (you can use a half-wave rectifier, but the LEDs will flicker slightly and will not be as bright. If you see commercial light strings flicker, it’s because they don’t have a full-wave design), which gives us pulsating DC. If we applied that directly to the LED string, we would put a ton of current through them and blow them up, so we need a resistor to limit the current. We’ll cover that in the next section.

I highly recommend using a fuse on the input of the power supply; it can protect you against a lot of problems. I re-used the plug from old holiday light strings, as they already have an integral fuse, and the price is right.

Step 8: Choosing the dropping resistor

The size of the dropping resister depends upon the voltage that we need to drop and the current that we want to use. Time for a bit of math.

    Voltage (resistor) = Voltage (line) – Voltage(LEDs)

and

    Voltage(LEDs) = # of LEDs * LED voltage drop

If we look at the data sheet for the LED (follow the link I listed earlier), we will find that the red LEDs have a typical forward drop of 2.1V, and I have 43 of them, so:

    Voltage(LEDs) = 43 * 2.1 = 90.3 V

Therefore:

    Voltage (resistor) = 120 – 90.3 = 29.7 V

The dropping voltage should be at least 10V to keep the current stable.

Now that we we have the voltage for the resistor, we need to choose what current to use. The red LEDs that I use can take up to 30 mA of current and last a long time (that value came from the datasheet), but they are BRIGHT at that current. I recommend starting at 3mA and then adjusting from there; I ended up having to adjust most of them down in brightness. The resistance value comes using ohms law:

   Voltage = Current * Resistance

or

    Resistance = Voltage / Current

In this case:

    Resistance = 29.7 / 3mA = 29.7 / 0.003 = 9900 ohms.

10K ohms is the closest standard value, so we’ll try that (in actuality, 3mA was too bright, so I dropped the red LEDs down to about 2 mA).

Are we done? Well, not quite. We need to figure out how much power the resister will dissipate, which is figured by the following:

    Power = Voltage * Current = 29.7 * 0.003 = 0.089 Watts

The resisters that I am using are 1/4 watt versions, so this is fine – a single 10K resister will work.


Let’s take another example – say we are using 40 blue LEDs.

    Voltage(LED) = 40 * 3.2 = 128 Volts

That is too much, so we will need to break it into two 20 LED strings. That gives us:

    Voltage (LED) = 20 * 3.2 = 64 Volts

and

    Voltage (Resistor) = 120 – 64 = 56 Volts

If we want to drive these at 20 mA, we get:

    Resistance = 56 / 0.02 = 2800 ohms.

2700 ohms is the closest standard value.

    Power = 56 * 0.02 = 1.12 Watts

That is more than 1/4 watt, and, in fact, that’s the amount of power on each of the two LED strings. We have a few choices.

  1. We can increase the number of LEDs to reduce the resistor voltage.
  2. We can get higher-wattage resistors.
  3. We can use multiple resistors. In this case we would need five 1/4 watt resistors, each 560 ohms.

Step 9: Wiring in the power supply and resistor

Once you have the resister chosen, you can wire it into the chain of LEDs:

Now we can wire the bridge rectifier and resistor into the chain of LEDs. Before you do this, hook it up both ways; it will not cause an issue if you hook it up backwards. Be very careful that you do not touch the incoming AC terminals yourself or touch them to the LED chain.

I’m really not happy with the bridge rectifier. It’s pretty big, and it’s not easy to deal with. If I had to do this again, I think I would build the bridge rectifier out of individual diodes on a separate small board (perfboard or maybe a PC board). It would be flatter and easier to deal with.

At this point, you should be able to carefully plug it in (make sure none of the wires cross), and check that it works.

Step 10: Encapsulation

We need to fix the LEDs in the plastic, insulate the exposed wires, and, if it’s going to be outside, waterproof it as well. I did it with clear silicone from a caulking tube:

The silicone goes on from the side; I’m trying to get it to ooze under the wires so that the wires are totally encased. We go all the way around from the outside, then from the inside, and then over the power supply. Here’s the result:

Step 11: Enjoy


Inaugural Eastside Tours Food Bank Challenge

Because I lead a Tuesday and Thursday night hilly ride and manage a popular internet bicycle climbing site, some have assume that I am a climber. And they are correct, at least by some measures; if you compare me to the average fifth grader, I am quite the climber. Compared to the people that I ride with, not so much; we hit the base of the hill, I tell them where the top will be, and they ride off.

The 6’2” frame that I got from my parents has been good to me over the years, but it is not especially optimized to cycling, especially when compared to the undersized runts that I ride with. What I need is a way to handicap them in some ways, to even the odds. A way to get them to handicap *themselves*.

And thus the Food Bank Challenge was born…

By disguising the event as a fundraiser (foodraiser?) for Northwest Harvest, I could get the riders in my group to self-handicap themselves.

The rules are simple.

  1. Show up to the ride with a backpack (or panniers) filled with food.
  2. Ride carrying all the extra weight.
  3. At the end you put all the food in the back of Eric’s car
  4. Go out for burritos.

Unfortunately, the weather was not as clement as hoped and many of the lighter climbers that I targeted did not show up, but we still managed to collect about 75 pounds of food.


My backpack held the 20 pound bag of rice on the left plus 5 pasta boxes for a total of 25 lbs.


Ride Report: (Redacted)

As I lay face down on the massage table, listening to the calming sounds of distant ocean surf and trying not to whimper, I indulged in a bit of musing. A massage is much like a long hilly bike ride; I pay money for a massage and suffer through the pain knowing at the other end, my muscles will be loose and I will feel better. Similarly, I pay money to go on long organized rides and suffer on the hills so that I can… well, I didn’t get any farther than that, but I’m sure there’s some reward at the end.

I also considered a dilemma that one might at some point face . Let’s say that – hypothetically of course – that you knew of a ride that was a better version of RSVP. A nicer route. A better destination. Limited to 50 people. Would you tell people about it? Or would you want to jealously hoard it, so that it wouldn’t attract too many people in the future? While you ponder that question, let me tell you about a ride I went on recently…

The ride started Friday morning at Magnuson park, near where Cascade has their offices. The spouse and I arrived at the start at 6:15, and I then needed to decide what to wear. There are two different schools of thought in this area – the Coats and the Pockets.

The Coats really don’t want to be cold; they therefore wear whatever it takes to be warm, even if it means they have to carry a coat or vest far longer than they would like. The Pockets, on the other hand, don’t want to wear anything that won’t fit into their jersey pockets, so that when the day warms, they can be unencumbered. Whether you are a Coat or Pocket is not fixed; it depends on a complex interplay between temperature, expected effort, and available jersey pocket volume. I run a few probable scenarios through my head, decide that today I’m a Pocket, and settle on arm warmers, leg warmers, toe warmers (my shoes have vents), and a extra-thin vest on top.

That would have been perfect *if* I had only worn something over the top while I was waiting for the ride to start – an unaccustomed luxury due to my wife hanging around until a few minutes before the start. As it was, I was chilly as we rolled out, and it took half an hour to get comfortable.

The first section is quite boring, so while it passes, let’s talk about my pre-ride preparation. For this trip, the items I take are divided into three different groups:

  • Things that I will need the first day while riding.
  • Things I will need that night and for the second day (goes in my backpack)
  • Things I will need after I arrive at the destination (goes in the suitcase the wife is taking).

I do my best Santa impression, and hope that I’ve remembered everything and it all ends up in the right place.

My training is best described as “suspect”. I’ve done a lot of rides this year, but I’ve only touched the far side of 50 miles once – and just barely at that – so the 100+ mile first day has me a bit apprehensive. I *have* been working on getting stronger, and I’m hoping my new nutrition approach will work out.

In my jersey pockets, I have the following:

  • 8 oz or so of beef jerky.
  • 16 Triscuit-brand crackers.
  • 3 packages of my accelerade-based drink mix (1/1 dilution with maltodextrin + added salt).
  • 1 tube of Nuun, strawberry-lemonade.
  • 1 US Passport.
  • 1 small tube of sunscreen

Interesting yet? No, still boring…

On the bike, there is:

  • My GPS (Garmin 705), pre-loaded with the routes for both days.
  • My windows phone, also loaded with routes for both days.
  • A set of route directions, also for both days. Not really – I put the second day’s directions in my backpack to save weight.
  • Salt tablets and ibuprofen in a TicTac container in my bento box (this lives on my bike all the time).
  • Wallet + tools + tube & inflator in my tail wedge.
  • One bottle of Nuun, one bottle of my drink mix.

Leaving the Woodinville park, I’m in the front, so I lead the group through Woodinville. There are 9 of us, only two of which I know. W rides on the Tue/Thu night rides that I lead occasionally, and D used to lead that ride in years past. We spin through Woodinville, and I lead the group up the first hill. It’s a not a particularly steep climb, but it steep enough I’m usually well in the middle of the pack, with climbers up ahead. I climb steadily, roll through the turn, and finish the climb. At the front.

WTF?

In the group that I ride in, there are two kinds of hills on which I can compete. The first is gentle 2-3% hills, where my 6’2” 175 pound frame (sometimes I call myself “Hincapie-sized”) puts me at less of a disadvantage. The second is short hills, where I can stand up and generally overpower the rest of the group. On the longer ones, I’m never at the front. Since I’m at the front on this one, either everybody in the group is seriously sandbagging it, or I’m one of the stronger riders in the group.

We head north on the traditional route; up to Paradise Lake road, across 522, and then north into the Snohomish valley. The day can only be described as glorious. I end up riding with D and L, and we are a pretty good group, and roll into our stop at the bathrooms on 1st street in Snohomish (26 miles). There we are met by our SAG car driver. The rest of the riders roll in, everybody takes a quick nature break, and I hop into a coffee shop and buy a thick slice of banana bread.

This ride is officially an unsupported ride – it will not features the big food stops that you find on the big rides. For the money I paid – and it was not particularly cheap – I get the following:

  • A truck to carry my bag to the hotel at the end of the ride.
  • SAG support (though I’m expected to be able to fix most things on my own).
  • A bus and truck ride back to the start Sunday morning, which I won’t use as the spouse is driving up.

Other than that, you are expected to be able to forage along the way.

From Snohomish, we hop on the Centennial trail. We will be on this for the next 22 miles. It’s pretty simple riding, on an old railroad bed. We do climb 300’ along the way, but like most railways, the climb is very gradual. After the trail ends, we ride on sidewalks into Arlington, without incident, except at one railway crossing that is at a severe angle to the trail. We follow the signs and dismount to go over, and I am just getting back on my bike when I hear a crash, and turn around to see D lying down with her bike on top of her. I’m really not sure how she managed to crash while off her bike, but she is okay and we roll into Arlington, stopping at the Haggens market for lunch. I get a panini, a bag of chips, and a coke zero. Actually, I only get half of a panini – they are huge (perhaps 40 sq in) and I know that my stomach would not be happy if I eat that much. Our support drivers are there, and we all enjoy lunch sitting at tables in the sun. This is a lot nicer food than is featured at the average food stop, and I’m happy to pay for it.

So far, the ride has been pretty easy. Having done this route before, it’s exactly what I expected (though a bit slower than expected). If we were doing the RSVP route, we would head north to Mount Vernon and then head west. On this ride, we’re going to head west immediately into Stanwood before turning north for a run along the coast. After a few miles I find myself back at the front of the group, and pull for about 20 miles into a bit of a headwind. I don’t have any speed goals, and we decide to keep the group together because nobody wants to ride into the wind by themselves.

I stay at the front for such a long time time for a number of reasons. I’m comfortable doing it, I have the power in my legs to do it, and it hurts less.

That last one probably requires a bit of an explanation.

I do not have a great relationship with my bike seat. It is better than the other ones that I have tried, and on the kind of rides that I usually do, it’s fine. When I climb up hills, I am putting a fair bit of pressure on the pedals, which significantly reduces the amount of weight on the seat. Descents are fast, so I’m not sitting down for much of them, and on the flats, I’m generally in the 17-19 MPH range, which also takes a bit of weight off. On this ride, I’m going slowly and I don’t have any hills. I’m standing up every few minutes and changing positions, but it only helps a little. It’s making my traditional neck issues flare up as well, so it’s not the most comfortable riding I’ve ever done.

And so, I stay on the front, where that little extra effort makes it more bearable. We are winding through bucolic farmland with a wooded ridge on the right. It is wonderful, except for the periodic olfactory assault that wafts from the dairies along the way. The road is named “Old Pioneer Highway”, which makes little sense. I’m pretty sure that none of the Pioneers built highways. What would they drive on them?

We ride out of the shelter of the ridge, and the famous Skagit Valley headwind joins the party. We are now heading mostly north into at least a 5 MPH headwind; I’m working pretty hard just to keep us at 16 MPH, and even that is too much for the group, so we slow down to about 15MPH. I’m starting to feel pretty tired, and on the theory that I’m dehydrated and down on food, I drink the rest of my nuun and empty my pockets; finishing off all of my Triscuits, the rest of the banana bread, and about half of the beef jerky. This less-fun section takes us through Conway and, on the exit, we stop at snow goose produce, for ice cream. Well, I don’t have any ice cream – I settle for some ice-cold water to replenish my bottles – as lactose and exercise are not good companions in my stomach. Some of the others got “immodest” ice cream cones, which – and I assure you I am not exaggerating – hold at least a pint of ice cream.


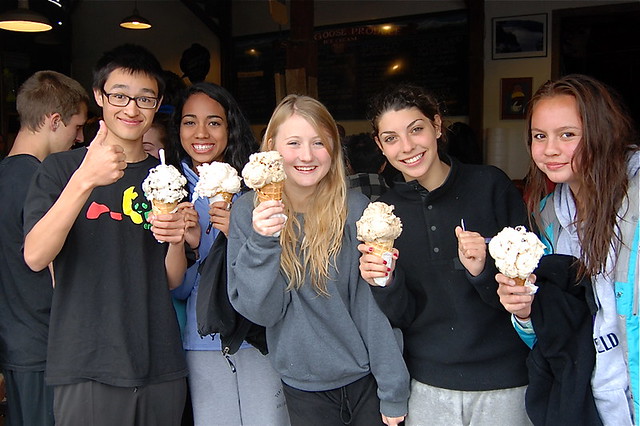
Ice Cream Stop. Left to right – Suzy, Captain John, Skippy the wonder squirrel, your author, Sir Arthur Fuzzybottom III.

At this point, our plan is to head west and ride on roads right next to the water, but the wind has slowed us down considerably and we need to make up a little time, so our host and part-time SAG driver G makes an executive decision to just ride north. This will cut a few miles off the route, but limit how much time we spend in the headwind. There is much rejoicing. Right before we head out,  I take a salt tablet and a couple of ibuprofen. We do the slowest paceline rotation I’ve ever been on (I don’t know – 14.5 MPH or so), nobody is having any fun at all, and the miles slowly pass. We finally hit the start of Chuckanut drive, with 92 miles on the clock.

There are some nice roads in the Puget Sound area, but few roads are as picturesque as Chuckanut drive is; it’s really the highlight of the whole trip. It alternately climbs and descends right along the edge of Puget Sound, and you get incredible views of the sound as the road winds through the forest. It’s pretty good in a car, but nothing comes close to riding it on a bicycle.  I’ve been feeling much better on the last few miles, so I’m on the front, when the group breaks as G. flats. He sends word forwards to go ahead and not wait for him, so we head towards the start of the climby bit. I’ve picked up the pace a bit; since I’m feeling better, I’m curious what I have in my legs. D and I are riding together, and we hit the first climb, which is about 125’ but not very steep. I ride fairly hard, D drops back a little, but catches up at the top.

I put a little more power in on the next hill. My legs feel fabulous. I go much harder on the next hill, and it’s clear that I have a lot left, so I go very hard up the hills and recover on the descents, and before I know it, I’ve traversed the 10 miles and 7 hills, and am waiting at the park at the exit. I pull off, have a bit of cookie that I picked up at a quick stop in Conway, and the SAG wagon pulls up. I tell them I’m going to wait for D to show up, and they drive off. She shows up a few minutes later, and we ride through Bellingham to the hotel.

After I check in and shower, I head out to meet the group for dinner, and we head out to a nice Italian place. I eat a salad, some bruschetta, spaghettini pomodoro, and part of the chicken parmesean from another rider’s dinner.

Stats

Distance: 107.16 miles
Time: 7:13
Average: 14.8 MPH
Average Heartrate: 116 BPM
Garmin calories: 6345 (not even close to 900 cal/hour. Maybe 500)
Average Cadence: 77 RPM
Elevation Gain: Unsure – my GPS was acting up. My guess is around 2000’.

The pace is pretty darn slow for that long of a ride. Note the low cadence – that means more pressure on the pedals, less pain in the butt…

Here’s the strava for the first day.

Day 2

I sleep well and get up at 6AM, head down to the hotel’s breakfast buffet for small bowl of cereal with very little milk, and a hard-boiled egg. I take a bagel to eat later.

We roll at out 8AM. After 15 minutes, my legs feel pretty good, and the rest of me… well, you can take it for granted that both my neck and my butt will be hurting until the finish, so I’ll stop talking about that. We zig-zag north and east through the farmland – thankfully the wind is much diminished – and we make good time. I split the group a couple of times, and slow down so that we can stay together. At Sumas we cross into Canada, and a few miles later, stop for lunch at a dairy (35 miles). I have a nice ham sandwich, chips, another Coke Zero, and once again, eat my lunch sitting out in the sun. At this point, our group is swelled to 11 as we are joined by another couple riders.

We head out after lunch; I’m trying to ride gentle for the group (my pulse is 105), and I split the group again. I drop back to talk to G’s wife, R (she is current riding and G is driving the SAG car), and she suggests that I just ride ahead. I am joined by D and L, and after some discussion, a target speed of 17 MPH is established. We settle into a nice paceline rotation on the straight sections. Well, that’s not exactly true – we are trying to navigate based on the cue sheet (I have my GPS but navigation mode uses lots of battery, so I don’t use it all the time), which uses road names that do exist in the proper arrangement but has distances that appear to be mostly fictional (I’ve decided that “historical fiction” is the proper classification for the cuesheet). Sometimes the turn we want is half a mile instead of 4 miles, other times it’s the opposite. We’re up to the 18-19 MPH range when we aren’t craning our heads looking for road signs or turning around to find a turn that we missed. I am happy that we are together; I am not sure that I would have found all the turns if I was on my own. We stop at a starbucks near Promontory for a nature break, and I pick up a nice oatmeal cookie and some water. We’re at 52 miles; the cue sheet says that the whole ride is 81 miles, but the mapping I did before suggests that it’s 75 miles. Either way, we have at most a couple of hours left of riding. The day so far has been very flat, and it’s pretty much going to stay that way.

We head back out. We’ve been staircasing to the northeast; head some to the north, then head some to the east. Eventually, we’re going to have to cross the Trans-Canada highway, and we head north on a Chilliwack river road, which winds around quite a bit and takes us to where we are right next to the highway. Then we turn east again; it’s not quite time to cross the highway. We are pretty consistently in the 19s as we just want to get the ride over. We are riding into Rosedale looking for a park with restrooms, when my bike makes a strange ping. It first, I think that it’s just a stone that got picked up, but L tells me to stop, as I’ve broken a spoke on the rear. We have about 11 miles left, so I squeeze it between two spokes where they cross and decide that the wheel is true enough to ride on. I take it easy for a few minutes, but the bike seems fine.  We are nearing “the bridge”.

The bridge will take us over the Frasier river. We arrive to find that it has no shoulder at all, and we decide to ride it as fast as possible. I’m at about 20 heading up the slope, 30 down the slope, and 25 on a really long flat spot, until we finally get across to a spot with a shoulder. The cars are generally well-behaved, but they’re going about 35 MPH faster than we are, and did I mention that there is no shoulder?

We go through a few more small towns, wicking it up to 20 on the flats, and after a while longer, we finally arrive at the finish. We ride into the resort, and check in.

The remainder of the day is taken up by the aforementioned massage, beer and apps, a nice dinner with very good company, and a soak in the hot tub. Then a well-deserved sleep.

The next day started with a light room service breakfast, and then a trip back home. The trip home seems really strange; not only do you get places much faster, but 60 MPH on Canada route 1 is very different than 18 MPH on the backroads through farmland.

Overall, it was a very nice ride. The route is nicer than RSVP, the ending point is prettier (though there’s more to do in Vancouver), and the lunch stops are very nice. I only have one reservation about recommending it. It’s that the current route can’t really support more than 50 people (not coincidentally, 50 is the limit on the ride), and it would be unfortunate for it to become a victim of its own success. The slow speed was a choice that I made – I could have ridden on ahead earlier on both days, but I didn’t want that kind of ride.

Stats

Distance: 75.30 miles
Time: 4:41
Average: 16.1 MPH
Average Heartrate: 102 BPM
Garmin calories: 4275
Average Cadence: 72 RPM

Here’s the strava for the second day.


Imaginary album generator

From 4chan via failblog…


  1. Go to Wikipedia, and hit Random Page. The title of the article is the name of your band.
  2. Go to Wikiquote, and hit Random Page. 
  3. Go the Flickr 7 days page. The 5th image is your album cover.

Now combine them in your favorite image editor. Here’s one I did tonight:


I’m not terribly excited about the band name, but I think “The dead are biodegradable” is a great album name. The guitar picture was just a bit of luck.


Training #3–Specificity

In the last post, I talked about the importance of achieving overload if you want to keep improvement, and talked about “spikiness” in workouts. You can get spikiness in different ways. The first thing that springs to mind is to segment our workouts into hard days and easy days. Will this help?

Well, it will let you get some overload when you start, but my guess is that over time, you will get used to the hard days, and you will plateau again.

The answer is “specificity”, which just means that you are going to focus a specific workout on a specific area. By focusing on that area – and getting sufficient recovery between workouts in that area – you can continue to generate overload, and continue to improve. There are literally hundreds of different kind of specific workouts you can do; here are a few:

  • 20 minute time trials (threshold repeats)
  • Hill repeats
  • Over/under intervals
  • Muscle tension
  • Single-leg drills
  • Cadence drills

Now, we have a different problem – the problem of figuring out what areas you need to work out, what workouts are most appropriate for those areas, and how to fit them all together along with appropriate recovery so that the program is just the right intensity – not too easy, and not too hard.

The best answer to this problem is “find a coach”, but I’ll share some ideas in future posts.

Next time, I think I’ll talk about macrocycles, mesocycles, and microcycles.


Training #2– Overloading


Which of the following is more true?

  1. Most cyclists don’t work out hard enough to see improvement.
  2. Most cyclists work out too hard to see improvement.

Think about this for a minute. Do you have an answer? Then read on…

If you chose answer #2, you are incorrect. But don’t start gloating if you chose answer #1, because you are also incorrect.

In fact, for most cyclists, both #1 and #2 are correct. My guess is that you are both riding too hard and not hard enough. Which probably makes no sense at all, so bear with me.

Training stress

Going back to my last post about training stress, here is another equation for you:

Training stress = Effort – Current ability

I should probably note that the equations are simplifications and may ignore important factors. Your actual mileage may vary.

The amount of training stress you put on is dependent on how hard you can ride and what your current ability is. When you first start, your current ability is much, so it’s easy to get training stress, and you improve. As you get better, if you ride at the same effort, the training stress decreases, until you reach the point that your effort matches your ability, and you plateau.

At this point, most people try to ride harder, to bump the effort side of the equation. That’s on the right track; let’s explore that more.

Effort

Effort = Ability to work hard – accumulated fatigue

There are physical and mental parts of each of these. Let’s talk about fatigue first.

I’m sure everybody has tired legs at times; after we put in an effort, we get tired; that is accumulated fatigue. This is also known as “overreaching”, and is common after a hard week.

There are three responses when fatigued:

  1. Try to work harder, to battle through the fatigue.
  2. Keep riding the way we have been riding.
  3. Reduce our workload considerably until we feel less fatigued.

Which one of these do you do? How does your choice affect the amount of effort that you are able to put out, and therefore the amount of training stress you can put on your system?

If you try the first one, you are unlikely to accomplish much because of your level of fatigue, and you run the risk of hitting overtraining, which can knock you down for weeks or months.

If you try the second, you will likely continue at that level of fatigue, or perhaps get more fatigue. It’s hard to maintain motivation.

If you try the third, you will recover from the fatigue, which will allow you to once again put out hard efforts.

Spikiness

Which brings us back to our original question. Most people ride at a constant level of effort – the “kinda hard” level – which, for a moderately-trained cyclist, isn’t hard enough to generate much training stress, but is too hard to allow recovery from fatigue. What you want is do make your workout spikey; to recover with easy efforts so that you can work *very* hard during your hard workouts, and after such a workout you should be very tired.

Which feels like you are wimping out; you’re supposed to be out there *training*, after all, and riding softly doesn’t seem like the right thing to do. Trust me, it is.

As for when you should work hard and when you should work easy, it’s hard to give a general answer because it depends on what your fitness level are, what training schedule you are using, what your experience level is, what your goals are, and the color of your bike.

For me, I’m generally riding only 3 days of week, so I don’t have a designated recovery ride. I do spend some time in the gym on my off days, and on those days I do just enough aerobic activity to get warmed up and get the kinks out of my legs. For the remainder of the workouts, I will get warmed up and then decide what is on the menu for the day; if I’m feeling good, I’ll work hard, and if I’m feeling fatigued, I’ll back off.

If you ride more than I do, you may want one or more recovery ride days in your schedule.

Another way to detect fatigue is to measure your resting heart rate in the morning; if it is elevated, that’s an indication that you are fatigued or perhaps a bit ill, and a good time to dial back your effort.

That’s a basic introduction to overloading; you can add a lot of rigor with specific schedules and other ways to evaluate fatigue level.

Next time I think I’ll talk about specificity, which is about focusing your workout on a specific area.


Pages:1...18192021222324...35